如果你讨厌一个人,你实际讨厌的是你自己的某些部分。我们自身没有的东西,是不会干扰到我们的。仁者见仁,智者见智。——德尔曼 黑塞《德米安》
写在前面
聊聊CICD的环境搭建以及一个基于Hexo的博客系统在CICD流程中的配置Demo
很早就想着写这样一篇博文,但是没有时间,之前写了一半,正好春节假期把剩下的一般写完.
本文属于Devpos实战类文章,基本没有理论,所有,小伙伴需要对devops有些基本的了解,
博文中讲的CICD属于Devops的一部分
当然小伙伴们也可以找一些云服务商提供的商业的Depops平台去学习,一般有免费的体验,比如华为云的软开云平台。
博文涉及内容:
Gitlab+Jenkins+Docker+Harbor+K8S集群 的CICD搭建教程在搭建好的CICD平台上持续集成部署hexo博客系统,Demo有些简陋,仅用于学习。
其中Gitlab+Jenkins +Harbor都是通过容器化部署
篇幅有限,关于CD环境k8s集群这里用之前部署好的,并且已经做了kubeconfig证书,关于这方便感兴趣小伙伴可以看看我之前的文章
下面为涉及到的机器:
用到的机器
ip
域名
客户机
192.168.26.1
本地物理机:
Gitlab+Jenkins+Docker
192.168.26.55
虚机:liruilongs.github.io
docker镜像仓库:harbor
192.168.26.56
虚机:vms56.liruilongs.github.io
k8s集群-master节点
192.168.26.81
虚机:vms81.liruilongs.github.io
k8s集群-node节点
192.168.26.82
虚机:vms82.liruilongs.github.io
k8s集群-node节点
192.168.26.83
虚机:vms83.liruilongs.github.io
拓扑图
这里客户机用本地的IDE持续编码,然后push代码到gitlab,gitlab中的web钩子触发jenkins中配置好的构建触发器,通过shell命令拉取gitlab仓库中的代码,然后通过拉取的应用源码和Dockerfile文件来构建应用镜像,构建完成后将应用镜像push到harbor私有镜像仓库,然后通过shell命令的方式在jenkins中用kubelet客户端将镜像从私有仓库拉取到k8s集群并更新其deploy中的镜像,默认deploy更新副本的方式为滚动更新,整个流程中,只有客户机push代码是手手动的方式,其他全是自动
上帝借由各种途径使人变得孤独,好让我们可以走向自己。 ——赫尔曼·黑塞《德米安》
一、CICD服务器环境搭建 CI即为持续集成(Continue Integration,简称CI),用通俗的话讲,就是持续的整合版本库代码编译后制作应用镜像。建立有效的持续集成环境可以减少开发过程中一些不必要的问题、提高代码质量、快速迭代等,
常用的工具和平台有:
Jenkins :基于Java开发的一种持续集成工具,用于监控持续重复的工作,旨在提供一个开放易用的软件平台,使软件的持续集成变成可能。Bamboo: 是一个企业级商用软件,可以部署在大规模生产环境中。
CD即持续交付Continuous Delivery和持续部署Continuous Deployment,用通俗的话说,即可以持续的部署到生产环境给客户使用,这里分为两个阶段,持续交付我理解为满足上线条件的过程,但是没有上线,持续部署,即为上线应用的过程
关于CD环境,我们使用以前搭建好的K8s集群,K8s集群可以实现应用的健康检测,动态扩容,滚动更新等优点,关于K8s集群的搭建,小伙伴可以看看我的其他文章
我们来搭建CI服务器:操作服务器: liruilongs.github.io:192.168.26.55
docker 环境安装 拉取镜像,启动并设置开机自启
1
2
3
4
┌──[root@liruilongs.github.io]-[~] └─$ yum -y install docker-ce ┌──[root@liruilongs.github.io]-[~] └─$ systemctl enable docker --now
配置docker加速器
1
2
3
4
5
6
7
8
sudo mkdir -p /etc/docker sudo tee /etc/docker/daemon.json <<-'EOF' { "registry-mirrors" : ["https://2tefyfv7.mirror.aliyuncs.com" ] } EOF sudo systemctl daemon-reload sudo systemctl restart docker
1.安装GitLab 并配置 GitLab 不多介绍。一个基于Git的版本控制平台,,提供了Git仓库管理、代码审查、问题跟踪、活动反馈和wiki,当然同时也提供了
1
2
┌──[root@liruilongs.github.io]-[~] └─$ docker pull beginor/gitlab-ce
–
创建共享卷目录 1 2 3 4 ┌──[root@liruilongs.github.io]-[~] └─$ mkdir -p /data/gitlab/etc/ /data/gitlab/log /data/gitlab/data ┌──[root@liruilongs.github.io]-[~] └─$ chmod 777 /data/gitlab/etc/ /data/gitlab/log /data/gitlab/data
创建 gitlab 容器 1 2 3 4 5 6 7 8 9 10 11 ┌──[root@liruilongs.github.io]-[~] └─$ docker run -itd --name=gitlab --restart=always --privileged=true -p 8443:443 -p 80:80 -p 222:22 -v /data/gitlab/etc:/etc/gitlab -v /data/gitlab/log :/var/log /gitlab -v /data/gitlab/data:/var/opt/gitlab beginor/gitlab-ce acc95b2896e8475915275d5eb77c7e63f63c31536432b68508f2f216d4fec634 ┌──[root@liruilongs.github.io]-[~] └─$ docker ps CONTAINER ID IMAGE COMMAND CREATED STATUS PORTS NAMES acc95b2896e8 beginor/gitlab-ce "/assets/wrapper" 53 seconds ago Up 51 seconds (health: starting) 0.0.0.0:80->80/tcp, :::80->80/tcp, 0.0.0.0:222->22/tcp, :::222->22/tcp, 0.0.0.0:8443->443/tcp, :::8443->443/tcp gitlab ┌──[root@liruilongs.github.io]-[~] └─$ ┌──[root@liruilongs.github.io]-[~] └─$#
切记:这里的端口要设置成80,要不push项目会提示没有报错,如果宿主机端口被占用,需要把这个端口腾出来
关闭容器修改配置文件 1 2 3 ┌──[root@liruilongs.github.io]-[~] └─$ docker stop gitlab gitlab
external_url ‘http://192.168.26.55'
1 2 3 4 5 6 7 8 9 10 11 12 13 14 15 16 17 18 19 20 21 ┌──[root@liruilongs.github.io]-[~] └─$ cat /data/gitlab/etc/gitlab.rb | grep external_url ┌──[root@liruilongs.github.io]-[~] └─$ sed -i "/external_url 'GENERATED_EXTERNAL_URL'/a external_url\t'http://192.168.26.55' " /data/gitlab/etc/gitlab.rb ┌──[root@liruilongs.github.io]-[~] └─$ cat /data/gitlab/etc/gitlab.rb | grep external_url external_url 'http://192.168.26.55' ┌──[root@liruilongs.github.io]-[~] └─$
gitlab_rails[‘gitlab_ssh_host’] = ‘192.168.26.55’
1
2
3
4
5
6
7
8
9
10
11
┌──[root@liruilongs.github.io]-[~] └─$ cat /data/gitlab/etc/gitlab.rb | grep gitlab_ssh_host ┌──[root@liruilongs.github.io]-[~] └─$ sed -i "/gitlab_ssh_host/a gitlab_rails['gitlab_ssh_host'] = '192.168.26.55' " /data/gitlab/etc/gitlab.rb ┌──[root@liruilongs.github.io]-[~] └─$ cat /data/gitlab/etc/gitlab.rb | grep gitlab_ssh_host gitlab_rails['gitlab_ssh_host' ] = '192.168.26.55' ┌──[root@liruilongs.github.io]-[~] └─$
gitlab_rails[gitlab_shell_ssh_port] = 222
1 2 3 4 5 6 7 8 9 10 11 ┌──[root@liruilongs.github.io]-[~] └─$ cat /data/gitlab/etc/gitlab.rb | grep gitlab_shell_ssh ┌──[root@liruilongs.github.io]-[~] └─$ sed -i "/gitlab_shell_ssh_port/a gitlab_rails['gitlab_shell_ssh_port'] = 222" /data/gitlab/etc/gitlab.rb ┌──[root@liruilongs.github.io]-[~] └─$ cat /data/gitlab/etc/gitlab.rb | grep gitlab_shell_ssh gitlab_rails[gitlab_shell_ssh_port] = 222 ┌──[root@liruilongs.github.io]-[~] └─$
1 2 3 4 5 6 7 8 9 10 ┌──[root@liruilongs.github.io]-[~] └─$ vim /data/gitlab/data/gitlab-rails/etc/gitlab.yml ┌──[root@liruilongs.github.io]-[~] └─$ gitlab: host: 192.168.26.55 port: 80 https: false
修改完配置文件之后。直接启动容器
1 2 ┌──[root@liruilongs.github.io]-[~] └─$ docker start gitlab
–
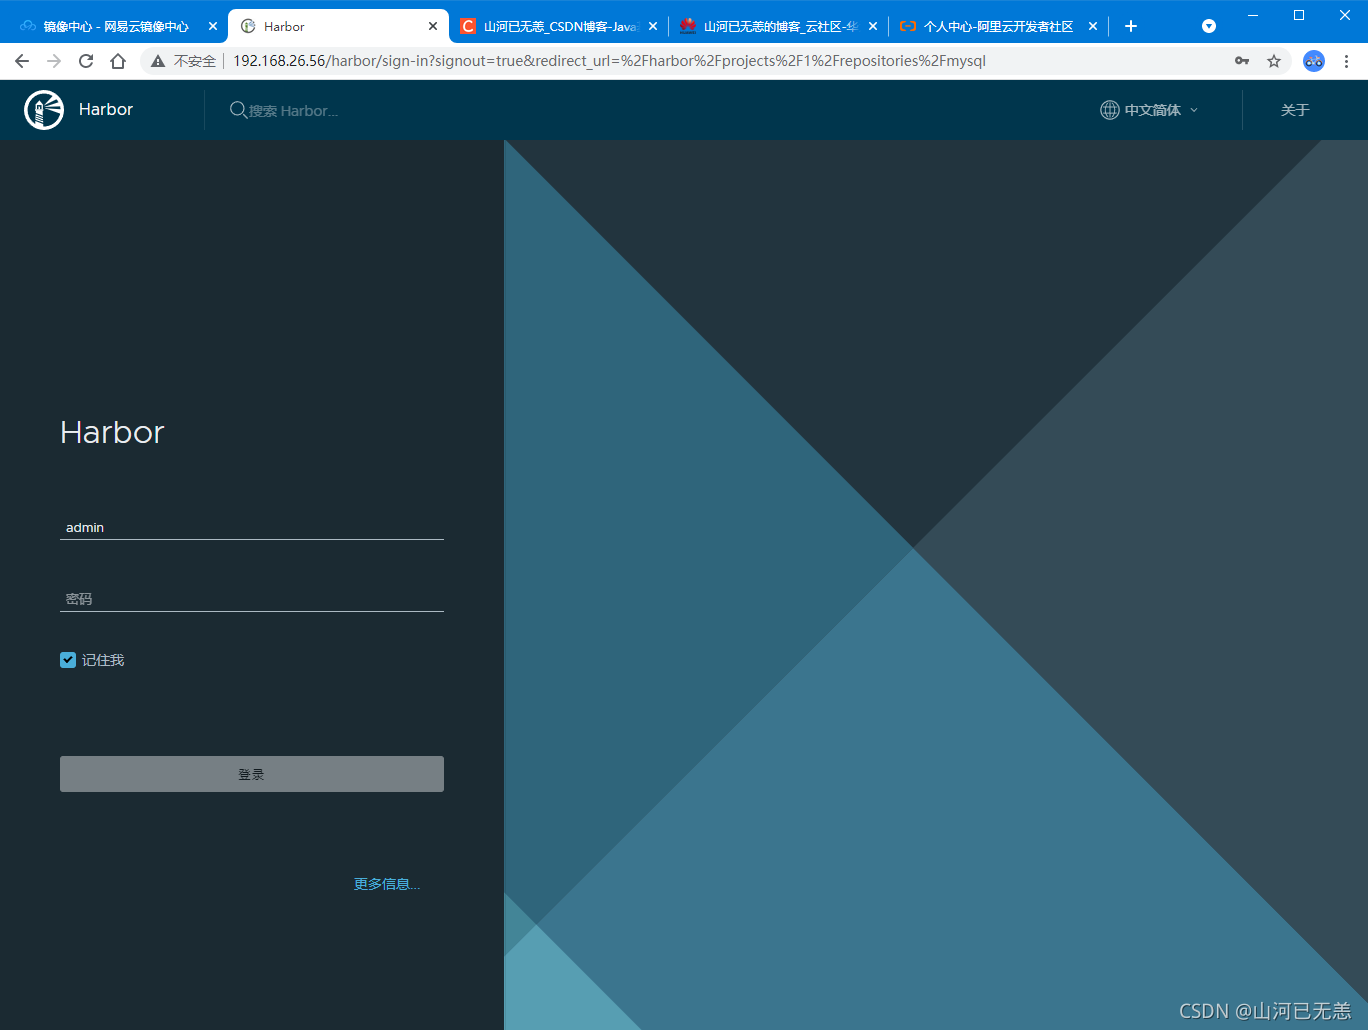
在宿主机所在的物理机访问,http://192.168.26.55/ ,会自动跳转到修改密码(root用户),如果密码设置的没有满足一定的复杂性,则会报500,需要从新设置
登录进入仪表盘
然后我们简单测试一下,push一个项目上去,这里的项目是一个基于hexo的博客系统
项目成功上传Gitlab
相关的git命名
1 2 3 4 5 6 7 8 9 10 11 12 13 14 15 16 17 18 19 PS F:\blogger> git init Initialized empty Git repository in F:/blogger/.git/ PS F:\blogger> git config --global user.name "Administrator" PS F:\blogger> git config --global user.email "admin@example.com" PS F:\blogger> git remote add origin http://192.168.26.55/root/blog.git PS F:\blogger> git add . PS F:\blogger> git commit -m "Initial commit" PS F:\blogger> git push -u origin master Enumerating objects: 322, done . Counting objects: 100% (322/322), done . Delta compression using up to 8 threads Compressing objects: 100% (302/302), done . Writing objects: 100% (322/322), 11.31 MiB | 9.22 MiB/s, done . Total 322 (delta 24), reused 0 (delta 0) remote: Resolving deltas: 100% (24/24), done . To http://192.168.26.55/root/blog.git * [new branch] master -> master Branch 'master' set up to track remote branch 'master' from 'origin' . PS F:\blogger>
2.安装配置远程镜像仓库harbor 下面我们要配置私有的docker镜像仓库,用到的机器为:
操作服务器:vms56.liruilongs.github.io:192.168.26.56
这里仓库我们选择harbor,因为有web页面,当然也可以使用 registry
harbor的配置
harbor的安装使用步骤
安装并启动docker并安装docker-compose
上传harbor的离线包
导入harbor的镜像
编辑harbor.yml
修改hostname 为自己的主机名,不用证书需要注释掉https
harbor_admin_password 登录密码
安装compose
运行脚本 ./install.sh
在浏览器里输入IP访问
docker login IP –家目录下会有一个.docker文件夹
下面我们开始安装
首先需要设置selinux、防火墙
1 2 3 ┌──[root@vms56.liruilongs.github.io]-[~] └─ Disabled
1 2 3 4 ┌──[root@vms56.liruilongs.github.io]-[~] └─ Removed symlink /etc/systemd/system/multi-user.target.wants/firewalld.service. Removed symlink /etc/systemd/system/dbus-org.fedoraproject.FirewallD1.service.
安装并启动docker并安装docker-compose,关于docker-compose,这里不用了解太多,一个轻量的docker编排工具
1 2 3 4 ┌──[root@vms56.liruilongs.github.io]-[~] └─ ┌──[root@vms56.liruilongs.github.io]-[~] └─
解压harbor 安装包:harbor-offline-installer-v2.0.6.tgz,导入相关镜像
1 2 3 4 5 6 7 8 9 10 11 12 13 14 ┌──[root@vms56.liruilongs.github.io]-[/] └─ bin dev harbor-offline-installer-v2.0.6.tgz lib machine-id mnt proc run srv tmp var boot etc home lib64 media opt root sbin sys usr ┌──[root@vms56.liruilongs.github.io]-[/] └─ harbor/harbor.v2.0.6.tar.gz harbor/prepare harbor/LICENSE harbor/install.sh harbor/common.sh harbor/harbor.yml.tmpl ┌──[root@vms56.liruilongs.github.io]-[/] └─
修改配置文件
1 2 3 4 5 6 7 8 9 10 11 12 13 14 ┌──[root@vms56.liruilongs.github.io]-[/] └─ ┌──[root@vms56.liruilongs.github.io]-[/harbor] └─ common.sh harbor.v2.0.6.tar.gz harbor.yml.tmpl install.sh LICENSE prepare ┌──[root@vms56.liruilongs.github.io]-[/harbor] └─ ┌──[root@vms56.liruilongs.github.io]-[/harbor] └─ common.sh harbor.v2.0.6.tar.gz harbor.yml harbor.yml.tmpl install.sh LICENSE prepare ┌──[root@vms56.liruilongs.github.io]-[/harbor] └─ ┌──[root@vms56.liruilongs.github.io]-[/harbor] └─
harbor.yml:设置IP和用户名密码
1 2 3 4 5 6 7 8 9 10 11 12 13 14 15 16 17 4 5 hostname: 192.168.26.56 6 7 ....... 12 13 14 15 16 17 18 .... 33 34 harbor_admin_password: Harbor12345 35 36
./prepare && ./install.sh
1 2 3 4 5 6 7 8 9 10 11 12 13 14 15 16 17 18 19 ┌──[root@vms56.liruilongs.github.io]-[/harbor] └─ prepare base dir is set to /harbor WARNING:root:WARNING: HTTP protocol is insecure. Harbor will deprecate http protocol in the future. Please make sure to upgrade to https Generated configuration file: /config/log /logrotate.conf Generated configuration file: /config/log /rsyslog_docker.conf Generated configuration file: /config/nginx/nginx.conf Generated configuration file: /config/core/env Generated configuration file: /config/core/app.conf Generated configuration file: /config/registry/config.yml Generated configuration file: /config/registryctl/env Generated configuration file: /config/registryctl/config.yml Generated configuration file: /config/db/env Generated configuration file: /config/jobservice/env Generated configuration file: /config/jobservice/config.yml Generated and saved secret to file: /data/secret/keys/secretkey Successfully called func: create_root_cert Generated configuration file: /compose_location/docker-compose.yml Clean up the input dir
1 2 3 4 5 6 7 8 9 10 11 12 13 14 15 16 17 18 19 20 21 22 23 24 25 26 27 28 29 30 31 32 33 34 ┌──[root@vms56.liruilongs.github.io]-[/harbor] └─ [Step 0]: checking if docker is installed ... Note: docker version: 20.10.9 [Step 1]: checking docker-compose is installed ... Note: stopping existing Harbor instance ... Removing harbor-jobservice ... done Removing nginx ... done Removing harbor-core ... done Removing registry ... done Creating harbor-log ... done Removing harbor-portal ... done Removing redis ... done Removing network harbor_harbor Creating registry ... done Creating harbor-core ... done Creating network "harbor_harbor" with the default driver Creating nginx ... done Creating redis ... Creating registry ... Creating harbor-portal ... Creating registryctl ... Creating harbor-db ... Creating harbor-core ... Creating harbor-jobservice ... Creating nginx ... ✔ ----Harbor has been installed and started successfully.---- ┌──[root@vms56.liruilongs.github.io]-[/harbor] └─
查看相关的镜像
1 2 3 4 5 6 7 8 9 10 11 12 13 14 15 ┌──[root@vms56.liruilongs.github.io]-[/harbor] └─ CONTAINER ID IMAGE COMMAND CREATED STATUS PORTS NAMES 0efcf7b83dcf goharbor/nginx-photon:v2.0.6 "nginx -g 'daemon of…" 16 minutes ago Up 16 minutes (healthy) 0.0.0.0:80->8080/tcp, :::80->8080/tcp nginx ee9d418c7cee goharbor/harbor-jobservice:v2.0.6 "/harbor/entrypoint.…" 16 minutes ago Up 16 minutes (healthy) harbor-jobservice 6052c481dbd0 goharbor/harbor-core:v2.0.6 "/harbor/entrypoint.…" 16 minutes ago Up 16 minutes (healthy) harbor-core 001ff83b037d goharbor/harbor-db:v2.0.6 "/docker-entrypoint.…" 17 minutes ago Up 16 minutes (healthy) 5432/tcp harbor-db 2ebc81356ef1 goharbor/harbor-registryctl:v2.0.6 "/home/harbor/start.…" 17 minutes ago Up 16 minutes (healthy) registryctl 6ca721c0fa75 goharbor/harbor-portal:v2.0.6 "nginx -g 'daemon of…" 17 minutes ago Up 16 minutes (healthy) 8080/tcp harbor-portal 2b06e2cf91ab goharbor/registry-photon:v2.0.6 "/home/harbor/entryp…" 17 minutes ago Up 16 minutes (healthy) 5000/tcp registry 2292a20780e2 goharbor/redis-photon:v2.0.6 "redis-server /etc/r…" 17 minutes ago Up 16 minutes (healthy) 6379/tcp redis a0e3e49cf9db goharbor/harbor-log:v2.0.6 "/bin/sh -c /usr/loc…" 17 minutes ago Up 17 minutes (healthy) 127.0.0.1:1514->10514/tcp harbor-log ┌──[root@vms56.liruilongs.github.io]-[/harbor] └─
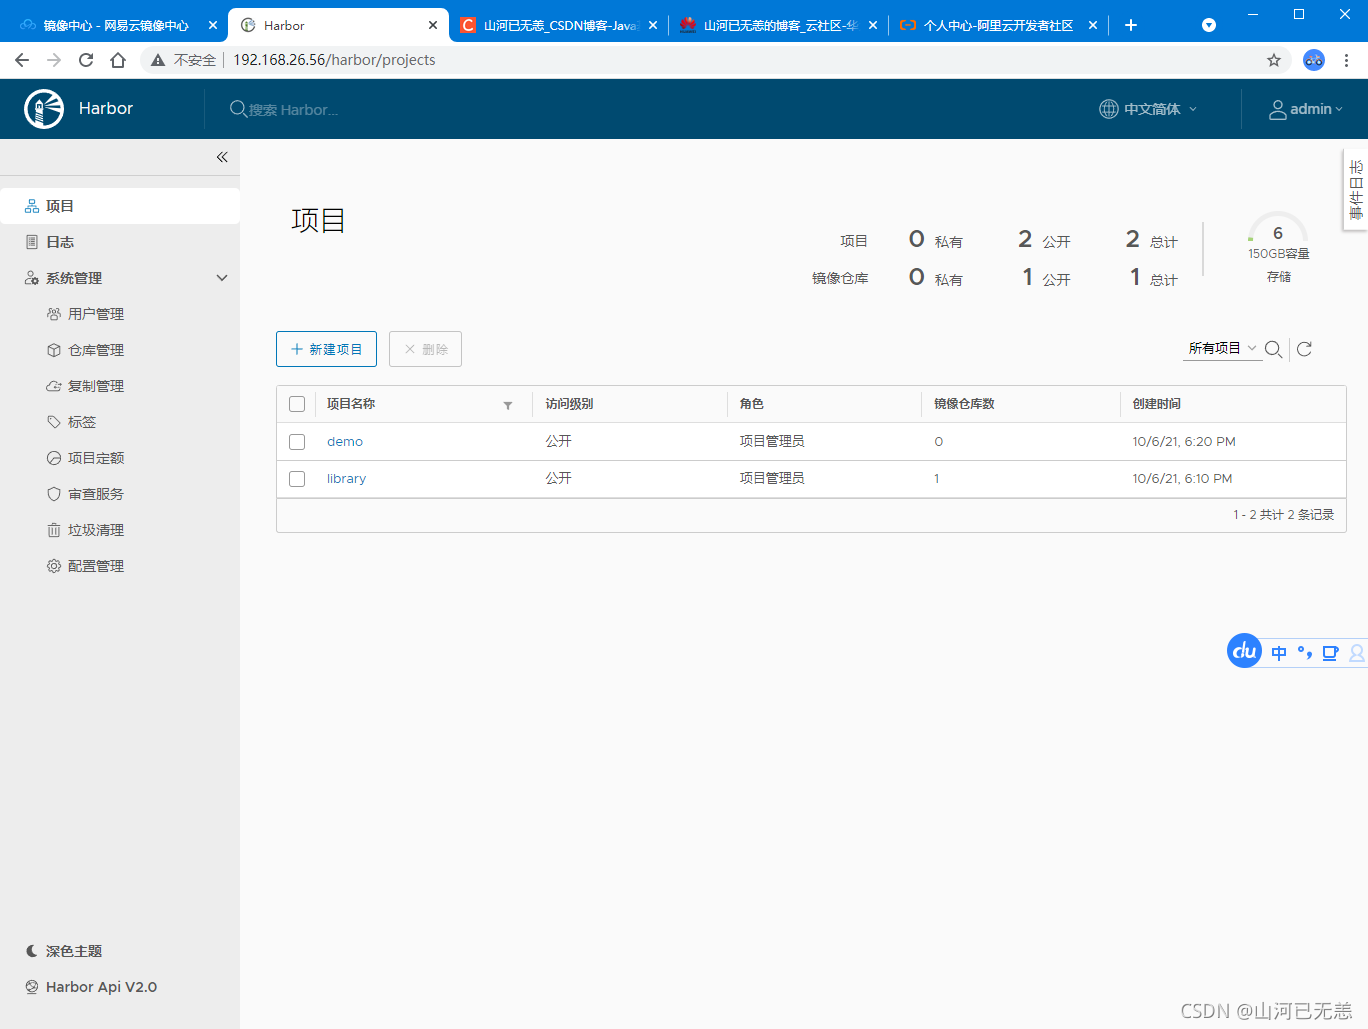
访问测试
harbor
CI服务器的docker配置 这里因为我们要在192.168.26.55(CI服务器)上push镜像到192.168.26.56(私仓),所有需要修改CI服务器上的Docker配置。添加仓库地址
操作服务器: liruilongs.github.io:192.168.26.55
1 2 3 4 5 6 7 ┌──[root@liruilongs.github.io]-[~] └─$ cat /etc/docker/daemon.json { "registry-mirrors" : ["https://2tefyfv7.mirror.aliyuncs.com" ] } ┌──[root@liruilongs.github.io]-[~] └─$ vim /etc/docker/daemon.json
修改后的配置文件
1 2 3 4 5 6 7 ┌──[root@liruilongs.github.io]-[~] └─$ cat /etc/docker/daemon.json { "registry-mirrors" : ["https://2tefyfv7.mirror.aliyuncs.com" ], "insecure-registries" : ["192.168.26.56" ] }
加载使其生效
1 2 3 4 5 ┌──[root@liruilongs.github.io]-[~] └─$ systemctl daemon-reload ┌──[root@liruilongs.github.io]-[~] └─$ systemctl restart docker ┌──[root@liruilongs.github.io]-[~]
CI机器简单测试一下
1 2 3 4 5 6 7 8 9 10 11 12 13 14 15 16 17 18 ┌──[root@liruilongs.github.io]-[~] └─$ docker login 192.168.26.56 Authenticating with existing credentials... WARNING! Your password will be stored unencrypted in /root/.docker/config.json. Configure a credential helper to remove this warning. See https://docs.docker.com/engine/reference/commandline/login/ Login Succeeded ┌──[root@liruilongs.github.io]-[~] └─$ docker tag busybox 192.168.26.56/demo/busybox ┌──[root@liruilongs.github.io]-[~] └─$ docker push 192.168.26.56/demo/busybox Using default tag: latest The push refers to repository [192.168.26.56/demo/busybox] cfd97936a580: Pushed latest: digest: sha256:febcf61cd6e1ac9628f6ac14fa40836d16f3c6ddef3b303ff0321606e55ddd0b size: 527 ┌──[root@liruilongs.github.io]-[~] └─$
push一个镜像,可以在私仓的web页面查看
harbor
到这里。我们配置了镜像仓库
3.安装配置jenkins
操作服务器: liruilongs.github.io:192.168.26.55
镜像jenkins拉取
1 2 3 4 5 6 7 8 9 10 11 12 13 14 15 16 17 18 19 20 21 22 23 24 25 26 27 28 29 30 ┌──[root@liruilongs.github.io]-[~] └─$ docker pull jenkins/jenkins:centos7-jdk8 。。。。。。 ┌──[root@liruilongs.github.io]-[~] └─$ docker history jenkins/jenkins:centos7-jdk8 IMAGE CREATED CREATED BY SIZE COMMENT de64a05279ba 5 days ago LABEL org.opencontainers.image.vendor=Jenkin… 0B buildkit.dockerfile.v0 <missing> 5 days ago COPY install-plugins.sh /usr/local /bin/insta… 10.6kB buildkit.dockerfile.v0 。。。。。。。。。。 <missing> 5 days ago ARG JENKINS_HOME=/var/jenkins_home 0B buildkit.dockerfile.v0 <missing> 5 days ago ARG agent_port=50000 0B buildkit.dockerfile.v0 <missing> 5 days ago ARG http_port=8080 0B buildkit.dockerfile.v0 <missing> 5 days ago ARG gid=1000 0B buildkit.dockerfile.v0 <missing> 5 days ago ARG uid=1000 0B buildkit.dockerfile.v0 <missing> 5 days ago ARG group=jenkins 0B buildkit.dockerfile.v0 <missing> 5 days ago ARG user=jenkins 0B buildkit.dockerfile.v0 <missing> 5 days ago RUN |5 TARGETARCH=amd64 COMMIT_SHA=0b797f024… 10.4MB buildkit.dockerfile.v0 <missing> 5 days ago COPY git_lfs_pub.gpg /tmp/git_lfs_pub.gpg <missing> 5 days ago ARG GIT_LFS_VERSION=3.0.1 0B buildkit.dockerfile.v0 <missing> 5 days ago ARG COMMIT_SHA 0B buildkit.dockerfile.v0 <missing> 5 days ago ARG TARGETARCH 0B buildkit.dockerfile.v0 <missing> 5 days ago RUN |2 TARGETARCH=amd64 COMMIT_SHA=0b797f024… 426MB buildkit.dockerfile.v0 <missing> 5 days ago ARG COMMIT_SHA 0B buildkit.dockerfile.v0 <missing> 5 days ago ARG TARGETARCH 0B buildkit.dockerfile.v0 <missing> 5 days ago ENV LANG=en_US.UTF-8 LANGUAGE=en_US:en LC_AL… 0B buildkit.dockerfile.v0 <missing> 7 weeks ago /bin/sh -c <missing> 7 weeks ago /bin/sh -c <missing> 7 weeks ago /bin/sh -c ┌──[root@liruilongs.github.io]-[~] └─$
–
创建共享卷,修改所属组和用户,和容器里相同 这里为什么要改成 1000,是因为容器里是以 jenkins 用户的身份去读写数据,而在容器里jenkins 的 uid 是 1000,
1 2 3 4 ┌──[root@liruilongs.github.io]-[~] └─$ mkdir /jenkins && chown 1000:1000 /jenkins ┌──[root@liruilongs.github.io]-[~] └─$
创建创建 jenkins 容器 1 2 3 4 5 6 7 8 9 ┌──[root@liruilongs.github.io]-[~] └─$ cat jenkins.docker.sh docker run -dit -p 8080:8080 -p 50000:50000 --name jenkins --privileged=true --restart=always -v /jenkins:/var/jenkins_home jenkins/jenkins:centos7-jdk8 ┌──[root@liruilongs.github.io]-[~] └─$ docker run -dit -p 8080:8080 -p 50000:50000 --name jenkins --privileged=true --restart=always -v /jenkins:/var/jenkins_home jenkins/jenkins:centos7-jdk8 39afa098c8a56973ce1559d374b058b8e6091175b5b783d613a9f2e356827684 ┌──[root@liruilongs.github.io]-[~] └─$ docker ps | grep jenkins 39afa098c8a5 jenkins/jenkins:centos7-jdk8 "/sbin/tini -- /usr/…" 3 minutes ago Up 2 minutes 0.0.0.0:8080->8080/tcp, :::8080->8080/tcp, 0.0.0.0:50000->50000/tcp, :::50000->50000/tcp jenkins
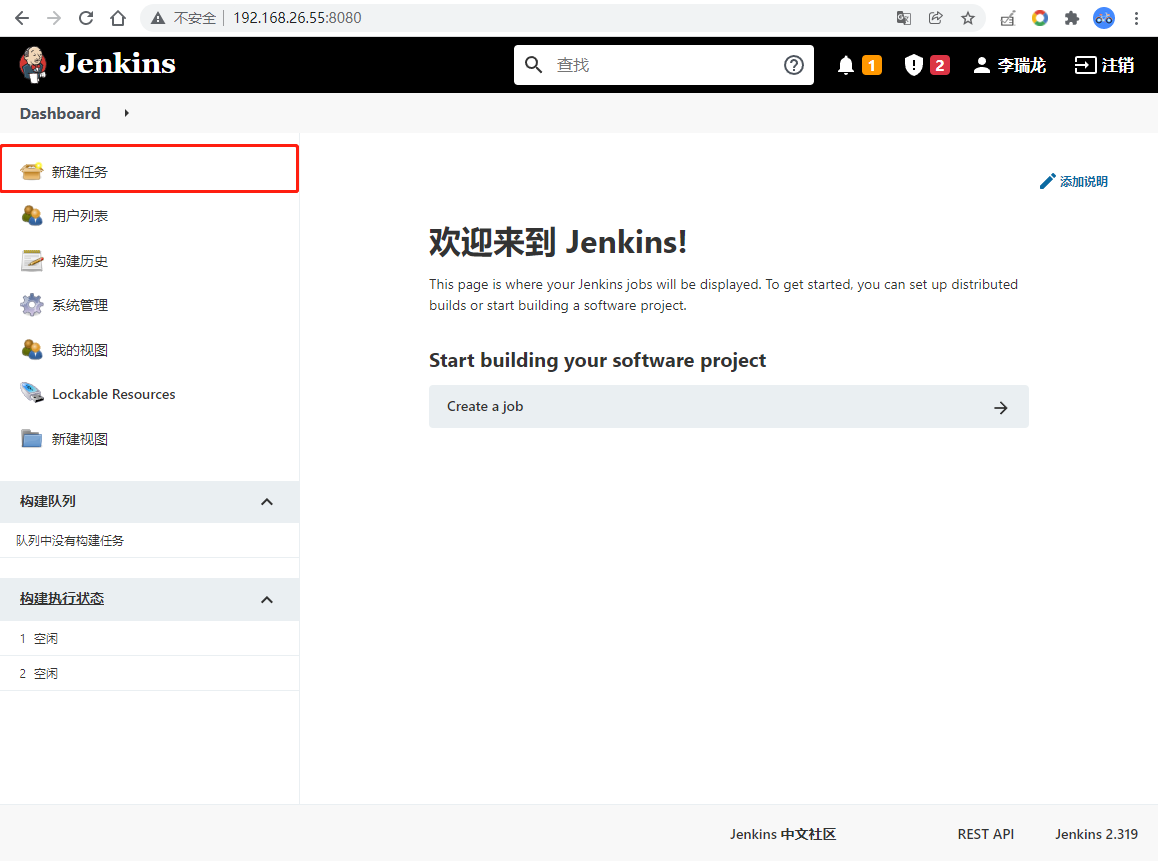
访问jenkins
先打开浏览器打开这个页面,让其初始化一下,直到看到界面
因为要修改 jenkins 的配置,所以此时关闭 jenkins 容器
1 2 3 ┌──[root@liruilongs.github.io]-[~] └─$ docker stop jenkins jenkins
更换国内清华大学镜像,Jenkins下载插件特别慢,更换国内的清华源的镜像地址会快不少
1 2 3 4 5 6 7 8 9 10 11 ┌──[root@liruilongs.github.io]-[~] └─$ cat /jenkins/hudson.model.UpdateCenter.xml <?xml version='1.1' encoding='UTF-8' ?> <sites> <site> <id>default</id> <url>https://updates.jenkins.io/update-center.json</url> </site> </sites> ┌──[root@liruilongs.github.io]-[~] └─$
1 2 3 4 5 6 7 8 9 10 11 12 ┌──[root@liruilongs.github.io]-[~] └─$ sed -i 's#updates.jenkins.io/update-center.json#mirrors.tuna.tsinghua.edu.cn/jenkins/updates/update-center.json#g ' /jenkins/hudson.model.UpdateCenter.xml ┌──[root@liruilongs.github.io]-[~] └─$ cat /jenkins/hudson.model.UpdateCenter.xml <?xml version='1.1' encoding='UTF-8' ?> <sites> <site> <id>default</id> <url>https://mirrors.tuna.tsinghua.edu.cn/jenkins/updates/update-center.json</url> </site> </sites>┌──[root@liruilongs.github.io]-[~] └─$
“http://www.google.com/" 替换为 “http://www.baidu.com/"
1 2 3 4 5 6 7 8 9 10 11 12 13 14 15 16 17 18 19 yum -y install jq ┌──[root@liruilongs.github.io]-[~] └─$ cat /jenkins/updates/default.json | jq '.connectionCheckUrl' "http://www.google.com/" ┌──[root@liruilongs.github.io]-[~] └─$ cat /jenkins/updates/default.json | jq 'keys' [ "connectionCheckUrl" , "core" , "deprecations" , "generationTimestamp" , "id" , "plugins" , "signature" , "updateCenterVersion" , "warnings" ] ┌──[root@liruilongs.github.io]-[~] └─$ sed -i s
替换后查看
1 2 3 4 5 6 7 8 9 10 11 12 13 14 15 16 17 18 ┌──[root@liruilongs.github.io]-[~] └─$ cat /jenkins/updates/default.json | jq '.connectionCheckUrl' "http://www.baidu.com/" ┌──[root@liruilongs.github.io]-[~] └─$ cat /jenkins/updates/default.json | jq 'keys' [ "connectionCheckUrl" , "core" , "deprecations" , "generationTimestamp" , "id" , "plugins" , "signature" , "updateCenterVersion" , "warnings" ] ┌──[root@liruilongs.github.io]-[~] └─$
重启docker,获取登录密匙
1 2 3 4 5 6 7 8 ┌──[root@liruilongs.github.io]-[~] └─$ docker start jenkins jenkins ┌──[root@liruilongs.github.io]-[~] └─$ ┌──[root@liruilongs.github.io]-[~] └─$ cat /jenkins/secrets/initialAdminPassword be15eaabc4c946de913dd5af8636cae9
**需要修改jenkins绑定的docker的启动参数 **,ExecStart=/usr/bin/dockerd -H tcp://0.0.0.0:2376 -H fd:// --containerd=/run/containerd/containerd.sock
修改镜像库启动参数后需要重启docker
1 2 3 4 5 ┌──[root@vms56.liruilongs.github.io]-[~] └─ ┌──[root@vms56.liruilongs.github.io]-[~] └─
安装 docker 插件
jenkins相关配置,这里的配置照着图片就好,需要配置一个docker集群供jenkins来根据Dockerfile构建镜像并push到私仓,这里docker集群即为CI服务器的docker
修改镜像库启动参数,ExecStart=/usr/bin/dockerd -H tcp://0.0.0.0:2376 -H fd:// --containerd=/run/containerd/containerd.sock
关联docker和jenkins
jenkins 安全设置 后面 gitlab 要和 jenkins 进行联动,所以必须要需要对 jenkins 的安全做一些设置,依次点击 系统管理-全局安全配置-授权策略,勾选”匿名用户具有可读权限”
添加 JVM 运行参数 -Dhudson.security.csrf.GlobalCrumbIssuerConfiguration.DISABLE_CSRF_PROTECTION=true 运行跨站请求访问
1 2 3 4 5 6 7 8 9 ┌──[root@liruilongs.github.io]-[~] └─$ docker exec -u root -it jenkins bash [root@39afa098c8a5 /] anaconda-post.log bin dev etc home lib lib64 media mnt opt proc root run sbin srv sys tmp usr var [root@39afa098c8a5 /] [root@39afa098c8a5 /] exit ┌──[root@liruilongs.github.io]-[~] └─$
下载kubectl客户端工具 这里的话我们要通过jenkins上的kubectl客户端连接k8s,所以我们需要安装一个k8s的客户端kubectl,下载k8s客户端
1 wget https://storage.googleapis.com/kubernetes-release/release/v1.22.2/bin/linux/amd64/kubectl
1 2 ┌──[root@liruilongs.github.io]-[~] └─$ yum install -y kubectl-1.22.2-0 --disableexcludes=kubernetes
拷贝 kubeconfig 文件 然后拷贝kubeconfig 证书,k8s集群中查看证书位置,这里的证书是之前创建好的,小伙伴可以看看我之前的文章
1 2 3 4 5 ┌──[root@liruilongs.github.io]-[~] └─$ scp root@192.168.26.81:/root/ansible/k8s-rbac-create/kc1 . Warning: Permanently added '192.168.26.81' (ECDSA) to the list of known hosts. root@192.168.26.81's password: kc1 100% 5566 108.7KB/s 00:00
拷贝证书和k8s集群客户端工具到jenkins容器内 1 2 3 4 5 6 ┌──[root@liruilongs.github.io]-[~] └─$ docker cp kc1 jenkins:/ ┌──[root@liruilongs.github.io]-[~] └─$ docker cp kubectl jenkins:/ ┌──[root@liruilongs.github.io]-[~] └─$
kubectl命令测试 1 2 3 4 5 6 7 8 9 ┌──[root@liruilongs.github.io]-[~] └─$ docker exec -u root -it jenkins bash [root@39afa098c8a5 /] anaconda-post.log bin dev etc home kc1 kubectl lib lib64 media mnt opt proc root run sbin srv sys tmp usr var [root@39afa098c8a5 /] Error: unknown flag: --kubeconfi See 'kubectl get --help' for usage. [root@39afa098c8a5 /] Error from server (Forbidden): pods is forbidden: User "liruilong" cannot list resource "pods" in API group "" at the cluster scope
发现没有权限,这里我们为了方便,直接赋予集群中的cluster-admin角色
1 2 3 4 5 ┌──[root@vms81.liruilongs.github.io]-[~/ansible/k8s-rbac-create] └─$kubectl create clusterrolebinding test --clusterrole=cluster-admin --user=liruilong clusterrolebinding.rbac.authorization.k8s.io/test created ┌──[root@vms81.liruilongs.github.io]-[~/ansible/k8s-rbac-create] └─$
命令测试没有问题
1 2 3 4 5 6 [root@39afa098c8a5 /] NAME STATUS ROLES AGE VERSION vms81.liruilongs.github.io Ready control-plane,master 51d v1.22.2 vms82.liruilongs.github.io NotReady <none> 51d v1.22.2 vms83.liruilongs.github.io NotReady <none> 51d v1.22.2 [root@39afa098c8a5 /]
二 、hexo博客系统CICD实战 4. k8s集群中配置hexo生产环境高可用 我们要部署Nginx来运行hexo博客系统,hexo编译完后为一堆静态文件,所以我们需要创建一个svc和一个deploy,使用SVC提供服务,使用deploy提供服务能力,使用Nginx+hexo的静态文件构成的镜像
1 2 3 4 5 6 7 8 9 10 11 12 13 14 15 16 17 18 19 20 21 22 23 24 25 26 apiVersion: apps/v1 kind: Deployment metadata: creationTimestamp: null labels: app: nginx name: nginxdep spec: replicas: 2 selector: matchLabels: app: nginx strategy: {} template: metadata: creationTimestamp: null labels: app: nginx spec: containers: - image: blog name: web resources: requests: cpu: 100m restartPolicy: Always
deployments创建 这里我们先用一个Nginx镜像来代替hexo博客的镜像
1 2 3 ┌──[root@vms81.liruilongs.github.io]-[~/ansible/k8s-deploy-create] └─$kubectl apply -f nginx.yaml deployment.apps/nginxdep created
查看deployments和pod
1 2 3 4 5 6 7 8 9 10 11 ┌──[root@vms81.liruilongs.github.io]-[~/ansible/k8s-deploy-create] └─$kubectl get deployments.apps | grep nginxdep nginxdep 2/2 2 2 109s ┌──[root@vms81.liruilongs.github.io]-[~/ansible/k8s-deploy-create] └─$kubectl get pods -o wide | grep web ┌──[root@vms81.liruilongs.github.io]-[~/ansible/k8s-deploy-create] └─$kubectl get pods -o wide | grep nginxdep nginxdep-645bf755b9-2w8jv 1/1 Running 0 2m22s 10.244.171.164 vms82.liruilongs.github.io <none> <none> nginxdep-645bf755b9-jfqxj 1/1 Running 0 2m22s 10.244.171.157 vms82.liruilongs.github.io <none> <none> ┌──[root@vms81.liruilongs.github.io]-[~/ansible/k8s-deploy-create] └─$
service创建 1 2 3 4 5 6 ┌──[root@vms81.liruilongs.github.io]-[~/ansible/k8s-deploy-create] └─$kubectl expose deploy nginxdep --port=8888 --target-port=80 --type =NodePort service/nginxdep exposed ┌──[root@vms81.liruilongs.github.io]-[~/ansible/k8s-deploy-create] └─$kubectl get svc -o wide | grep nginxdep nginxdep NodePort 10.106.217.50 <none> 8888:31964/TCP 16s app=nginx
访问测试没有问题,之后我们配置好jenkins上的触发器,直接替换就OK
1 2 3 4 5 6 7 8 9 10 11 12 13 14 15 16 17 18 19 20 21 22 23 24 25 26 27 ┌──[root@vms81.liruilongs.github.io]-[~/ansible/k8s-deploy-create] └─$curl 127.0.0.1:31964 <!DOCTYPE html > <html > <head > <title > Welcome to nginx!</title > <style > html { color -scheme: light dark; }body { width : 35em ; margin : 0 auto;font-family : Tahoma, Verdana, Arial, sans-serif; }</style > </head > <body > <h1 > Welcome to nginx!</h1 > <p > If you see this page, the nginx web server is successfully installed andworking. Further configuration is required.</p > <p > For online documentation and support please refer to<a href ="http://nginx.org/" > nginx.org</a > .<br /> Commercial support is available at <a href ="http://nginx.com/" > nginx.com</a > .</p > <p > <em > Thank you for using nginx.</em > </p > </body > </html > ┌──[root@vms81.liruilongs.github.io]-[~/ansible/k8s-deploy-create] └─$
5.k8s集群配置私仓地址 我们通过kubectl set 命令更新deploy的镜像时,获取的镜像是通过私仓获取的,所以需要在启动参数添加私仓地址
ExecStart=/usr/bin/dockerd –insecure-registry 192.168.26.56 -H fd:// –containerd=/run/containerd/containerd.sock
这里所有的节点都需要设置后重启docker
1 2 3 4 5 6 7 8 9 10 11 12 13 14 15 16 17 ┌──[root@vms81.liruilongs.github.io]-[~/ansible/k8s-deploy-create] └─$vim /usr/lib/systemd/system/docker.service ┌──[root@vms81.liruilongs.github.io]-[~/ansible/k8s-deploy-create] └─$systemctl daemon-reload ;systemctl restart docker & [1] 23273 ┌──[root@vms81.liruilongs.github.io]-[~/ansible/k8s-deploy-create] └─$ssh root@192.168.26.82 Last login: Sun Jan 16 06:09:07 2022 from 192.168.26.1 ┌──[root@vms82.liruilongs.github.io]-[~] └─$vim /usr/lib/systemd/system/docker.service ┌──[root@vms82.liruilongs.github.io]-[~] └─$systemctl daemon-reload ;systemctl restart docker & [1] 26843 ┌──[root@vms82.liruilongs.github.io]-[~] └─$exit 登出 Connection to 192.168.26.82 closed.
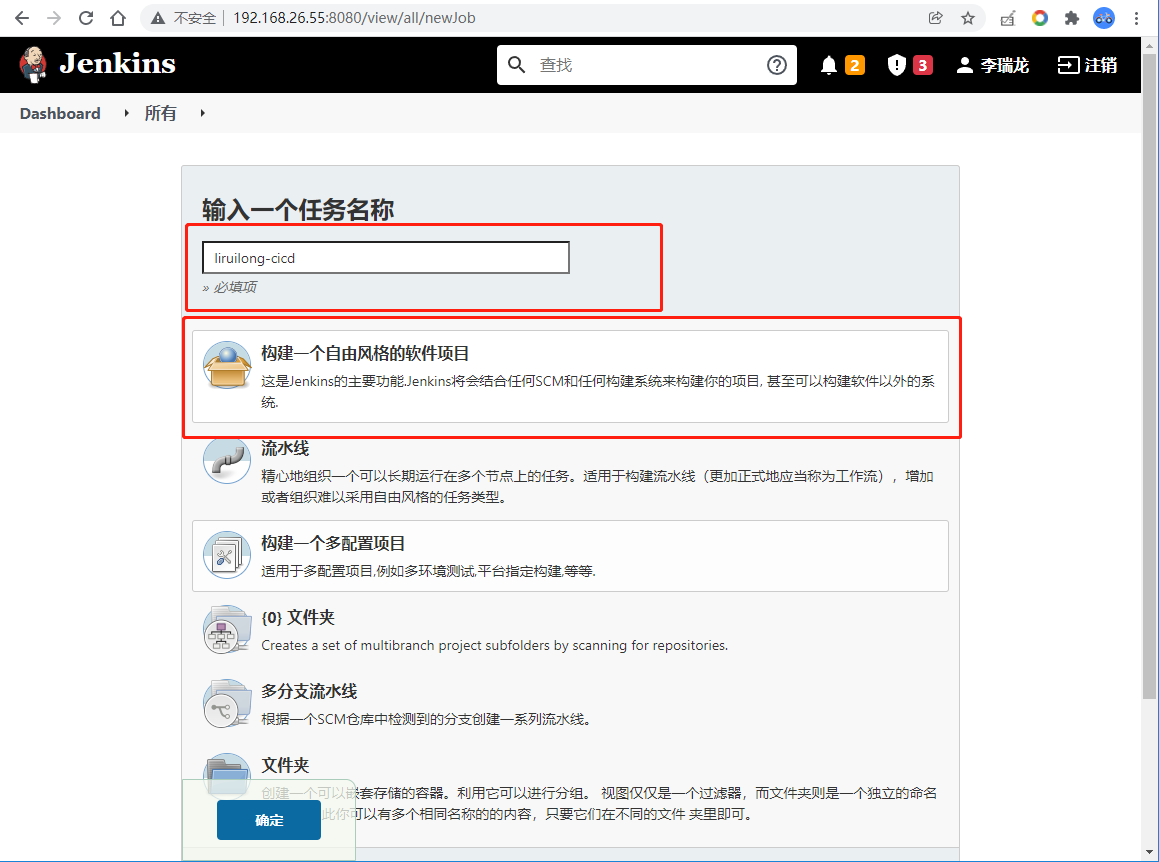
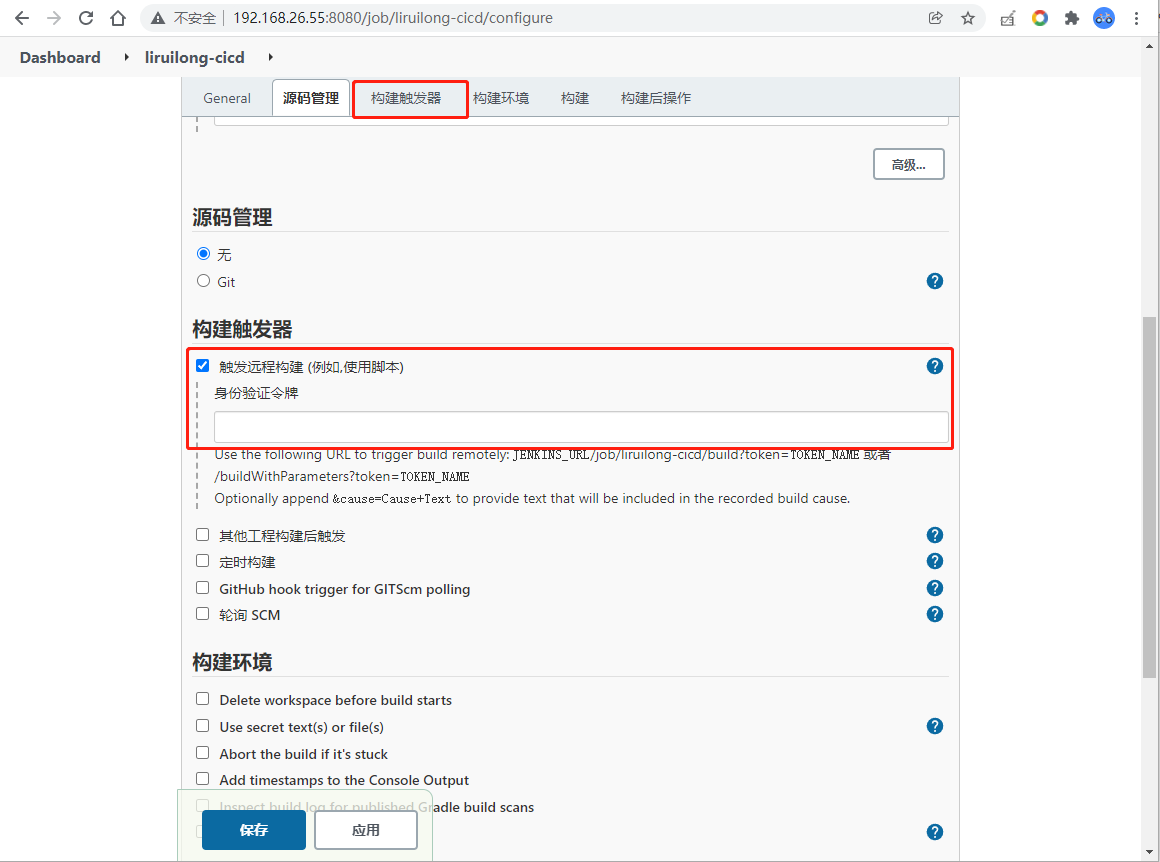
6.jenkins配置CICD流程 访问jenkins,接下来才是重点,我们要的jenkins上配置整个CICD流程,从而实现自动化
访问jenkins,接下来才是重点,我们要的jenkins上配置整个CICD流程,从而实现自动化
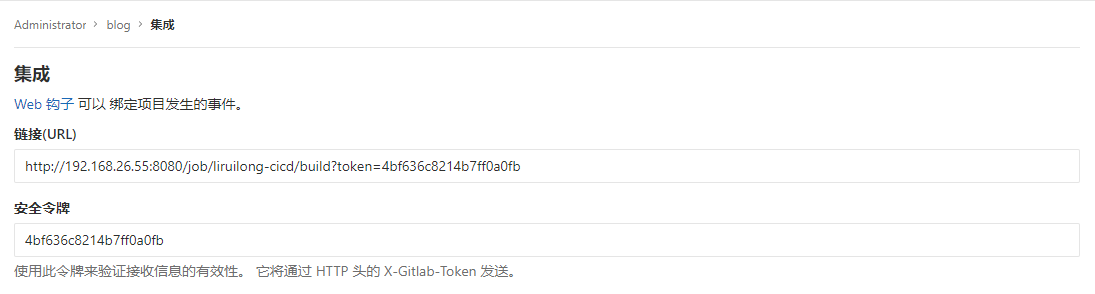
这里的Token我们设置为:4bf636c8214b7ff0a0fb,同时需要记住访问方式:JENKINS_URL/job/liruilong-cicd/build?token=TOKEN_NAME
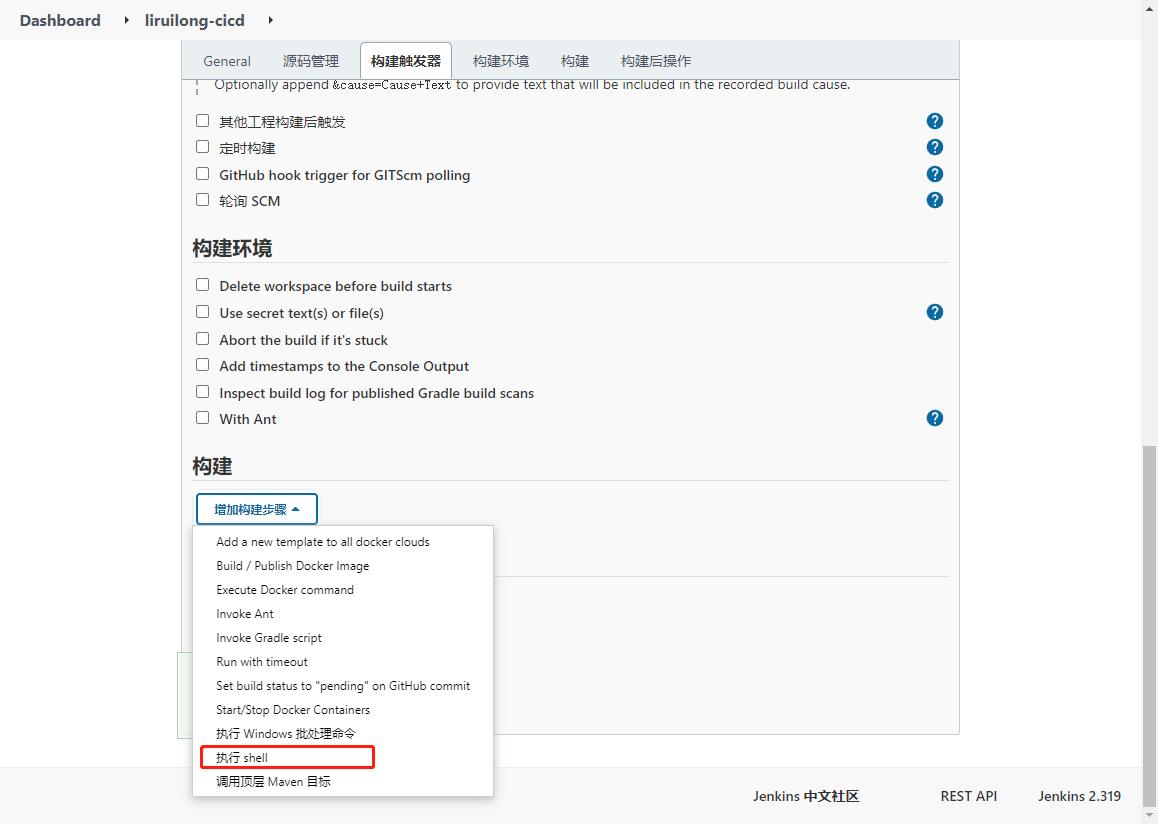
构建触发器选择shell构建:克隆代码
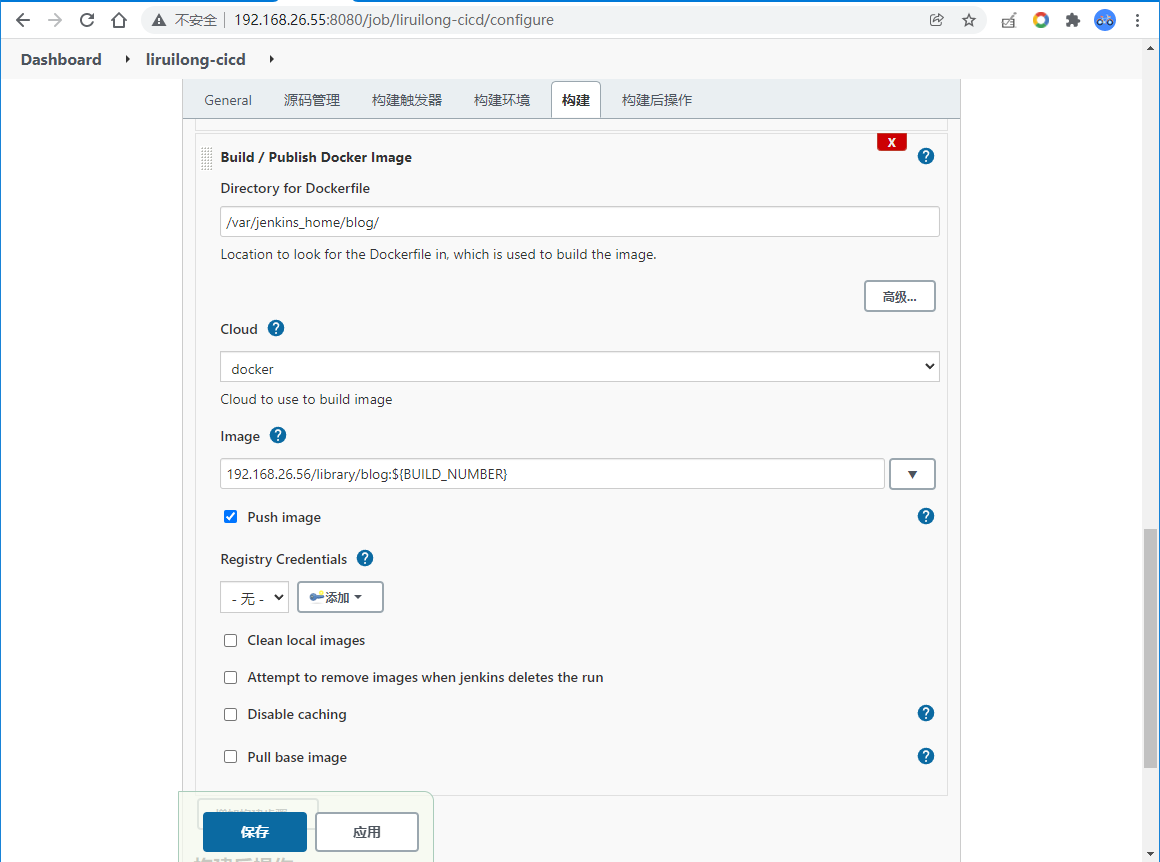
选择镜像构建
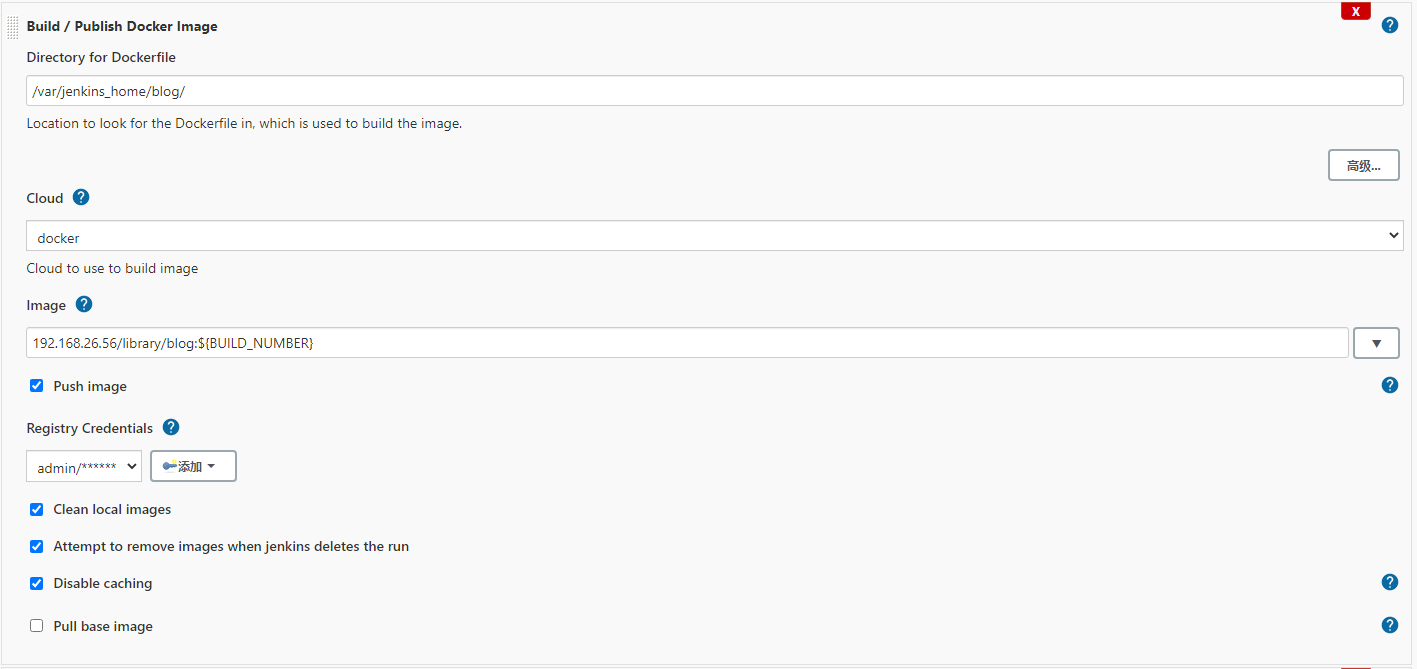
构建镜像并push私仓
这里切记需要添加私仓的认证信息,即上面设置的用户名和密码
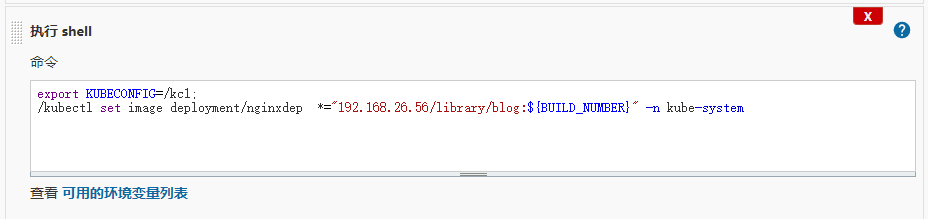
选择shell构建,更新镜像
相关的文本信息
1 2 3 cd ~rm -rf blog git clone http://192.168.26.55/root/blog.git
1 2 3 /var/jenkins_home/blog/ 192.168.26.56/library/blog:${BUILD_NUMBER}
1 2 export KUBECONFIG=/kc1;/kubectl set image deployment/nginxdep *="192.168.26.56/library/blog:${BUILD_NUMBER} " -n kube-system
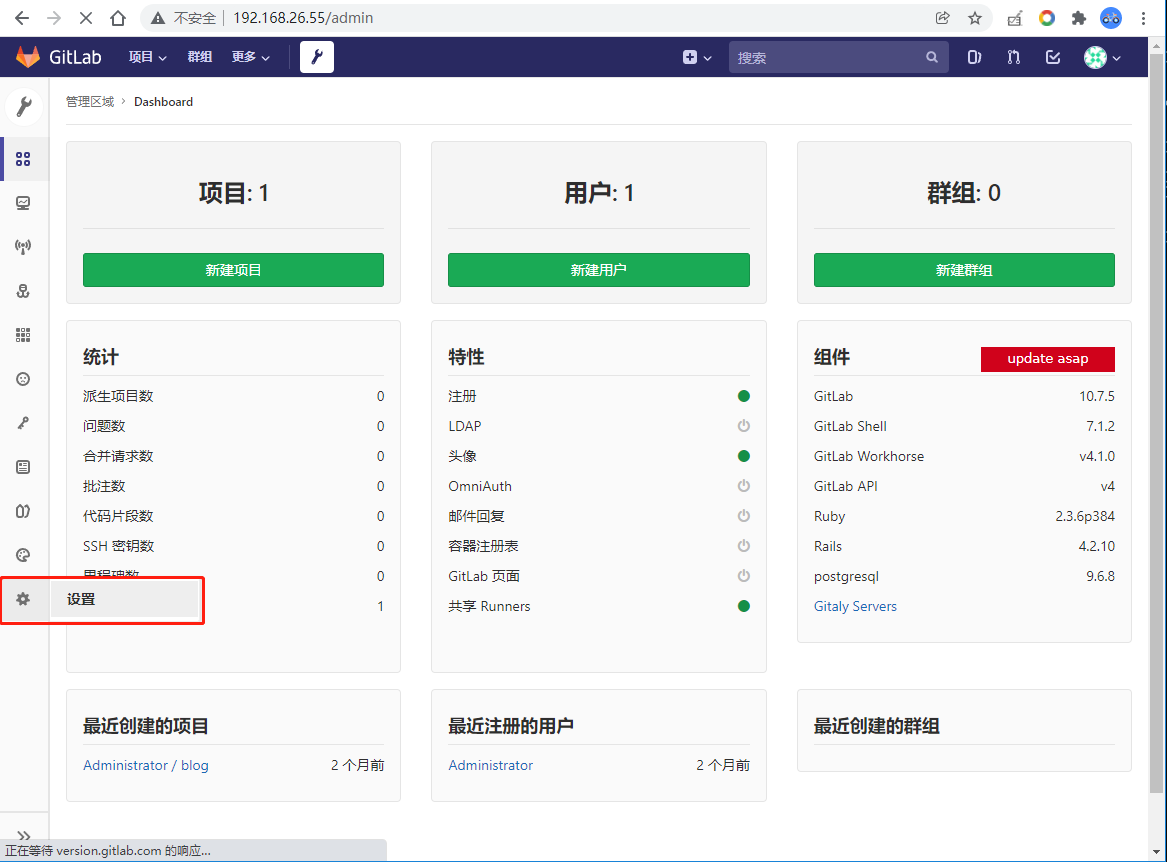
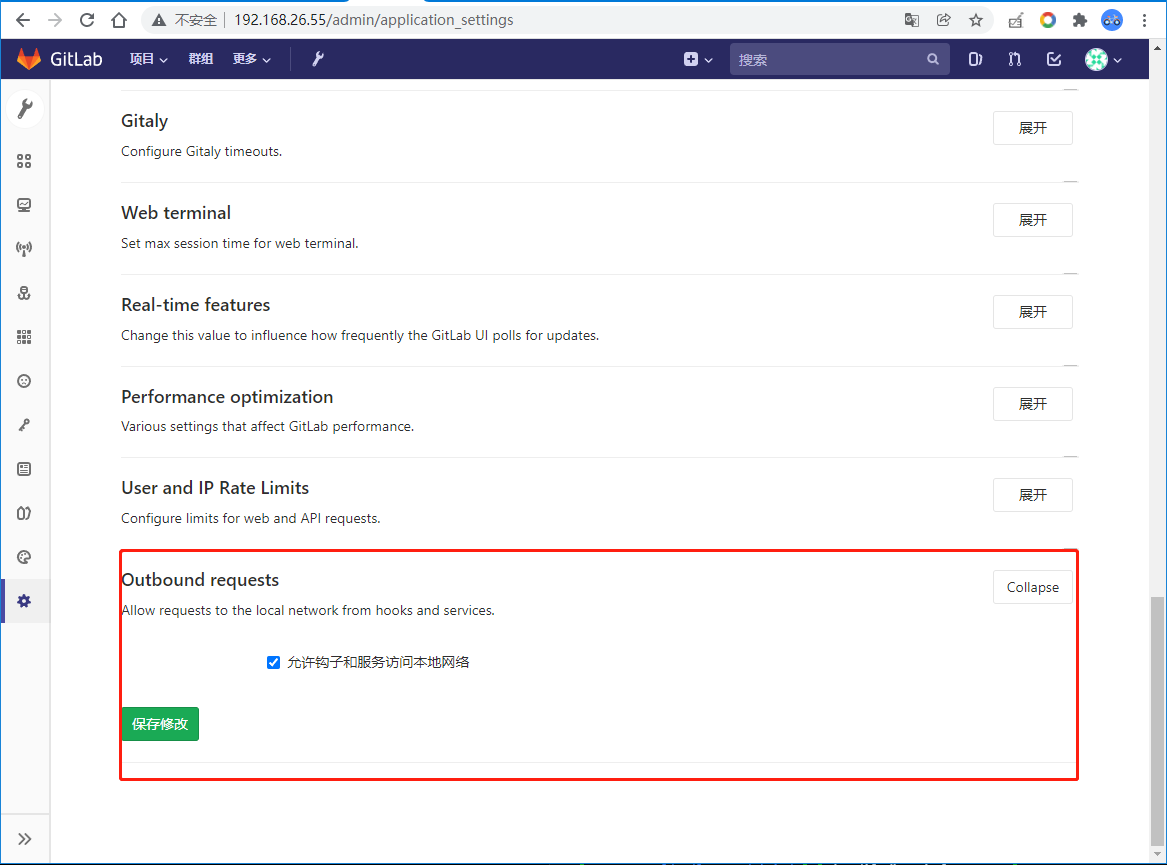
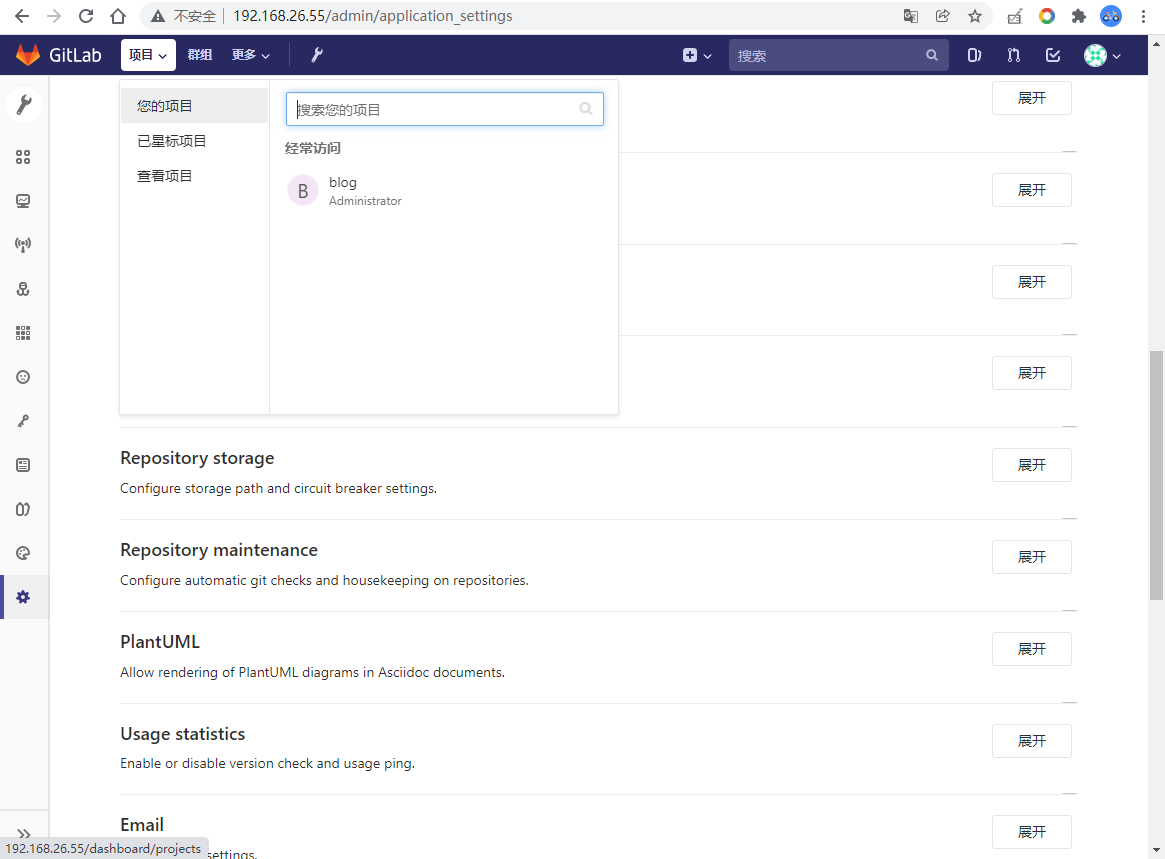
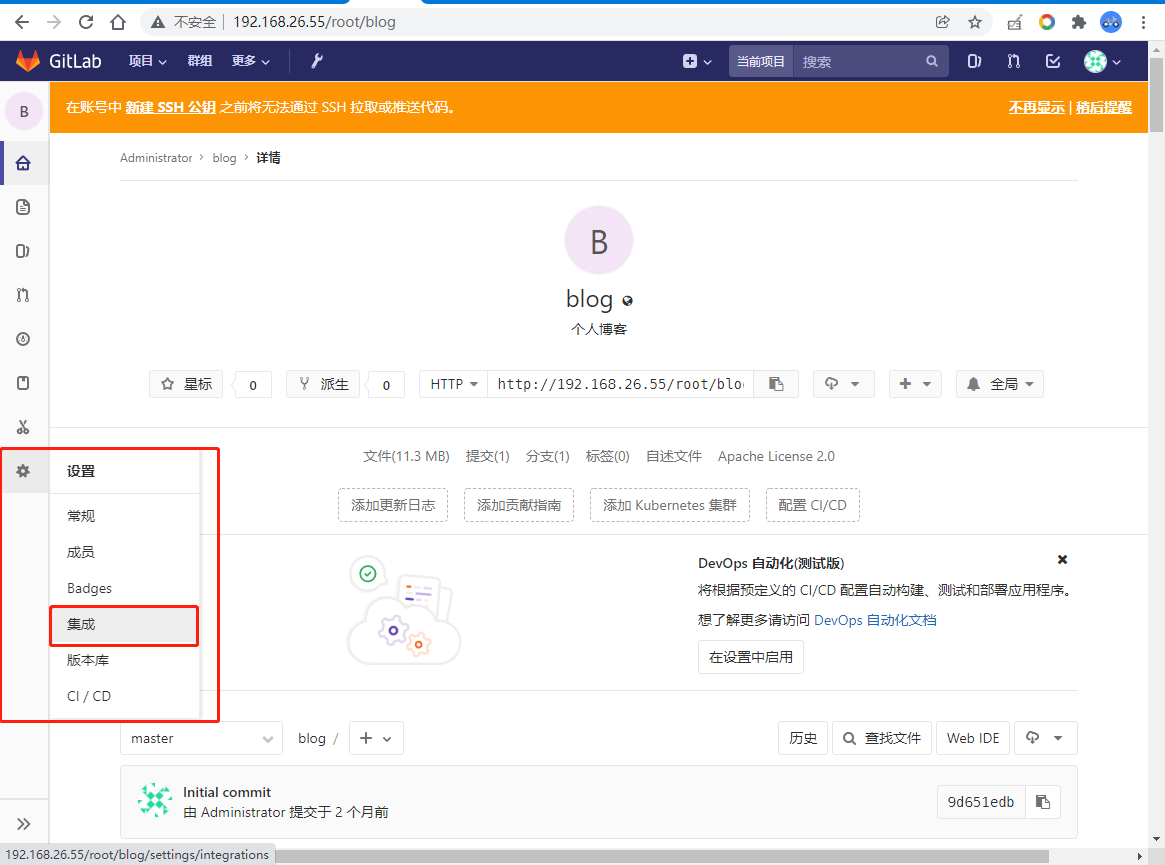
7.配置 gitlab 和 jenkins 的联动
访问gitlab配置联动
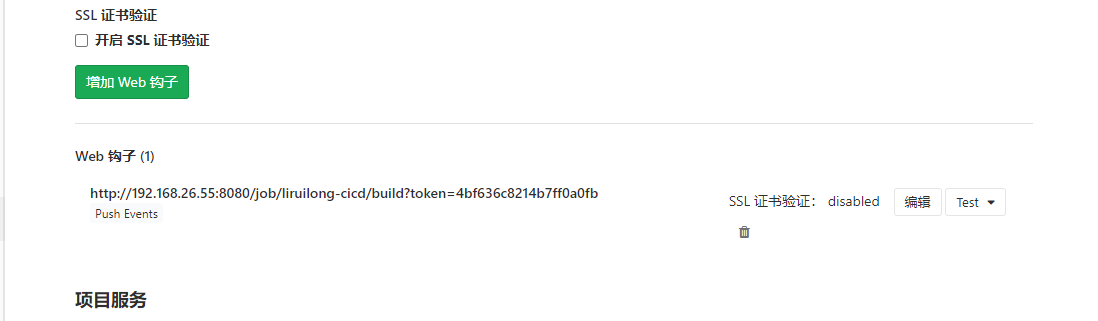
点击增加web钩子
/view/all/job/liruilong-cicd/build?token=
到这里,联动已经配置完成
8.编写Dockerfile文件,更新代码测试 下面我们编译一下hexo,生成public的一个文件夹,然后上传gitlab
1 2 3 4 5 6 7 8 9 10 11 12 13 PS F:\blogger> hexo g ..... PS F:\blogger> git add .\public\ PS F:\blogger> git commit -m "编译代码" PS F:\blogger> git push ``` **<font color=seagreen>同时需要编写Dockerfile文件来创建镜像</font>** ```bash FROM docker.io/library/nginx:latest MAINTAINER liruilong ADD ./public/ /usr/share/nginx/html/ EXPOSE 80 CMD ["nginx" , "-g" ,"daemon off;" ]
1 2 3 4 5 6 7 8 9 10 11 12 13 14 PS F:\blogger> git add . PS F:\blogger> git commit -m "Dockcerfile文件编写" [master 217e0ed] Dockcerfile文件编写 1 file changed, 1 deletion(-) PS F:\blogger> git push Enumerating objects: 5, done . Counting objects: 100% (5/5), done . Delta compression using up to 8 threads Compressing objects: 100% (3/3), done . Writing objects: 100% (3/3), 307 bytes | 307.00 KiB/s, done . Total 3 (delta 2), reused 0 (delta 0) To http://192.168.26.55/root/blog.git 6690612..217e0ed master -> master PS F:\blogger>
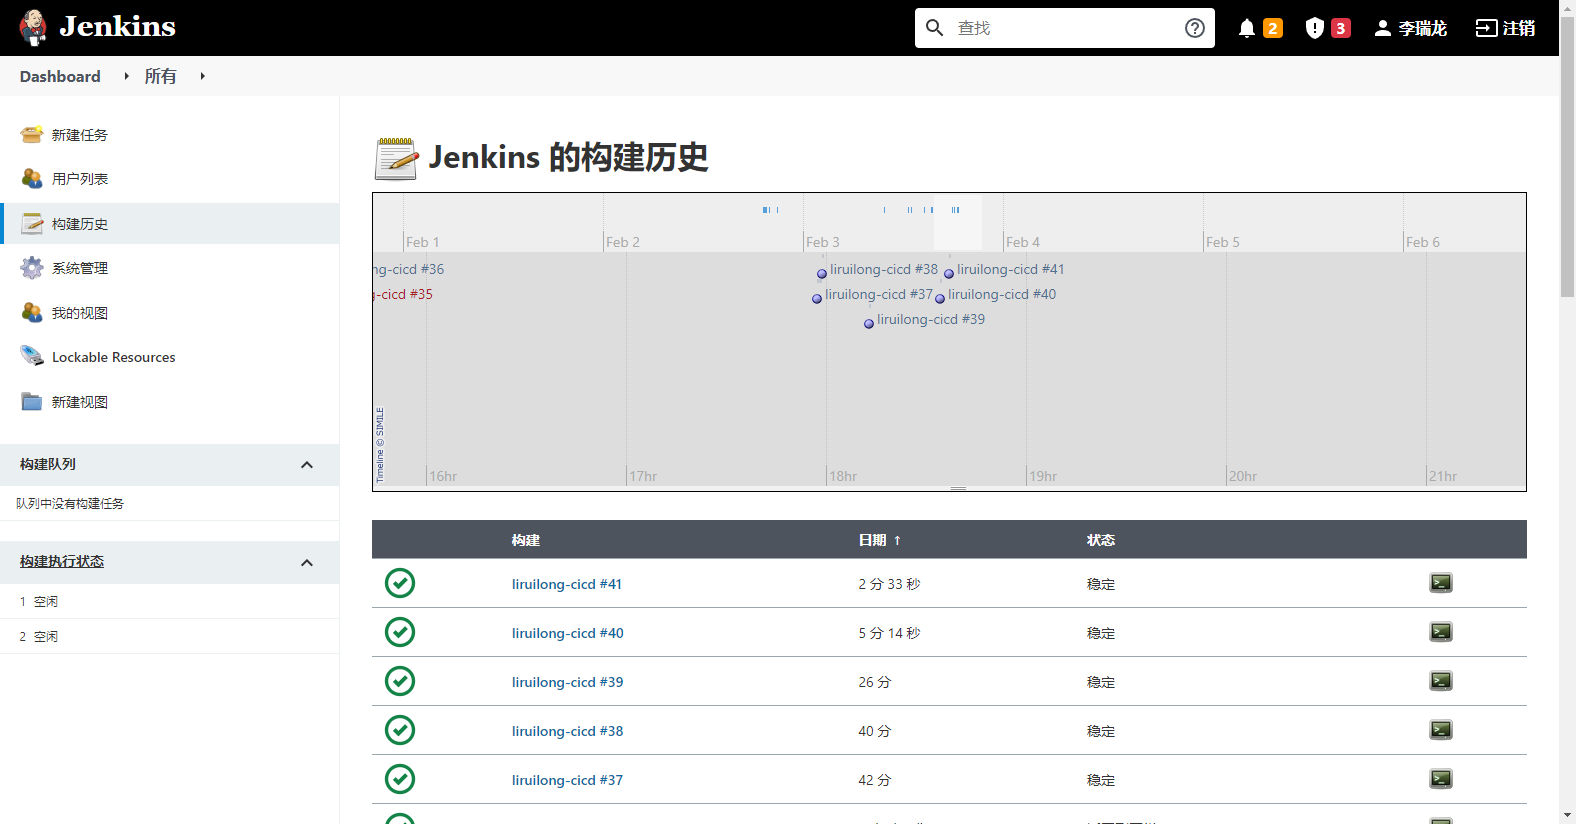
jenkins输出
1 2 3 4 5 6 7 8 9 10 11 12 13 14 15 16 17 18 19 20 21 22 23 24 25 26 27 28 29 30 31 32 33 34 35 36 37 38 39 40 41 42 43 44 45 46 47 48 49 50 51 52 53 54 55 56 57 58 59 60 61 62 63 64 65 66 67 68 69 70 71 72 73 74 75 76 77 78 79 80 81 82 83 84 85 86 87 88 89 90 91 92 93 94 95 96 97 98 99 100 101 Started by remote host 192.168.26.1 Running as SYSTEM Building in workspace /var/jenkins_home/workspace/liruilong-cicd [liruilong-cicd] $ /bin/sh -xe /tmp/jenkins6108687102523328796.sh + cd /var/jenkins_home + rm -rf blog + git clone http://192.168.26.55/root/blog.git Cloning into 'blog' ... Docker Build Docker Build: building image at path /var/jenkins_home/blog Step 1/5 : FROM docker.io/library/nginx:latest ---> f8f4ffc8092c Step 2/5 : MAINTAINER liruilong ---> Running in e341b5562b64 Removing intermediate container e341b5562b64 ---> 4e9f5aa47ab5 Step 3/5 : ADD ./public/ /usr/share/nginx/html/ ---> 3956cff32507 Step 4/5 : EXPOSE 80 ---> Running in b4c27124989d Removing intermediate container b4c27124989d ---> ba9d1764d764 Step 5/5 : CMD ["nginx" , "-g" ,"daemon off;" ] ---> Running in 61dca01a4883 Removing intermediate container 61dca01a4883 ---> 2aadc5732a60 Successfully built 2aadc5732a60 Tagging built image with 192.168.26.56/library/blog:41 Docker Build Response : 2aadc5732a60 Pushing [192.168.26.56/library/blog:41] The push refers to repository [192.168.26.56/library/blog] 89570901cdea: Preparing 65e1ea1dc98c: Preparing 88891187bdd7: Preparing 6e109f6c2f99: Preparing 0772cb25d5ca: Preparing 525950111558: Preparing 476baebdfbf7: Preparing 525950111558: Waiting 476baebdfbf7: Waiting 88891187bdd7: Layer already exists 6e109f6c2f99: Layer already exists 65e1ea1dc98c: Layer already exists 0772cb25d5ca: Layer already exists 89570901cdea: Pushing [> ] 301.6kB/28.75MB 89570901cdea: Pushing [==> ] 1.193MB/28.75MB 476baebdfbf7: Layer already exists 525950111558: Layer already exists 89570901cdea: Pushing [======> ] 3.917MB/28.75MB 89570901cdea: Pushing [==========> ] 5.996MB/28.75MB 89570901cdea: Pushing [==============> ] 8.097MB/28.75MB 89570901cdea: Pushing [==================> ] 10.76MB/28.75MB 89570901cdea: Pushing [=====================> ] 12.57MB/28.75MB 89570901cdea: Pushing [========================> ] 13.8MB/28.75MB 89570901cdea: Pushing [=========================> ] 14.71MB/28.75MB 89570901cdea: Pushing [===========================> ] 15.59MB/28.75MB 89570901cdea: Pushing [=============================> ] 16.79MB/28.75MB 89570901cdea: Pushing [===============================> ] 18.27MB/28.75MB 89570901cdea: Pushing [=================================> ] 19.45MB/28.75MB 89570901cdea: Pushing [===================================> ] 20.34MB/28.75MB 89570901cdea: Pushing [=====================================> ] 21.55MB/28.75MB 89570901cdea: Pushing [=======================================> ] 22.44MB/28.75MB 89570901cdea: Pushing [=========================================> ] 23.64MB/28.75MB 89570901cdea: Pushing [==========================================> ] 24.52MB/28.75MB 89570901cdea: Pushing [============================================> ] 25.42MB/28.75MB 89570901cdea: Pushing [==============================================> ] 26.61MB/28.75MB 89570901cdea: Pushing [===============================================> ] 27.19MB/28.75MB 89570901cdea: Pushing [=================================================> ] 28.69MB/28.75MB 89570901cdea: Pushing [==================================================>] 29.32MB 89570901cdea: Pushed 41: digest: sha256:c90b64945a8d063f7bcdcc39f00f91b6d83acafcd6b2ec6aba5b070474bafc37 size: 1782 Cleaning local images [2aadc5732a60] Docker Build Done [liruilong-cicd] $ /bin/sh -xe /tmp/jenkins246013519648603221.sh + export KUBECONFIG=/kc1 + KUBECONFIG=/kc1 + /kubectl set image deployment/nginxdep '*=192.168.26.56/library/blog:41' -n kube-system deployment.apps/nginxdep image updated Finished: SUCCESS
9.访问hexo博客系统 1 2 3 4 5 6 7 8 9 10 11 12 13 14 15 16 17 18 19 20 21 22 23 24 25 26 27 28 29 30 31 32 33 34 35 36 37 38 39 40 41 42 43 44 45 46 47 48 49 50 51 52 53 54 55 56 57 58 59 60 61 62 63 64 65 66 67 68 ┌──[root@vms81.liruilongs.github.io]-[~/ansible/k8s-deploy-create] └─$kubectl get deployments.apps | grep nginxdep nginxdep 2/2 2 2 30h ┌──[root@vms81.liruilongs.github.io]-[~/ansible/k8s-deploy-create] └─$kubectl get pods -o wide | grep nginxdep nginxdep-bddfd9b5f-94d88 1/1 Running 0 110s 10.244.171.142 vms82.liruilongs.github.io <none> <none> nginxdep-bddfd9b5f-z57qc 1/1 Running 0 35m 10.244.171.177 vms82.liruilongs.github.io <none> <none> ┌──[root@vms81.liruilongs.github.io]-[~/ansible/k8s-deploy-create] └─$kubectl get svc -o wide | grep nginxdep nginxdep NodePort 10.106.217.50 <none> 8888:31964/TCP 30h app=nginx ┌──[root@vms81.liruilongs.github.io]-[~/ansible/k8s-deploy-create] └─$kubectl describe pods nginxdep-bddfd9b5f-94d88 Name: nginxdep-bddfd9b5f-94d88 Namespace: kube-system Priority: 0 Node: vms82.liruilongs.github.io/192.168.26.82 Start Time: Fri, 04 Feb 2022 03:11:14 +0800 Labels: app=nginx pod-template-hash=bddfd9b5f Annotations: cni.projectcalico.org/podIP: 10.244.171.142/32 cni.projectcalico.org/podIPs: 10.244.171.142/32 Status: Running IP: 10.244.171.142 IPs: IP: 10.244.171.142 Controlled By: ReplicaSet/nginxdep-bddfd9b5f Containers: web: Container ID: docker://669f48cb626d5067f40bb1aaa378268a7ee9879488b0b298a86271957c162316 Image: 192.168.26.56/library/blog:41 Image ID: docker-pullable://192.168.26.56/library/blog@sha256:c90b64945a8d063f7bcdcc39f00f91b6d83acafcd6b2ec6aba5b070474bafc37 Port: <none> Host Port: <none> State: Running Started: Fri, 04 Feb 2022 03:11:15 +0800 Ready: True Restart Count: 0 Requests: cpu: 100m Environment: <none> Mounts: /var/run/secrets/kubernetes.io/serviceaccount from kube-api-access-trn5n (ro) Conditions: Type Status Initialized True Ready True ContainersReady True PodScheduled True Volumes: kube-api-access-trn5n: Type: Projected (a volume that contains injected data from multiple sources) TokenExpirationSeconds: 3607 ConfigMapName: kube-root-ca.crt ConfigMapOptional: <nil> DownwardAPI: true QoS Class: Burstable Node-Selectors: <none> Tolerations: node.kubernetes.io/not-ready:NoExecute op=Exists for 300s node.kubernetes.io/unreachable:NoExecute op=Exists for 300s Events: Type Reason Age From Message ---- ------ ---- ---- ------- Normal Scheduled 4m10s default-scheduler Successfully assigned kube-system/nginxdep-bddfd9b5f-94d88 to vms82.liruilongs.github.io Normal Pulling 4m9s kubelet Pulling image "192.168.26.56/library/blog:41" Normal Pulled 4m9s kubelet Successfully pulled image "192.168.26.56/library/blog:41" in 67.814838ms Normal Created 4m9s kubelet Created container web Normal Started 4m9s kubelet Started container web
访问hexo博客系统