傍晚时分,你坐在屋檐下,看着天慢慢地黑下去,心里寂寞而凄凉,感到自己的生命被剥夺了。当时我是个年轻人,但我害怕这样生活下去,衰老下去。在我看来,这是比死亡更可怕的事。——–王小波
写在前面
嗯,准备RHCA,学习整理这部分知识
所谓自动化配置服务和网络接口,其实是使用Ansible配置
关于Ansible的一些基本操作在RHCE一门课中有涉及。
博文内容为对Ansible操作回顾:
Ansible的简单概述及环境配置的Demo使用Ansible自动化管理配置Service unit
使用Ansible的rhel-system-roles.network角色来自动化配置网络接口
阅读本文需要了解一些基本Ansible知识
傍晚时分,你坐在屋檐下,看着天慢慢地黑下去,心里寂寞而凄凉,感到自己的生命被剥夺了。当时我是个年轻人,但我害怕这样生活下去,衰老下去。在我看来,这是比死亡更可怕的事。——–王小波
利用Ansible我们可以实现服务和网络的自动化管理,试想如果有数十台机器搭集群,需要配置firewalld、SElinux、NetworkManager,如果一台一台配就特别麻烦,而且是需要一个交互环境,即使刷脚本我们也需要一台一台远程去看状态,但是使用Ansible就很方便。
Ansible 简述 Ansible概念和架构 Ansible是一款简洁、高效的运维自动化工具。基于Python开发,集合了众多运维工具(puppet、cfengine、chef、func、fabric)的优点,只需要将ansible安装在主控机器上,就可以通过SSH协议实现针对大量受管服务器的批量化、剧本化的管理。通过Ansible实现远程控制,,实现了批量系统配置、批量程序部署、批量运行命令等功能。
ansible是基于模块工作的,本身没有批量自动化的能力。真正具有批量自动化的是ansible所运行的模块,ansible只是提供一种框架。
为了方便复杂任务(包含大批量任务操作、模板、变量等资源)的重复使用,降低playbook剧本编写难度,ansible提出角色的概念,所谓角色就是预先定义好的一套目录结构。针对每一个角色,ansible会到固定的目录去调取特定的数据,使用角色时不指定hosts: 清单主机列表,而是交给调用此角色的剧本来指定.
下面我们来看一个ansible的demo
Ansible Demo Ansible需要配置控制节点到受管节点的SSH免密和root提权,这里我们已经配置好测试下
1
2
3
┌──[root@control]-[~/web] └─$ssh node1 sudo id uid=0(root) gid=0(root) groups=0(root) context=unconfined_u:unconfined_r:unconfined_t:s0-s0:c0.c1023
对于Ansible的所有配置,命令操作,都是在一个指定文件夹下进行的,Ansible在执行临时命令或者剧本时会扫描当前工作目录,满足要求才会执行,否则会发出警告。新建ansible目录,编写主机清单inventory,主机清单用于指定要控制的主机
inventory:指定操作的主机,是一个配置文件里面定义监控的主机,可以是域名,IP。同时支持分组,表达式等高级特性
1
2
3
4
5
6
7
8
9
10
11
┌──[root@control]-[~] └─$mkdir web;cd web ┌──[root@control]-[~/web] └─$touch inventory ┌──[root@control]-[~/web] └─$cat > inventory << EOF > [webs] > node1 > EOF ┌──[root@control]-[~/web] └─$
当前目录编写ansible配置文件,用于指定主机清单文件,连接受管机器的远程的用户名,用户的su 提权等
1
2
3
4
5
6
7
8
9
10
11
12
13
14
15
16
17
18
┌──[root@control]-[~/web] └─$ls ansible.cfg inventory ┌──[root@control]-[~/web] └─$cat ansible.cfg [defaults] inventory=inventory remote_user=root roles_path=roles [privilege_escalation] become=True become_method=sudo become_user=root become_ask_pass=False
ping 受控节点测试:管控到受控的ping命令测试
1
2
3
4
5
6
7
8
9
10
┌──[root@control]-[~/web] └─$ansible webs -m ping node1 | SUCCESS => { "ansible_facts" : { "discovered_interpreter_python" : "/usr/libexec/platform-python" }, "changed" : false , "ping" : "pong" }
只需要几步,我们就通过control来控制node1机器,当然上面我们省略了ansible装包,配置SSH免密、sudo提权。
上面的命令相当于在Control机器ping node1机器,-m指定模块,默认为command模块
1
2
┌──[root@control]-[~/web] └─$ping node1
剧本实现服务自动化配置 利用Ansible实现服务自动化管理,主要涉及模块:Service、systemd和service_facts,下面我们看一个Demo
通过编写ploybook的方式,用yum、service、firewalld模块实现httpd服务的自动配置
编写剧本 vim deploy_book_web.yaml
1
2
3
4
5
6
7
8
9
10
11
12
13
14
15
16
17
18
19
20
21
22
- name: deploy web servers hosts: webs tasks: - name: install httpd yum: name: httpd state: present - name: start and enable httpd service: name: httpd state: started enabled: yes - name: set firewall to allow httpd service firewalld: service: http permanent: yes immediate: yes state: enabled - name: index.html write copy: dest: /var/www/html/index.html content: "Hello Word !\n"
通过 ansible-playbook --syntax-check 来检测剧本语法
1
2
3
4
┌──[root@control]-[~/web] └─$ansible -playbook deploy_book_web.yaml --syntax-check playbook: deploy_book_web.yaml
通过 ansible-playbook 执行剧本
1
2
3
4
5
6
7
8
9
10
11
12
13
14
15
16
17
18
19
20
21
22
23
┌──[root@control]-[~/web] └─$ansible -playbook deploy_book_web.yaml PLAY [deploy web servers] ********************************************************************************************** TASK [Gathering Facts] ************************************************************************************************* ok: [node1] TASK [install httpd] *************************************************************************************************** changed: [node1] TASK [start and enable httpd] ****************************************************************************************** changed: [node1] TASK [set firewall to allow httpd service] ***************************************************************************** changed: [node1] TASK [index.html write] ************************************************************************************************ changed: [node1] PLAY RECAP ************************************************************************************************************* node1 : ok=4 changed=4 unreachable=0 failed=0 skipped=0 rescued=0 ignored=0
测试httpd服务
1
2
3
4
5
┌──[root@control]-[~/web] └─$curl node1 Hello Word ! ┌──[root@control]-[~/web] └─$
服务自动化常用模块 软件管理模块(yum/dnf):yum/dnf 模块用于安装软件包,常用参数
name:软件名、软件名-版本号、逗号分隔的列表、@组名、*通配符
state:present、absent,
list:软件名、installed、available1 2 3 4 5 6 7 8 9 10 11 12 13 14 15 16 17 18 19 20 21 22 23 24 25 - name: install the nginx rpm from a remote repo yum: name: http://nginx.org/packages/centos/6/noarch/RPMS/nginx-release-centos-6-0.el6.ngx.n> state: present - name: install nginx rpm from a local file yum: name: /usr/local/src/nginx-release-centos-6-0.el6.ngx.noarch.rpm state: present - name: install the 'Development tools' package group yum: name: "@Development tools" state: present - name: install the 'Gnome desktop' environment group yum: name: "@^gnome-desktop-environment" state: present - name: List ansible packages and register result to print with debug later. yum: list: ansible register: result
安全控制模块(firewalld):用于管理配置Linux防火墙服务 firewalld,常用参数:
permanent(永久开启)
port(端口)
service(服务)、
source(源端)
state(状态)
immediate(立即生效)1 2 3 4 5 6 7 8 9 10 11 12 13 14 15 16 17 18 19 20 21 22 23 - firewalld: service: https permanent: yes state: enabled - firewalld: port: 8081 /tcp permanent: yes state: disabled - firewalld: port: 161 -162 /udp permanent: yes state: enabled - name: Redirect port 443 to 8443 with Rich Rule firewalld: rich_rule: rule family=ipv4 forward-port port=443 protocol=tcp to-port=8443 zone: public permanent: yes immediate: yes state: enabled
服务控制模块(service/systemd):代替systemctl 指令来控制服务的启动/停止/重启、开机自启动状态的设置
name=服务名 //指定系统服务名(必选参数)
state=”started|stoped|restarted|reloaded” //启动|停止|重启|重载服务
enable=”yes|no” //是否开机自启
service模块用于执行基本的系统服务管理
1 2 3 4 5 6 7 8 9 10 11 12 13 14 15 16 17 18 19 20 21 22 23 24 25 26 27 28 29 30 31 32 33 34 35 36 - name: Start service httpd, if not started service: name: httpd state: started - name: Stop service httpd, if started service: name: httpd state: stopped - name: Restart service httpd, in all cases service: name: httpd state: restarted - name: Reload service httpd, in all cases service: name: httpd state: reloaded - name: Enable service httpd, and not touch the state service: name: httpd enabled: yes - name: Start service foo, based on running process /usr/bin/foo service: name: foo pattern: /usr/bin/foo state: started - name: Restart network service for interface eth0 service: name: network state: restarted args: eth0
systemd模块可以提供更多配置选项,例如daemon-reload。reload 子命令重新加载的是当前service unit的配置文件。daemon-reload 子命令是重新加载 systemd 程序的配置文件。而所有的 unit 配置文件都是作为 systemd 程序的配置文件存在的。所以需要执行daemon-reload 命令的时候
新添加 unit 配置文件时需要执行 daemon-reload 子命令
有 unit 的配置文件发生变化时也需要执行 daemon-reload 子命令
1 2 3 4 5 6 7 8 9 10 11 12 13 14 15 16 17 18 19 20 - name: reload service httpd, in all cases systemd: name: httpd state: reloaded - name: enable service httpd and ensure it is not masked systemd: name: httpd enabled: yes masked: no - name: enable a timer for dnf-automatic systemd: name: dnf-automatic.timer state: started enabled: yes - name: just force systemd to reread configs (2.4 and above) systemd: daemon_reload: yes
service_facts模块:对于服务模块来讲,还可以通过service_facts模块收集有关系统上服务的信息,并将该信息存储在ansible_facts[services]变量中。
1 2 3 4 5 6 7 8 9 10 11 12 13 14 - name: populate service facts service_facts: - debug: var: ansible_facts.services - name: serviers facts hosts: webs tasks: - name: collect service status facts service_facts: - name: display whether NetworkManager is running debug: var: ansible_facts['services']['NetworkManager.service']['state']
通过service_facts模块查看NetworkManager服务运行状态为running
1 2 3 4 5 6 7 8 9 10 11 12 13 14 ┌──[root@control]-[~/web] └─$vim service_facts.yaml ┌──[root@control]-[~/web] └─$ansible -playbook service_facts.yaml --syntax-check playbook: service_facts.yaml ┌──[root@control]-[~/web] └─$ansible -playbook service_facts.yaml ....... TASK [display whether NetworkManager is running] *********************************************************************** ok: [node1] => { "ansible_facts['services']['NetworkManager.service']['state']" : "running" } ........
角色实现网络自动化配置 使用ansible配置不但可以通过剧本的方式,也可以通过角色的方式来配置,自RHEL7.4开始,操作系统随附了多个Ansible角色,由rhel-system-roles软包提供。在RHEL8中,该软件包可从AppStream频道获取。系统角色的目的是标准化配置版本6.10及以上的任何RHEL主机。RHEL系统角色来源于开源Ansible Galaxy的Linux System Role项目。
系统角色默认安装在/usr/share/ansible/roles目录,Ansible可以直接引用这些角色。一般通过拷贝的方法,使用ansible配置网络常用模块network_connections来配置。对应的角色包为rhel-system-roles.network
下面我们使用角色rhel-system-roles.network,以及角色中network_connections变量配置网络。角色的执行,首先需要拷贝对应的角色包当前角色目录下,然后编写需要替换的变量文件(即tasks/main.yml中的变量),我们可以在host_vars主机变量文件夹下编写,之前需要编写执行角色的剧本。
角色环境配置 1 2 3 4 5 6 7 8 9 ┌──[root@workstation.lab.example.com]-[~] └─$dnf list rhel-system-roles Last metadata expiration check: 0:00:58 ago on Thu 14 Apr 2022 11:42:34 PM CST. Available Packages rhel-system-roles.noarch 1.0-9.el8 rhel-8.1-for-x86_64-appstream-rpms ┌──[root@workstation.lab.example.com]-[~] └─$dnf -y install rhel-system-roles.noarch Last metadata expiration check: 0:01:15 ago on Thu 14 Apr 2022 11:42:34 PM CST. ......
查看预先设置好的角色包位置。
1 2 3 4 5 6 7 8 ┌──[root@workstation.lab.example.com]-[~] └─$ansible -galaxy list - linux-system-roles.kdump, (unknown version) - linux-system-roles.network, (unknown version) ....... ┌──[root@workstation.lab.example.com]-[~] └─$
拷贝角色到当前的roles目录下
1 2 3 4 5 6 7 8 9 10 11 12 13 14 ┌──[root@workstation.lab.example.com]-[~/web] └─$mkdir roles ┌──[root@workstation.lab.example.com]-[~/web] └─$ansible -galaxy list ┌──[root@workstation.lab.example.com]-[~/web] └─$cp -r /usr/share/ansible/roles/rhel-system-roles.network/ roles/network ┌──[root@workstation.lab.example.com]-[~/web] └─$cd roles/network/ ┌──[root@workstation.lab.example.com]-[~/web/roles/network] └─$ls defaults library LICENSE meta module_utils pylintrc README.html README.md tasks tests tox.ini ┌──[root@workstation.lab.example.com]-[~/web/roles/network] └─$
查看当前目录的ansible环境拥有的角色
1 2 3 4 5 6 ┌──[root@workstation.lab.example.com]-[~/web] └─$ansible -galaxy list - network, (unknown version) ┌──[root@workstation.lab.example.com]-[~/web] └─$
查看network角色执行的任务剧本,这是一个写好的模板,我们配置网络只需要在文件中定向最下面的network_connections变量即可
1 2 3 4 5 6 7 8 9 10 11 12 13 14 15 16 17 18 19 20 21 22 23 24 25 26 27 28 29 30 31 32 33 34 35 36 37 38 39 40 41 42 43 44 45 46 47 48 49 50 51 52 53 54 55 56 57 58 59 60 61 62 ┌──[root@workstation.lab.example.com]-[~/web] └─$cat roles/network/tasks/main.yml --- - name: Check which services are running service_facts: no_log: true - name: Check which packages are installed package_facts: no_log: true - name: Print network provider debug: msg: "Using network provider: {{ network_provider }}" - name: Install packages package: name: "{{ network_packages }}" state: present when: - not network_packages is subset(ansible_facts.packages.keys()) - name: Enable and start NetworkManager service: name: "{{ network_service_name }}" state: started enabled: true when: - network_provider == "nm" - name: Enable network service service: name: "{{ network_service_name }}" enabled: true when: - network_provider == "initscripts" - name: Ensure initscripts network file dependency is present copy: dest: /etc/sysconfig/network content: "# Created by network system role" force: false when: - network_provider == "initscripts" - name: Configure networking connection profiles network_connections: provider: "{{ network_provider | mandatory }}" ignore_errors: "{{ network_ignore_errors | default(omit) }}" force_state_change: "{{ network_force_state_change | default(omit) }}" connections: "{{ network_connections | default([]) }}" - name: Re-test connectivity ping: ┌──[root@workstation.lab.example.com]-[~/web] └─$
编写变量文件 在host_vars文件夹下定义变量
1 2 ┌──[root@workstation.lab.example.com]-[~/web] └─$mkdir host_vars;cd host_vars
定义一个静态IP的网络接口配置的变量文件
1 2 ┌──[root@workstation.lab.example.com]-[~/web] └─$cat host_vars/servera.yaml
通过network_connections还可以配置网桥,VLAN等其他的一些配置,更多见附录
1 2 3 4 5 6 7 8 9 10 11 12 13 14 15 16 17 18 19 --- network_connections: - name: ethO-static type: ethernet interface_name: eth0 persistent_state: present autoconnect: yes state: up ip: address: - 172.25 .250 .10 /24 - 172.25 .254 .10 /24 gateway4: 172.25 .250 .254 dns: - 172.25 .250 .254 - 172.25 .254 .254 dns_search: - lab.example.com - example.com
通过debug模块来测试变量
1 2 3 4 5 6 7 8 9 10 11 12 13 14 15 16 17 18 19 20 21 22 23 24 25 26 27 28 29 ┌──[root@workstation.lab.example.com]-[~/web] └─$ansible servera -m debug -a 'var=network_connections' servera | SUCCESS => { "network_connections" : [ { "autoconnect" : true , "interface_name" : "eth0" , "ip" : { "address" : [ "172.25.250.10/24" , "172.25.254.10/24" ], "dns" : [ "172.25.250.254" , "172.25.254.254" ], "dns_search" : [ "lab.example.com" , "example.com" ], "gateway4" : "172.25.250.254" }, "name" : "ethO-static" , "persistent_state" : "present" , "state" : "up" , "type" : "ethernet" } ] }
编写执行角色剧本 1 2 3 4 5 6 7 8 9 ┌──[root@workstation.lab.example.com]-[~/web] └─$vim config_network.yaml ┌──[root@workstation.lab.example.com]-[~/web] └─$cat config_network.yaml --- - name: config eth0 on servea hosts: servara roles: - network
查看原本的eth0接口配置
1 2 3 4 5 6 7 8 9 ┌──[root@workstation.lab.example.com]-[~/web] └─$ansible servera -m shell -a "ip addr show eth0" servera | CHANGED | rc=0 >> 2: eth0: <BROADCAST,MULTICAST,UP,LOWER_UP> mtu 1500 qdisc fq_codel state UP group default qlen 1000 link/ether 52:54:00:00:fa:0a brd ff:ff:ff:ff:ff:ff inet 172.25.250.10/24 brd 172.25.250.255 scope global noprefixroute eth0 valid_lft forever preferred_lft forever inet6 fe80::984:87d2:dba7:1007/64 scope link noprefixroute valid_lft forever preferred_lft forever
执行剧本
1 2 ┌──[root@workstation.lab.example.com]-[~/web] └─$ansible -playbook config_network.yaml
查看执行之后的网络状态
1 2 3 4 5 6 7 8 9 10 11 ┌──[root@workstation.lab.example.com]-[~/web] └─$ansible servera -m shell -a "ip addr show eth0" servera | CHANGED | rc=0 >> 2: eth0: <BROADCAST,MULTICAST,UP,LOWER_UP> mtu 1500 qdisc fq_codel state UP group default qlen 1000 link/ether 52:54:00:00:fa:0a brd ff:ff:ff:ff:ff:ff inet 172.25.250.10/24 brd 172.25.250.255 scope global noprefixroute eth0 valid_lft forever preferred_lft forever inet 172.25.254.10/24 brd 172.25.254.255 scope global noprefixroute eth0 valid_lft forever preferred_lft forever inet6 fe80::e88f:e7dd:6595:4edf/64 scope link noprefixroute valid_lft forever preferred_lft forever
ipv4的地址信息
1 2 3 4 5 6 7 8 9 10 11 12 ┌──[root@workstation.lab.example.com]-[~/web] └─$ansible servera -m setup -a "filter=ansible_all_ipv4_addresses" servera | SUCCESS => { "ansible_facts" : { "ansible_all_ipv4_addresses" : [ "172.25.250.10" , "172.25.254.10" ], "discovered_interpreter_python" : "/usr/libexec/platform-python" }, "changed" : false }
dns信息
1 2 3 4 5 6 7 8 9 10 11 12 13 14 15 16 17 18 ┌──[root@workstation.lab.example.com]-[~/web] └─$ansible servera -m setup -a "filter=ansible_dns" servera | SUCCESS => { "ansible_facts" : { "ansible_dns" : { "nameservers" : [ "172.25.250.254" , "172.25.254.254" ], "search" : [ "lab.example.com" , "example.com" ] }, "discovered_interpreter_python" : "/usr/libexec/platform-python" }, "changed" : false }
Ansible facts 我们上面使用setup模块,这里简单介绍下,Ansible使用facts向控制节点检索有关受管主机配置的信息。一般叫系统变量,或者系统指标。通过变量,我们可以查看系统的一些详细信息,剧本的信息的收集是通过gather_facts=yes自动搜集,临时命令调用setup模块,剧本默认会调用。
1 2 3 ┌──[root@workstation.lab.example.com]-[~/web] └─$ansible servera -m setup -a "filter=ansible_all_ipv4_addresses"
常见的网络方面的系统变量
网络相关系统指标
网络相关系统指标
ansible_interfaces
ansible_all_ipv4_addresses
ansible_domain
ansible_all_ipv6_addresses
ansible_interfacename
ansible_default_ipv4
ansible_eth0.active
ansible_default_ipv4.address
ansible_eth0.device
ansible default ipv4.interface
ansible_eth0.features
ansible_default_ipv4.gateway
ansible_eth0.ipv4
ansible_default_ipv4.netmask
ansible_eth0.ipv6
ansible_default_ipv4.type
ansible eth0.macaddress
ansible_default_ipv6
ansible_fqdn
ansible_dns
ansible_hostname
ansible_dns.nameservers
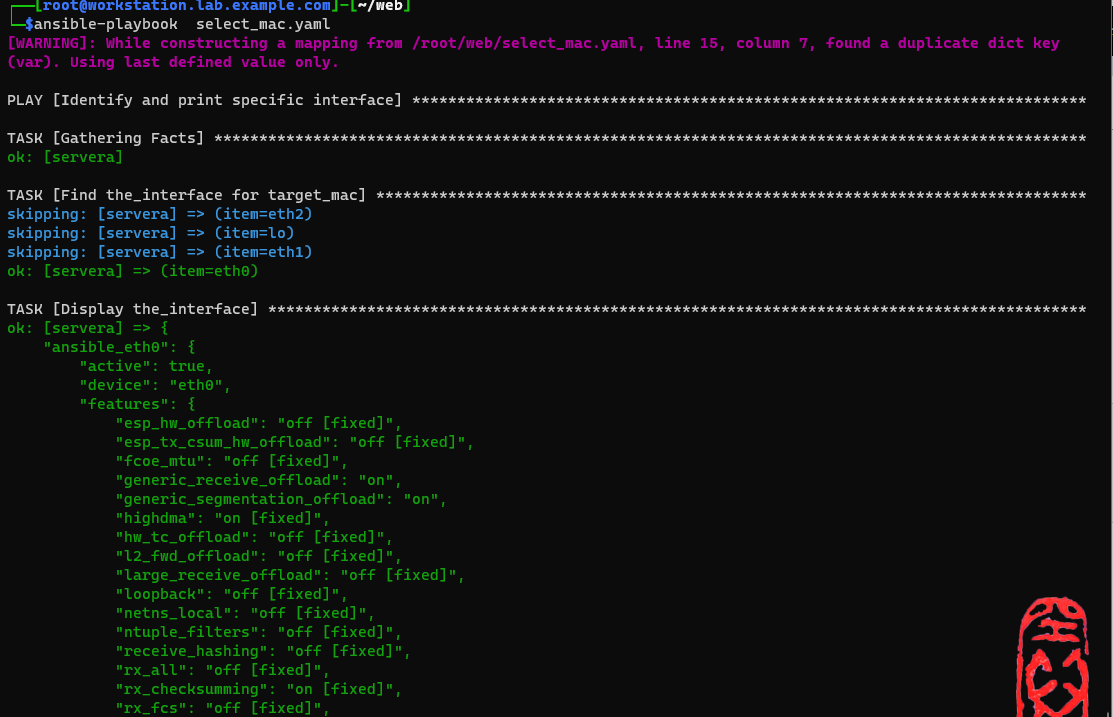
facts应用 如果我们知道网络端口的MAC地址,使用Ansible来检索该接口的名称。
1 2 3 4 5 6 7 8 9 10 11 12 13 14 15 16 - name: Identify and print specific interface hosts: servera vars: target_mac: "52:54:00:00:fa:0a" tasks: - name: Find the_interface for target_mac set_fact: the_interface: "{{item}} " when: - ansible_facts[item]['macaddress'] is defined - ansible_facts[item]['macaddress']==target_mac loop: "{{ansible_facts['interfaces']}} " - name: Display the_interface debug: var: the_interface var: ansible_{{the_interface}}
附录 下面是一些网络配置角色帮助文档中的一些Demo
多次设置相同的连接配置文件:
1 2 3 4 5 6 7 8 9 network_connections: - name: Wired0 type: ethernet interface_name: eth0 ip: dhcp4: yes - name: Wired0 state: up
激活一个已存在的连接配置文件
1 2 3 network_connections: - name: eth0 state: up
取消激活一个已存在的连接配置文件:
1 2 3 network_connections: - name: eth0 state: down
创建持久连接配置文件:
1 2 3 4 5 6 7 8 network_connections: - name: eth0 type: ethernet autoconnect: yes mac: 00 :00:5e:00:53:5d ip: dhcp4: yes
删除一个名为“eth0”的连接配置文件(如果它存在):
1 2 3 network_connections: - name: eth0 persistent_state: absent
配置Ethernet链路:
1 2 3 4 5 6 7 8 network_connections: - name: eth0 type: ethernet ethernet: autoneg: no speed: 1000 duplex: full
创建网桥连接:
1 2 3 4 network_connections: - name: br0 type: bridge
配置网桥连接:
1 2 3 4 5 6 7 network_connections: - name: internal-br0 interface_name: br0 type: bridge ip: dhcp4: no auto6: no
设置 master 和 slave_type:
1 2 3 4 5 6 7 8 9 10 11 12 network_connections: - name: br0-bond0 type: bond interface_name: bond0 master: internal-br0 slave_type: bridge - name: br0-bond0-eth1 type: ethernet interface_name: eth1 master: br0-bond0 slave_type: bond
配置 VLAN:
1 2 3 4 5 6 7 8 9 10 11 12 13 14 15 16 17 18 19 network_connections: - name: eth1-profile autoconnet: no type: ethernet interface_name: eth1 ip: dhcp4: no auto6: no - name: eth1.6 autoconnect: no type: vlan parent: eth1-profile vlan: id: 6 ip: address: - 192.0 .2 .5 /24 auto6: no
Configuring MACVLAN:
1 2 3 4 5 6 7 8 9 10 11 12 13 14 15 16 17 18 network_connections: - name: eth0-profile type: ethernet interface_name: eth0 ip: address: - 192.168 .0 .1 /24 - name: veth0 type: macvlan parent: eth0-profile macvlan: mode: bridge promiscuous: yes tap: no ip: address: - 192.168 .1 .1 /24
设置IP配置:
1 2 3 4 5 6 7 8 9 10 11 12 13 14 15 16 17 18 19 20 21 22 23 24 25 26 27 28 29 30 31 32 33 34 35 36 network_connections: - name: eth0 type: ethernet ip: route_metric4: 100 dhcp4: no gateway4: 192.0 .2 .1 dns: - 192.0 .2 .2 - 198.51 .100 .5 dns_search: - example.com - subdomain.example.com route_metric6: -1 auto6: no gateway6: 2001 :db8::1 address: - 192.0 .2 .3 /24 - 198.51 .100 .3 /26 - 2001 :db8::80/7 route: - network: 198.51 .100 .128 prefix: 26 gateway: 198.51 .100 .1 metric: 2 - network: 198.51 .100 .64 prefix: 26 gateway: 198.51 .100 .6 metric: 4 route_append_only: no rule_append_only: yes
动态IP配置
1 2 3 4 5 6 7 8 9 10 11 12 13 network_connections: - name: enp2s0-dhcp type: ethernet interface_name: enp2s0 persistent_state: present zone: external ip: dhcp4: yes auto6: no ethernet: autoneg: no speed: 1000 duplex: full
静态IP配置
1 2 3 4 5 6 7 8 9 10 11 12 13 14 15 16 17 18 network _connections: - name: ethO-static type: ethernet interface_name: eth0 persistent_state: present autoconnect: yes state: up ip: address: - 172.25 .250 .10 /24 - 172.25 .254 .10 /24 gateway4: 172.25 .250 .254 dns: - 172.25 .250 .254 - 172.25 .254 .254 dns_search: - lab.example.com - example.com