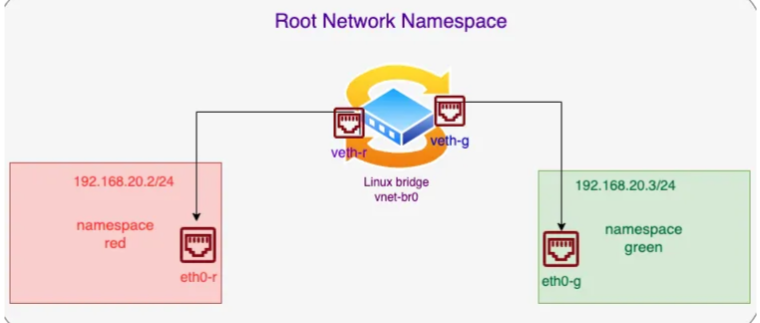
桥接设备(Bridge Device)是在网络层次结构中工作的二层设备(Data Link Layer),它主要用于连接多个网络设备。桥接设备通过学习和转发数据帧的方式,将连接到它的网络设备组成一个共享的以太网段,使得这些设备可以直接通信。桥接设备工作在数据链路层(第二层),它不涉及 IP 地址或路由。基于 MAC 地址构建地址转发表。
┌──[root@liruilongs.github.io]-[~] └─$ip netns add red ┌──[root@liruilongs.github.io]-[~] └─$ip netns add green
用于在 Linux 上创建一个名为 vnet-br0 的桥接设备。
1 2
┌──[root@liruilongs.github.io]-[~] └─$ip link add vnet-br0 type bridge
添加虚拟网卡对eth0-r 和 veth-r、eth0-g 和 veth-g
1
2
3
4
┌──[root@liruilongs.github.io]-[~] └─$ip link add eth0-r type veth peer name veth-r ┌──[root@liruilongs.github.io]-[~] └─$ip link add eth0-g type veth peer name veth-g
把两个虚拟网卡对中的一端放到上面创建的网络命名空间
1 2 3 4
┌──[root@liruilongs.github.io]-[~] └─$ip link set eth0-r netns red ┌──[root@liruilongs.github.io]-[~] └─$ip link set eth0-g netns green
然后将虚拟网卡对的另一端连接到vnet-br0桥。
1
2
3
4
┌──[root@liruilongs.github.io]-[~] └─$ip link set veth-r master vnet-br0 ┌──[root@liruilongs.github.io]-[~] └─$ip link set veth-g master vnet-br0
查看根网络命名空间的桥接设备类型的网络设备(桥接表)。
1
2
3
4
┌──[root@liruilongs.github.io]-[~] └─$ip link show type bridge 5: vnet-br0: <BROADCAST,MULTICAST> mtu 1500 qdisc noop state DOWN mode DEFAULT group default qlen 1000 link/ether 62:2b:41:f9:39:b3 brd ff:ff:ff:ff:ff:ff
查看桥接设备(vnet-br0)关联的网络设备。
1 2 3 4 5 6
┌──[root@liruilongs.github.io]-[~] └─$ip link show master vnet-br0 6: veth-r@if7: <BROADCAST,MULTICAST> mtu 1500 qdisc noop master vnet-br0 state DOWN mode DEFAULT group default qlen 1000 link/ether 62:2b:41:f9:39:b3 brd ff:ff:ff:ff:ff:ff link-netns red 8: veth-g@if9: <BROADCAST,MULTICAST> mtu 1500 qdisc noop master vnet-br0 state DOWN mode DEFAULT group default qlen 1000 link/ether be:a3:9a:1c:a1:06 brd ff:ff:ff:ff:ff:ff link-netns green
根据输出,有两个网络设备与 vnet-br0 桥接设备关联:
veth-r@if7:这是一个虚拟网络设备(veth pair),它与 vnet-br0 桥接设备关联。它的状态是 DOWN,表示当前处于未激活状态。它的 MAC 地址为 62:2b:41:f9:39:b3。此设备属于 red 网络命名空间。
veth-g@if9:这是另一个虚拟网络设备(veth pair),也与 vnet-br0 桥接设备关联。它的状态是 DOWN,表示当前处于未激活状态。它的 MAC 地址为 be:a3:9a:1c:a1:06。此设备属于 green 网络命名空间。
激活桥接对应的网络设备
1 2 3 4 5 6
┌──[root@liruilongs.github.io]-[~] └─$ip link set vnet-br0 up ┌──[root@liruilongs.github.io]-[~] └─$ip link set veth-r up ┌──[root@liruilongs.github.io]-[~] └─$ip link set veth-g up
激活 网络命名空间中的回环地址和对应的虚拟网卡对
1 2 3 4 5 6 7 8
┌──[root@liruilongs.github.io]-[~] └─$ip netns exec red ip link set lo up ┌──[root@liruilongs.github.io]-[~] └─$ip netns exec red ip link set eth0-r up ┌──[root@liruilongs.github.io]-[~] └─$ip netns exec green ip link set lo up ┌──[root@liruilongs.github.io]-[~] └─$ip netns exec green ip link set eth0-g up
ip link 确认设备状态
1 2 3 4 5 6 7 8 9 10 11 12 13
┌──[root@liruilongs.github.io]-[~] └─$ip link 1: lo: <LOOPBACK,UP,LOWER_UP> mtu 65536 qdisc noqueue state UNKNOWN mode DEFAULT group default qlen 1000 link/loopback 00:00:00:00:00:00 brd 00:00:00:00:00:00 2: ens160: <BROADCAST,MULTICAST,UP,LOWER_UP> mtu 1500 qdisc mq state UP mode DEFAULT group default qlen 1000 link/ether 00:0c:29:93:51:67 brd ff:ff:ff:ff:ff:ff altname enp3s0 5: vnet-br0: <BROADCAST,MULTICAST,UP,LOWER_UP> mtu 1500 qdisc noqueue state UP mode DEFAULT group default qlen 1000 link/ether 62:2b:41:f9:39:b3 brd ff:ff:ff:ff:ff:ff 6: veth-r@if7: <BROADCAST,MULTICAST,UP,LOWER_UP> mtu 1500 qdisc noqueue master vnet-br0 state UP mode DEFAULT group default qlen 1000 link/ether 62:2b:41:f9:39:b3 brd ff:ff:ff:ff:ff:ff link-netns red 8: veth-g@if9: <BROADCAST,MULTICAST,UP,LOWER_UP> mtu 1500 qdisc noqueue master vnet-br0 state UP mode DEFAULT group default qlen 1000 link/ether be:a3:9a:1c:a1:06 brd ff:ff:ff:ff:ff:ff link-netns green
进入网络命名空间 shell 环境,分配 IP, 给 red 命名空间分配IP 地址 192.168.20.2/24
1 2 3 4
┌──[root@liruilongs.github.io]-[~] └─$ip netns exec red bash ┌──[root@liruilongs.github.io]-[~] └─$ip address add 192.168.20.2/24 dev eth0-r
┌──[root@liruilongs.github.io]-[~] └─$ip netns exec green ping baidu.com -c 3 PING baidu.com (110.242.68.66) 56(84) bytes of data. 64 bytes from 110.242.68.66 (110.242.68.66): icmp_seq=1 ttl=127 time=20.5 ms 64 bytes from 110.242.68.66 (110.242.68.66): icmp_seq=2 ttl=127 time=20.0 ms 64 bytes from 110.242.68.66 (110.242.68.66): icmp_seq=3 ttl=127 time=20.3 ms
--- baidu.com ping statistics --- 3 packets transmitted, 3 received, 0% packet loss, time 2003ms rtt min/avg/max/mdev = 20.031/20.261/20.475/0.181 ms
1 2 3 4 5 6 7 8 9 10
┌──[root@liruilongs.github.io]-[~] └─$ip netns exec red ping baidu.com -c 3 PING baidu.com (110.242.68.66) 56(84) bytes of data. 64 bytes from 110.242.68.66 (110.242.68.66): icmp_seq=1 ttl=127 time=20.2 ms 64 bytes from 110.242.68.66 (110.242.68.66): icmp_seq=2 ttl=127 time=20.3 ms 64 bytes from 110.242.68.66 (110.242.68.66): icmp_seq=3 ttl=127 time=20.1 ms
--- baidu.com ping statistics --- 3 packets transmitted, 3 received, 0% packet loss, time 2003ms rtt min/avg/max/mdev = 20.085/20.197/20.278/0.082 ms
在两个命名空间中做内网 ping 测试
1 2 3 4 5 6 7 8 9 10
┌──[root@liruilongs.github.io]-[~] └─$ip netns exec red ping 192.168.26.149 -c 3 PING 192.168.26.149 (192.168.26.149) 56(84) bytes of data. 64 bytes from 192.168.26.149: icmp_seq=1 ttl=64 time=0.241 ms 64 bytes from 192.168.26.149: icmp_seq=2 ttl=64 time=0.110 ms 64 bytes from 192.168.26.149: icmp_seq=3 ttl=64 time=0.075 ms
--- 192.168.26.149 ping statistics --- 3 packets transmitted, 3 received, 0% packet loss, time 2074ms rtt min/avg/max/mdev = 0.075/0.142/0.241/0.071 ms
1 2 3 4 5 6 7 8 9 10 11 12
┌──[root@liruilongs.github.io]-[~] └─$ip netns exec green ping 192.168.26.149 -c 3 PING 192.168.26.149 (192.168.26.149) 56(84) bytes of data. 64 bytes from 192.168.26.149: icmp_seq=1 ttl=64 time=0.258 ms 64 bytes from 192.168.26.149: icmp_seq=2 ttl=64 time=0.097 ms 64 bytes from 192.168.26.149: icmp_seq=3 ttl=64 time=0.094 ms
这里我们用两个 Linux network namespace 来模拟 ,创建两个网络命名空间,同时配置两个 veth pair,一端放到命名空间
1 2 3 4
liruilonger@cloudshell:~$ sudo ip netns add ns1 liruilonger@cloudshell:~$ sudo ip netns add ns2 liruilonger@cloudshell:~$ sudo ip link add v1 netns ns1 type veth peer name v1-P liruilonger@cloudshell:~$ sudo ip link add v2 netns ns2 type veth peer name v2-P
确认创建的 veth pair
1
2
3
4
5
6
7
8
9
10
11
12
13
liruilonger@cloudshell:~$ ip link 1: lo: <LOOPBACK,UP,LOWER_UP> mtu 65536 qdisc noqueue state UNKNOWN mode DEFAULT group default qlen 1000 link/loopback 00:00:00:00:00:00 brd 00:00:00:00:00:00 2: eth0@if6: <BROADCAST,MULTICAST,UP,LOWER_UP> mtu 1500 qdisc noqueue state UP mode DEFAULT group default link/ether 0a:10:50:88:eb:09 brd ff:ff:ff:ff:ff:ff link-netnsid 0 3: docker0: <NO-CARRIER,BROADCAST,MULTICAST,UP> mtu 1500 qdisc noqueue state DOWN mode DEFAULT group default link/ether 02:42:f9:2d:29:3e brd ff:ff:ff:ff:ff:ff 4: tunl0@NONE: <NOARP> mtu 1480 qdisc noop state DOWN mode DEFAULT group default qlen 1000 link/ipip 0.0.0.0 brd 0.0.0.0 5: v1-P@if3: <BROADCAST,MULTICAST> mtu 1500 qdisc noop state DOWN mode DEFAULT group default qlen 1000 link/ether 76:81:b0:33:e4:2b brd ff:ff:ff:ff:ff:ff link-netns ns1 6: v2-P@if3: <BROADCAST,MULTICAST> mtu 1500 qdisc noop state DOWN mode DEFAULT group default qlen 1000 link/ether aa:a6:ac:15:b1:64 brd ff:ff:ff:ff:ff:ff link-netns ns2
另一端放到 根网络命名空间,同时两个Veth-pair 配置不同网段IP启动。
1
2
3
4
liruilonger@cloudshell:~$ sudo ip addr add 10.10.10.1/24 dev v1-P liruilonger@cloudshell:~$ sudo ip link set v1-P up liruilonger@cloudshell:~$ sudo ip addr add 10.10.20.1/24 dev v2-P liruilonger@cloudshell:~$ sudo ip link set v2-P up
命名空间一端的同样配置IP 并启用
1 2 3 4
liruilonger@cloudshell:~$ sudo ip netns exec ns1 ip addr add 10.10.10.2/24 dev v1 liruilonger@cloudshell:~$ sudo ip netns exec ns2 ip addr add 10.10.20.2/24 dev v2 liruilonger@cloudshell:~$ sudo ip netns exec ns1 ip link set v1 up liruilonger@cloudshell:~$ sudo ip netns exec ns2 ip link set v2 up
确定设备在线
1 2 3 4 5 6 7 8 9 10 11 12 13 14
liruilonger@cloudshell:~$ ip link 1: lo: <LOOPBACK,UP,LOWER_UP> mtu 65536 qdisc noqueue state UNKNOWN mode DEFAULT group default qlen 1000 link/loopback 00:00:00:00:00:00 brd 00:00:00:00:00:00 2: eth0@if6: <BROADCAST,MULTICAST,UP,LOWER_UP> mtu 1500 qdisc noqueue state UP mode DEFAULT group default link/ether 0a:10:50:88:eb:09 brd ff:ff:ff:ff:ff:ff link-netnsid 0 3: docker0: <NO-CARRIER,BROADCAST,MULTICAST,UP> mtu 1500 qdisc noqueue state DOWN mode DEFAULT group default link/ether 02:42:f9:2d:29:3e brd ff:ff:ff:ff:ff:ff 4: tunl0@NONE: <NOARP> mtu 1480 qdisc noop state DOWN mode DEFAULT group default qlen 1000 link/ipip 0.0.0.0 brd 0.0.0.0 5: v1-P@if3: <BROADCAST,MULTICAST,UP,LOWER_UP> mtu 1500 qdisc noqueue state UP mode DEFAULT group default qlen 1000 link/ether 76:81:b0:33:e4:2b brd ff:ff:ff:ff:ff:ff link-netns ns1 6: v2-P@if3: <BROADCAST,MULTICAST,UP,LOWER_UP> mtu 1500 qdisc noqueue state UP mode DEFAULT group default qlen 1000 link/ether aa:a6:ac:15:b1:64 brd ff:ff:ff:ff:ff:ff link-netns ns2 liruilonger@cloudshell:~$
设置隧道端点,用remote和local表示隧道外层IP: remote 10.10.20.2 local 10.10.10.2
隧道内层IP配置: ip addr add 10.10.100.10 peer 10.10.200.10 dev tunl
1 2 3 4
liruilonger@cloudshell:~$ sudo ip netns exec ns1 ip tunnel add tunl mode ipip remote 10.10.20.2 local 10.10.10.2 liruilonger@cloudshell:~$ sudo ip netns exec ns1 ip link set tunl up liruilonger@cloudshell:~$ sudo ip netns exec ns1 ip addr add 10.10.100.10 peer 10.10.200.10 dev tunl liruilonger@cloudshell:~$
原始的IP 头
src: 10.10.100.10
dst: 10.10.200.10
封装后的IP头
src: 10.10.10.2 | src: 10.10.100.10
dst: 10.10.20.2 | dst: 10.10.200.10
同样需要在 ns2 上做相同的配置
1 2 3 4
liruilonger@cloudshell:~$ sudo ip netns exec ns2 ip tunnel add tunr mode ipip remote 10.10.10.2 local 10.10.20.2 liruilonger@cloudshell:~$ sudo ip netns exec ns2 ip link set tunr up liruilonger@cloudshell:~$ sudo ip netns exec ns2 ip addr add 10.10.200.10 peer 10.10.100.10 dev tunr liruilonger@cloudshell:~$
到这里 两个 tun 设备的 隧道就建立成功了,我们可以在其中一个命名空间对另一个命名空间的 tun 设备发起 ping 测试
1 2 3 4 5 6 7 8 9 10
liruilonger@cloudshell:~$ sudo ip netns exec ns1 ping 10.10.200.10 -c 3 PING 10.10.200.10 (10.10.200.10) 56(84) bytes of data. 64 bytes from 10.10.200.10: icmp_seq=1 ttl=64 time=0.091 ms 64 bytes from 10.10.200.10: icmp_seq=2 ttl=64 time=0.062 ms 64 bytes from 10.10.200.10: icmp_seq=3 ttl=64 time=0.067 ms
liruilonger@cloudshell:~$ sudo ip netns exec ns1 ip link 1: lo: <LOOPBACK> mtu 65536 qdisc noop state DOWN mode DEFAULT group default qlen 1000 link/loopback 00:00:00:00:00:00 brd 00:00:00:00:00:00 2: tunl0@NONE: <NOARP> mtu 1480 qdisc noop state DOWN mode DEFAULT group default qlen 1000 link/ipip 0.0.0.0 brd 0.0.0.0 3: v1@if5: <BROADCAST,MULTICAST,UP,LOWER_UP> mtu 1500 qdisc noqueue state UP mode DEFAULT group default qlen 1000 link/ether 72:de:67:0b:28:e1 brd ff:ff:ff:ff:ff:ff link-netnsid 0 4: tunl@NONE: <POINTOPOINT,NOARP,UP,LOWER_UP> mtu 1480 qdisc noqueue state UNKNOWN mode DEFAULT group default qlen 1000 link/ipip 10.10.10.2 peer 10.10.20.2 liruilonger@cloudshell:~$
两个命名空间除了 veth-pair 对应的 veth 虚拟设备,各有个一个 tun 设备,link/ipip 中的内容表示封装后的包的两端地址,即外层IP。
1 2 3 4 5 6 7 8 9 10
liruilonger@cloudshell:~$ sudo ip netns exec ns2 ip link 1: lo: <LOOPBACK> mtu 65536 qdisc noop state DOWN mode DEFAULT group default qlen 1000 link/loopback 00:00:00:00:00:00 brd 00:00:00:00:00:00 2: tunl0@NONE: <NOARP> mtu 1480 qdisc noop state DOWN mode DEFAULT group default qlen 1000 link/ipip 0.0.0.0 brd 0.0.0.0 3: v2@if6: <BROADCAST,MULTICAST,UP,LOWER_UP> mtu 1500 qdisc noqueue state UP mode DEFAULT group default qlen 1000 link/ether f2:dd:3c:7d:eb:50 brd ff:ff:ff:ff:ff:ff link-netnsid 0 4: tunr@NONE: <POINTOPOINT,NOARP,UP,LOWER_UP> mtu 1480 qdisc noqueue state UNKNOWN mode DEFAULT group default qlen 1000 link/ipip 10.10.20.2 peer 10.10.10.2 liruilonger@cloudshell:~$
只有一个机器,这里我们和上面一样使用两个 Linux netowrk namespace node1,node2 来模拟两个主机
创建两个 网络命名空间
1 2 3 4 5
liruilonger@cloudshell:~$ sudo ip netns add node1 liruilonger@cloudshell:~$ sudo ip netns add node2 liruilonger@cloudshell:~$ ip netns list node2 node1
使用 veth 对 来建立通信(VETH1,VETH2),配置 IP
1 2 3 4 5
liruilonger@cloudshell:~$ sudo ip link add veth1 netns node1 type veth peer name veth2 netns node2 liruilonger@cloudshell:~$ sudo ip netns exec node1 ip addr add 192.168.1.2/24 dev veth1 liruilonger@cloudshell:~$ sudo ip netns exec node2 ip addr add 192.168.1.3/24 dev veth2 liruilonger@cloudshell:~$ sudo ip netns exec node1 ip link set dev veth1 up liruilonger@cloudshell:~$ sudo ip netns exec node2 ip link set dev veth2 up
两个命名空间都开启 ipv4 转发,ping 测试
1 2 3 4 5 6 7 8 9 10 11 12 13 14
liruilonger@cloudshell:~$ sudo ip netns exec node1 sysctl -w net.ipv4.ip_forward=1 net.ipv4.ip_forward = 1 liruilonger@cloudshell:~$ sudo ip netns exec node2 sysctl -w net.ipv4.ip_forward=1 net.ipv4.ip_forward = 1 liruilonger@cloudshell:~$ sudo ip netns exec node1 ping -c 3 192.168.1.3 PING 192.168.1.3 (192.168.1.3) 56(84) bytes of data. 64 bytes from 192.168.1.3: icmp_seq=1 ttl=64 time=0.066 ms 64 bytes from 192.168.1.3: icmp_seq=2 ttl=64 time=0.047 ms 64 bytes from 192.168.1.3: icmp_seq=3 ttl=64 time=0.038 ms
liruilonger@cloudshell:~$ sudo ip netns exec node1 ip link add vxlan0 type vxlan id 42 dstport 4789 remote 192.168.1.3 local 192.168.1.2 dev veth1
在名为 node1 的网络命名空间中创建了一个名为 vxlan0 的 VXLAN 接口。
它使用 VXLAN 标识 VID 42,
指定了 VXLAN 流量使用的目标端口号,通常使用 UDP 端口 4789
并设置了远程端点的 IP 地址为 192.168.1.3
本地端点的 IP 地址为 192.168.1.2
该 VXLAN 接口使用veth1作为底层网络接口
1 2 3 4
liruilonger@cloudshell:~$ sudo ip netns exec node1 ip -d link show dev veth1 2: veth1@if2: <BROADCAST,MULTICAST,UP,LOWER_UP> mtu 1500 qdisc noqueue state UP mode DEFAULT group default qlen 1000 link/ether ea:d1:4d:8c:c0:9a brd ff:ff:ff:ff:ff:ff link-netns node2 promiscuity 0 minmtu 68 maxmtu 65535 veth addrgenmode eui64 numtxqueues 2 numrxqueues 2 gso_max_size 65536 gso_max_segs 65535
为刚创建的VXLAN网卡配置IP地址 172.17.1.2/24 并启用它
1 2
liruilonger@cloudshell:~$ sudo ip netns exec node1 ip addr add 172.17.1.2/24 dev vxlan0 liruilonger@cloudshell:~$ sudo ip netns exec node1 ip link set vxlan0 up
liruilonger@cloudshell:~$ sudo ip netns exec node1 ip route 172.17.1.0/24 dev vxlan0 proto kernel scope link src 172.17.1.2 192.168.1.0/24 dev veth1 proto kernel scope link src 192.168.1.2
vxlan0 的 FDB 地址转发表项中的内容如下
1 2 3 4 5
liruilonger@cloudshell:~$ sudo ip netns exec node1 bridge fdb 33:33:00:00:00:01 dev veth1 self permanent 01:00:5e:00:00:01 dev veth1 self permanent 33:33:ff:8c:c0:9a dev veth1 self permanent 00:00:00:00:00:00 dev vxlan0 dst 192.168.1.3 via veth1 self permanent
默认的VTEP对端地址为192.168.1.3。换句话说,原始报文经过vxlan0后会被内核添加上VXLAN头部,而外部UDP头的目的 IP 地址会被冠上192.168.1.3。这里的IP地址即为我们上面的配置的 远程端点 的 IP
在另一个命名空间也进行相同的配置,配置项这里不做说明
1 2
liruilonger@cloudshell:~$ sudo ip netns exec node2 bash root@cs-1080702884152-ephemeral-ne4n:/home/liruilonger# ip link add vxlan0 type vxlan id 42 dstport 4789 remote 192.168.1.2 local 192.168.1.3 dev veth2
1 2 3 4
root@cs-1080702884152-ephemeral-ne4n:/home/liruilonger# ip -d link show dev vxlan0 3: vxlan0: <BROADCAST,MULTICAST> mtu 1450 qdisc noop state DOWN mode DEFAULT group default qlen 1000 link/ether 5a:46:75:cd:ce:9e brd ff:ff:ff:ff:ff:ff promiscuity 0 minmtu 68 maxmtu 65535 vxlan id 42 remote 192.168.1.2 local 192.168.1.3 dev veth2 srcport 0 0 dstport 4789 ttl auto ageing 300 udpcsum noudp6zerocsumtx noudp6zerocsumrx addrgenmode eui64 numtxqueues 1 numrxqueues 1 gso_max_size 65536 gso_max_segs 65535
1 2 3 4 5 6 7 8 9 10
root@cs-1080702884152-ephemeral-ne4n:/home/liruilonger# ip addr add 172.17.1.3/24 dev vxlan0 root@cs-1080702884152-ephemeral-ne4n:/home/liruilonger# ip link set vxlan0 up root@cs-1080702884152-ephemeral-ne4n:/home/liruilonger# ip route 172.17.1.0/24 dev vxlan0 proto kernel scope link src 172.17.1.3 192.168.1.0/24 dev veth2 proto kernel scope link src 192.168.1.3 root@cs-1080702884152-ephemeral-ne4n:/home/liruilonger# bridge fdb 33:33:00:00:00:01 dev veth2 self permanent 01:00:5e:00:00:01 dev veth2 self permanent 33:33:ff:6d:21:bb dev veth2 self permanent 00:00:00:00:00:00 dev vxlan0 dst 192.168.1.2 via veth2 self permanent
测试两个命名空间中 veth 对应的 VTEP 内的 vxlan 设备的连通性
在 node2 对应的网络命令空间 ping node1 的 vxlan IP 地址
1 2 3 4 5 6 7 8 9 10
root@cs-1080702884152-ephemeral-ne4n:/home/liruilonger# ping -c 3 172.17.1.2 PING 172.17.1.2 (172.17.1.2) 56(84) bytes of data. 64 bytes from 172.17.1.2: icmp_seq=1 ttl=64 time=0.088 ms 64 bytes from 172.17.1.2: icmp_seq=2 ttl=64 time=0.062 ms 64 bytes from 172.17.1.2: icmp_seq=3 ttl=64 time=0.063 ms
liruilonger@cloudshell:~$ sudo ip netns exec node1 bash root@cs-1080702884152-ephemeral-ne4n:/home/liruilonger# ping -c 5 172.17.1.3 PING 172.17.1.3 (172.17.1.3) 56(84) bytes of data. 64 bytes from 172.17.1.3: icmp_seq=1 ttl=64 time=0.053 ms 64 bytes from 172.17.1.3: icmp_seq=2 ttl=64 time=0.058 ms 64 bytes from 172.17.1.3: icmp_seq=3 ttl=64 time=0.059 ms 64 bytes from 172.17.1.3: icmp_seq=4 ttl=64 time=0.064 ms 64 bytes from 172.17.1.3: icmp_seq=5 ttl=64 time=0.065 ms
┌──[root@vms100.liruilongs.github.io]-[~/ansible] └─$ansible-console -i host.yaml --limit 192.168.26.103 Welcome to the ansible console. Type help or ? to list commands.
这里小伙伴会发现这个虚拟网卡没有随机 MAC 地址,所有的 MAC 地址为 ee:ee:ee:ee:ee:ee , 也没有IP地址。
向所在的节点发送 ARP 请求后,节点上的代理 ARP 进程将接收到这个请求,应答报文中MAC地址是主机自己的MAC地址,容器的后续报文 IP 地址还是 目的容器,但是 MAC 地址就变成了主机上该网卡的地址
也就是说,所有的报文都会发给主机,主机根据IP地址再进行转发.
主机上这块网卡不管 ARP 请求的内容,直接用自己的 MAC 地址作为应答的行为被称为 ARP proxy ,可以通过以下内核参数检查
在 Linux 内核中,ARP Proxy 是通过 proxy_arp 参数配置的,可以按接口逐一启用。以下是常见的检查和配置方法,1:表示启用了 ARP Proxy
1 2 3 4 5 6 7 8 9
┌──[root@vms100.liruilongs.github.io]-[~/ansible] └─$ansible-console -i host.yaml --limit 192.168.26.103 Welcome to the ansible console. Type help or ? to list commands.
┌──[root@vms100.liruilongs.github.io]-[~/ansible] └─$ansible-console -i host.yaml --limit 192.168.26.105 Welcome to the ansible console. Type help or ? to list commands.
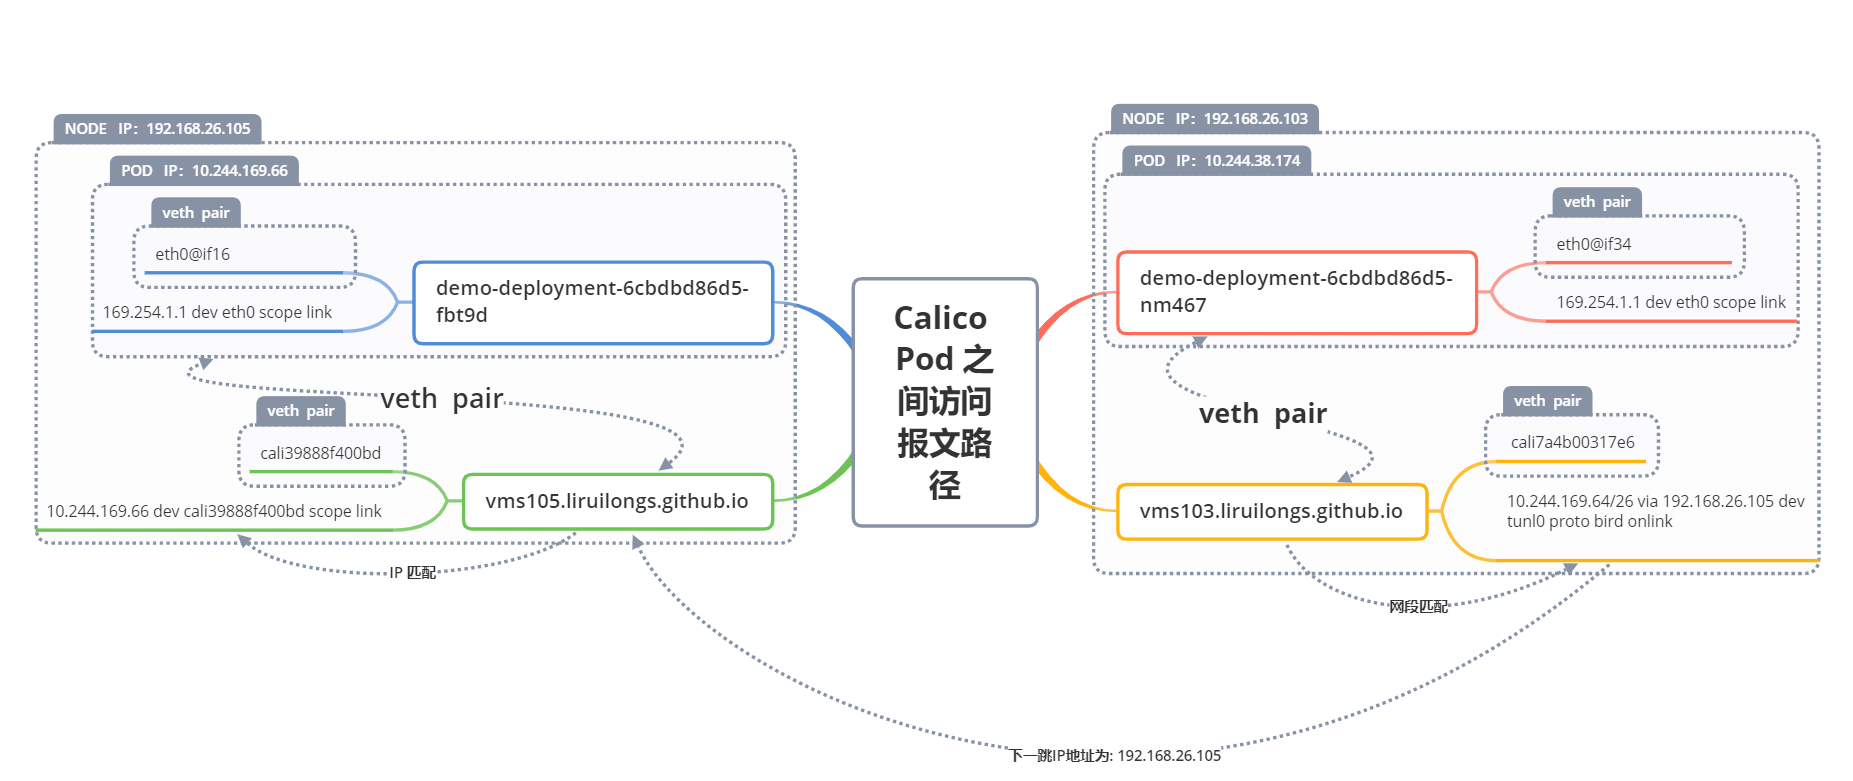
root@all (1)[f:5]# ip route 192.168.26.105 | CHANGED | rc=0 >> default via 192.168.26.2 dev ens32 10.244.31.64/26 via 192.168.26.106 dev tunl0 proto bird onlink 10.244.38.128/26 via 192.168.26.103 dev tunl0 proto bird onlink 10.244.63.64/26 via 192.168.26.102 dev tunl0 proto bird onlink blackhole 10.244.169.64/26 proto bird 10.244.169.65 dev calid5e76ad523e scope link 10.244.169.66 dev cali39888f400bd scope link 10.244.169.70 dev cali0fdeca04347 scope link 10.244.169.73 dev cali7cf9eedbe64 scope link 10.244.169.77 dev calia011d753862 scope link 10.244.169.78 dev caliaa36e67b275 scope link 10.244.169.90 dev califc24aa4e3bd scope link 10.244.169.119 dev calibdca950861e scope link 10.244.169.120 dev cali40813694dd6 scope link 10.244.169.121 dev calie1fd05af50d scope link 10.244.198.0/26 via 192.168.26.101 dev tunl0 proto bird onlink 10.244.239.128/26 via 192.168.26.100 dev tunl0 proto bird onlink 169.254.0.0/16 dev ens32 scope link metric 1002 172.17.0.0/16 dev docker0 proto kernel scope link src 172.17.0.1 192.168.26.0/24 dev ens32 proto kernel scope link src 192.168.26.105
通过路由信息 会匹配10.244.169.66 dev cali39888f400bd scope link 这个路由规则,也就是是创建Pod时在当前节点创建的路由规则
1 2 3 4
root@all (1)[f:5]# ip route | grep 66 192.168.26.105 | CHANGED | rc=0 >> 10.244.169.66 dev cali39888f400bd scope link root@all (1)[f:5]#
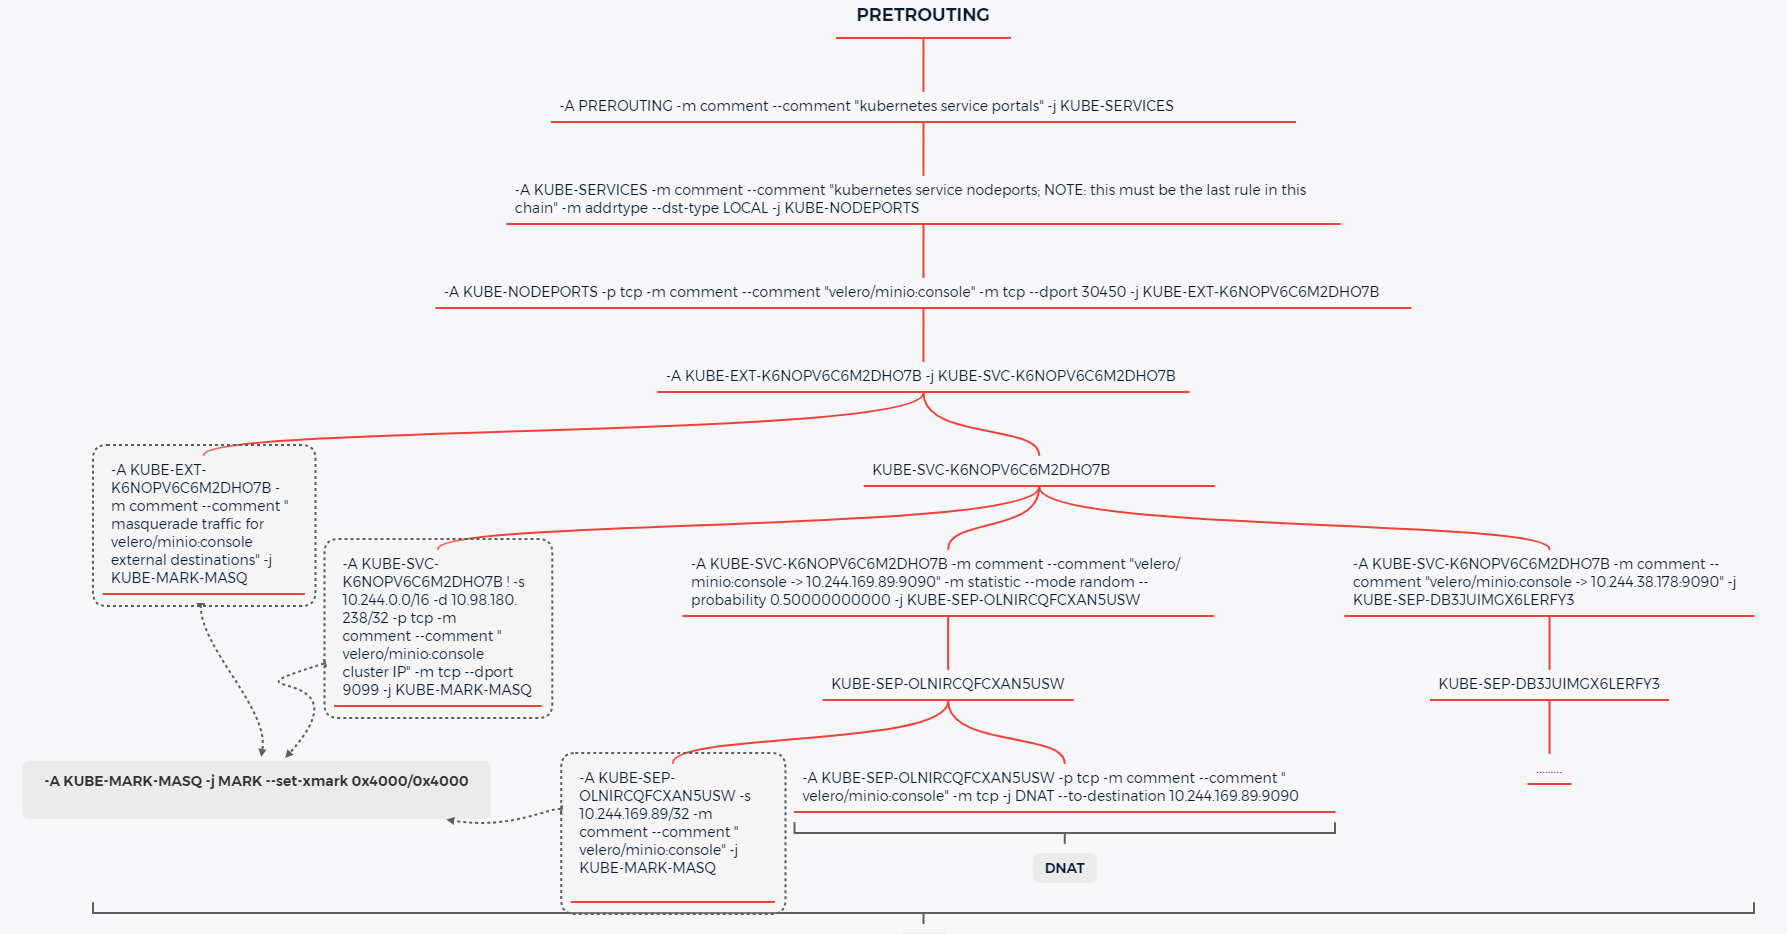
root@all (6)[f:5]# bash -c "iptables-save | grep -e '-j KUBE-NODEPORTS'" 192.168.26.106 | CHANGED | rc=0 >> -A KUBE-SERVICES -m comment --comment "kubernetes service nodeports; NOTE: this must be the last rule in this chain" -m addrtype --dst-type LOCAL -j KUBE-NODEPORTS -A INPUT -m comment --comment "kubernetes health check service ports" -j KUBE-NODEPORTS 192.168.26.102 | CHANGED | rc=0 >> -A KUBE-SERVICES -m comment --comment "kubernetes service nodeports; NOTE: this must be the last rule in this chain" -m addrtype --dst-type LOCAL -j KUBE-NODEPORTS -A INPUT -m comment --comment "kubernetes health check service ports" -j KUBE-NODEPORTS 192.168.26.105 | CHANGED | rc=0 >> -A KUBE-SERVICES -m comment --comment "kubernetes service nodeports; NOTE: this must be the last rule in this chain" -m addrtype --dst-type LOCAL -j KUBE-NODEPORTS -A INPUT -m comment --comment "kubernetes health check service ports" -j KUBE-NODEPORTS 192.168.26.101 | CHANGED | rc=0 >> -A KUBE-SERVICES -m comment --comment "kubernetes service nodeports; NOTE: this must be the last rule in this chain" -m addrtype --dst-type LOCAL -j KUBE-NODEPORTS -A INPUT -m comment --comment "kubernetes health check service ports" -j KUBE-NODEPORTS 192.168.26.100 | CHANGED | rc=0 >> -A KUBE-SERVICES -m comment --comment "kubernetes service nodeports; NOTE: this must be the last rule in this chain" -m addrtype --dst-type LOCAL -j KUBE-NODEPORTS -A INPUT -m comment --comment "kubernetes health check service ports" -j KUBE-NODEPORTS 192.168.26.103 | CHANGED | rc=0 >> -A KUBE-SERVICES -m comment --comment "kubernetes service nodeports; NOTE: this must be the last rule in this chain" -m addrtype --dst-type LOCAL -j KUBE-NODEPORTS -A INPUT -m comment --comment "kubernetes health check service ports" -j KUBE-NODEPORTS root@all (6)[f:5]#
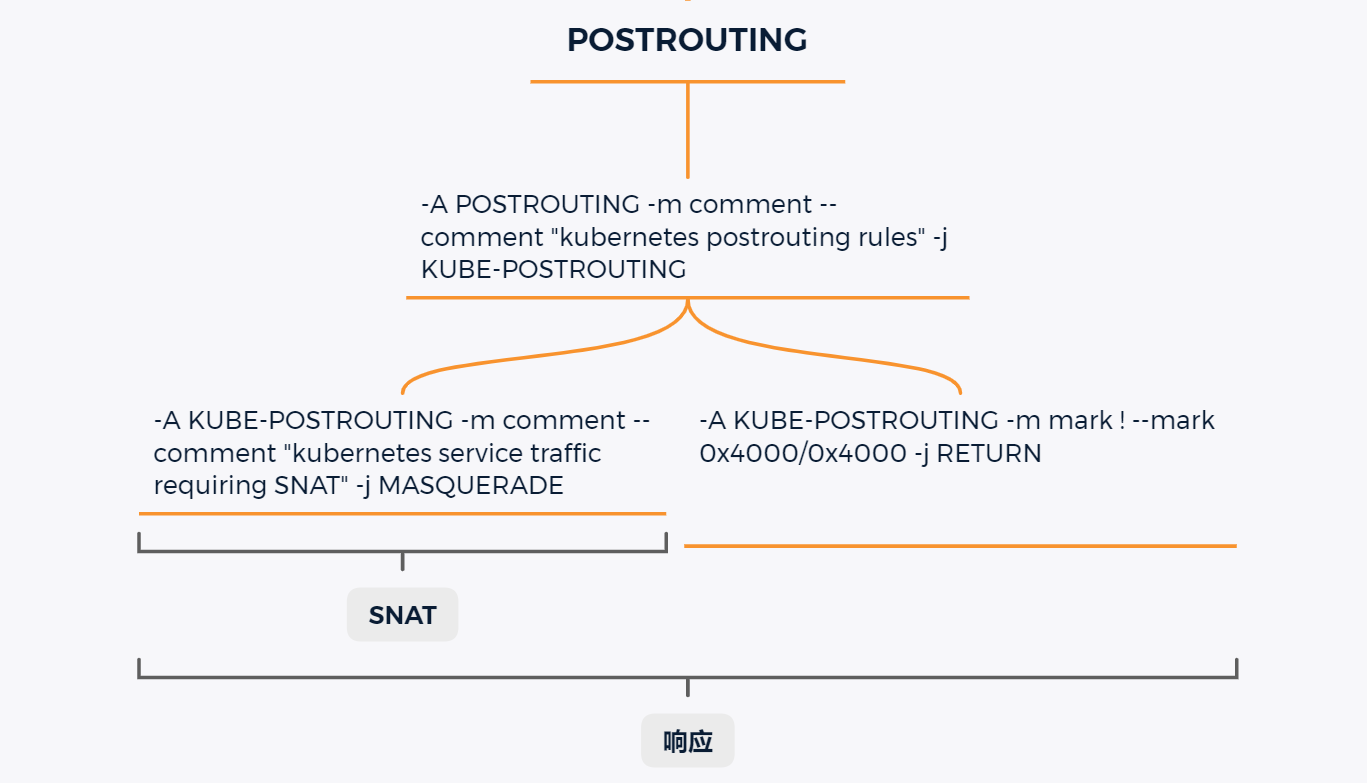
通过KUBE-NODEPORTS这条链可以看到,跳转到了 KUBE-NODEPORTS
1 2 3 4 5 6 7 8 9 10 11 12 13 14 15 16 17 18 19
root@all (6)[f:5]# bash -c "iptables-save | grep -e '-j KUBE-NODEPORTS'" 192.168.26.106 | CHANGED | rc=0 >> -A KUBE-SERVICES -m comment --comment "kubernetes service nodeports; NOTE: this must be the last rule in this chain" -m addrtype --dst-type LOCAL -j KUBE-NODEPORTS -A INPUT -m comment --comment "kubernetes health check service ports" -j KUBE-NODEPORTS 192.168.26.102 | CHANGED | rc=0 >> -A KUBE-SERVICES -m comment --comment "kubernetes service nodeports; NOTE: this must be the last rule in this chain" -m addrtype --dst-type LOCAL -j KUBE-NODEPORTS -A INPUT -m comment --comment "kubernetes health check service ports" -j KUBE-NODEPORTS 192.168.26.105 | CHANGED | rc=0 >> -A KUBE-SERVICES -m comment --comment "kubernetes service nodeports; NOTE: this must be the last rule in this chain" -m addrtype --dst-type LOCAL -j KUBE-NODEPORTS -A INPUT -m comment --comment "kubernetes health check service ports" -j KUBE-NODEPORTS 192.168.26.101 | CHANGED | rc=0 >> -A KUBE-SERVICES -m comment --comment "kubernetes service nodeports; NOTE: this must be the last rule in this chain" -m addrtype --dst-type LOCAL -j KUBE-NODEPORTS -A INPUT -m comment --comment "kubernetes health check service ports" -j KUBE-NODEPORTS 192.168.26.100 | CHANGED | rc=0 >> -A KUBE-SERVICES -m comment --comment "kubernetes service nodeports; NOTE: this must be the last rule in this chain" -m addrtype --dst-type LOCAL -j KUBE-NODEPORTS -A INPUT -m comment --comment "kubernetes health check service ports" -j KUBE-NODEPORTS 192.168.26.103 | CHANGED | rc=0 >> -A KUBE-SERVICES -m comment --comment "kubernetes service nodeports; NOTE: this must be the last rule in this chain" -m addrtype --dst-type LOCAL -j KUBE-NODEPORTS -A INPUT -m comment --comment "kubernetes health check service ports" -j KUBE-NODEPORTS
然后在跟 KUBE-NODEPORTS 这条链,发现是从 PREROUTING 这条内置链跳转的
1 2 3 4 5 6 7 8 9 10 11 12 13 14
root@all (6)[f:5]# bash -c "iptables-save | grep -e '-j KUBE-SERVICES' | grep PREROUTING" 192.168.26.106 | CHANGED | rc=0 >> -A PREROUTING -m comment --comment "kubernetes service portals" -j KUBE-SERVICES 192.168.26.101 | CHANGED | rc=0 >> -A PREROUTING -m comment --comment "kubernetes service portals" -j KUBE-SERVICES 192.168.26.102 | CHANGED | rc=0 >> -A PREROUTING -m comment --comment "kubernetes service portals" -j KUBE-SERVICES 192.168.26.100 | CHANGED | rc=0 >> -A PREROUTING -m comment --comment "kubernetes service portals" -j KUBE-SERVICES 192.168.26.105 | CHANGED | rc=0 >> -A PREROUTING -m comment --comment "kubernetes service portals" -j KUBE-SERVICES 192.168.26.103 | CHANGED | rc=0 >> -A PREROUTING -m comment --comment "kubernetes service portals" -j KUBE-SERVICES root@all (6)[f:5]#
┌──[root@vms100.liruilongs.github.io]-[~/ansible] └─$ansible-console -i host.yaml --limit 192.168.26.100 Welcome to the ansible console. Type help or ? to list commands.
root@all (1)[f:5]# bash -c "route" 192.168.26.100 | CHANGED | rc=0 >> Kernel IP routing table Destination Gateway Genmask Flags Metric Ref Use Iface default 192.168.26.2 0.0.0.0 UG 0 0 0 ens32 10.244.31.64 vms106.liruilon 255.255.255.192 UG 0 0 0 tunl0 10.244.38.128 vms103.liruilon 255.255.255.192 UG 0 0 0 tunl0 10.244.63.64 vms102.liruilon 255.255.255.192 UG 0 0 0 tunl0 10.244.169.64 vms105.liruilon 255.255.255.192 UG 0 0 0 tunl0 10.244.198.0 vms101.liruilon 255.255.255.192 UG 0 0 0 tunl0 10.244.239.128 0.0.0.0 255.255.255.192 U 0 0 0 * 10.244.239.129 0.0.0.0 255.255.255.255 UH 0 0 0 calic2f7856928d 10.244.239.132 0.0.0.0 255.255.255.255 UH 0 0 0 cali349ff1af8c4 link-local 0.0.0.0 255.255.0.0 U 1002 0 0 ens32 172.17.0.0 0.0.0.0 255.255.0.0 U 0 0 0 docker0 192.168.26.0 0.0.0.0 255.255.255.0 U 0 0 0 ens32 root@all (1)[f:5]# bash -c "ip route | grep 169" 192.168.26.100 | CHANGED | rc=0 >> 10.244.169.64/26 via 192.168.26.105 dev tunl0 proto bird onlink ......
IP 为 10.244.169.89,通过路由信息查看可以确认,它匹配 10.244.169.64/26 via 192.168.26.105 dev tunl0 proto bird onlink 这一条路由
这条路由信息表示 它匹配 10.244.169.64/26 这个网段(2^(32-掩码位数)-2,10.244.169.64到10.244.169.127)的 IP ,并且说明下一跳地址为 192.168.26.105.
查看所有节点的路由信息,我们发现 192.168.26.105 这个节点路由没有,直接丢弃了相关的包,这是因为下一跳地址即是 192.168.26.105,即 Pod 位于这个节点。
1 2 3 4 5 6 7 8 9 10 11 12 13 14
root@all (6)[f:5]# bash -c "ip route | grep 10.244.169.64" 192.168.26.101 | CHANGED | rc=0 >> 10.244.169.64/26 via 192.168.26.105 dev tunl0 proto bird onlink 192.168.26.102 | CHANGED | rc=0 >> 10.244.169.64/26 via 192.168.26.105 dev tunl0 proto bird onlink 192.168.26.105 | CHANGED | rc=0 >> blackhole 10.244.169.64/26 proto bird 192.168.26.100 | CHANGED | rc=0 >> 10.244.169.64/26 via 192.168.26.105 dev tunl0 proto bird onlink 192.168.26.106 | CHANGED | rc=0 >> 10.244.169.64/26 via 192.168.26.105 dev tunl0 proto bird onlink 192.168.26.103 | CHANGED | rc=0 >> 10.244.169.64/26 via 192.168.26.105 dev tunl0 proto bird onlink root@all (6)[f:5]#
所以这里要分两种情况,当 NodePort 访问使用 IP地址 不是 Pod 所在实际的 节点IP时, 会通过路由表跳转过去,当使用Pod所在节点IP 访问,则不需要走路由表获取下一跳地址。
到达目标节点 192.168.26.105 之后,任然要读取路由表,通过下面代码可以看到,通过路由条目 10.244.169.89 dev calia011d753862 scope link 即把对 PodIP 的请求给了虚拟网卡 calia011d753862,这其实是一对 veth pair ,数据包会直接到 对应的 Pod 内的虚拟网卡,也就是我要访问的 Pod。
1 2 3 4 5 6 7 8 9 10 11 12 13
┌──[root@vms100.liruilongs.github.io]-[~/ansible] └─$ansible-console -i host.yaml --limit 192.168.26.105 Welcome to the ansible console. Type help or ? to list commands.
root@all (1)[f:5]# bash -c "ip route | grep 89" 192.168.26.105 | CHANGED | rc=0 >> 10.244.169.89 dev calia011d753862 scope link root@all (1)[f:5]# bash -c "docker ps | grep minio" 192.168.26.105 | CHANGED | rc=0 >> 408fdb941f59 cf9a50a36310 "/usr/bin/docker-ent…" About an hour ago Up About an hour k8s_minio_minio-b6d98746c-m7rzc_velero_1e9b20fc-1a68-4c2a-bb8f-80072e3c5dab_6 ea6fa7f2174f registry.aliyuncs.com/google_containers/pause:3.8 "/pause" About an hour ago Up About an hour k8s_POD_minio-b6d98746c-m7rzc_velero_1e9b20fc-1a68-4c2a-bb8f-80072e3c5dab_6 root@all (1)[f:5]#
我们可直接进入工作节点查看,容器网卡和节点网卡的对应关系。
1 2 3 4 5 6 7 8 9 10 11 12
┌──[root@vms100.liruilongs.github.io]-[~/ansible] └─$ssh root@192.168.26.105 Last login: Sat Apr 8 10:51:08 2023 from 192.168.26.100 ┌──[root@vms105.liruilongs.github.io]-[~] └─$dockerexec -it 408fdb941f59 bash [root@minio-b6d98746c-m7rzc /]# cat /sys/class/net/eth0/iflink 7 [root@minio-b6d98746c-m7rzc /]# exit exit ┌──[root@vms105.liruilongs.github.io]-[~] └─$ip a | grep "7:" 7: calia011d753862@if3: <BROADCAST,MULTICAST,UP,LOWER_UP> mtu 1480 qdisc noqueue state UP
到这一步,数据包由 NodeIP:NodePort 到了 PodIP:PodPort ,实现了 对 Pod 的请求。
┌──[root@vms100.liruilongs.github.io]-[~/ansible] └─$ansible-console -i host.yaml --limit 192.168.26.100 Welcome to the ansible console. Type help or ? to list commands.