不加思考地滥读或无休止地读书,所读过的东西无法刻骨铭心,其大部分终将消失殆尽。——叔本华
写在前面 不加思考地滥读或无休止地读书,所读过的东西无法刻骨铭心,其大部分终将消失殆尽。——叔本华
容器使用cgroup对资源进行限制 下面问Docker服务的信息,我们可以看到他使用的资源控制驱动为systemd
1
2
3
4
5
6
7
8
9
10
11
12
13
14
15
16
17
18
19
20
21
[root@liruilong ~] Containers: 4 Running: 2 Paused: 0 Stopped: 2 Images: 3 Server Version: 1.13.1 Storage Driver: overlay2 Backing Filesystem: extfs Supports d_type: true Native Overlay Diff: true Logging Driver: journald Cgroup Driver: systemd Plugins: Volume: local Network: bridge host macvlan null overlay Swarm: inactive Runtimes: docker-runc runc Default Runtime: docker-runc Init Binary: /usr/libexec/docker/docker-init-current containerd version: (expected: aa8187dbd3b7ad67d8e5e3a15115d3eef43a7ed1)
容器内存限制:-m 200M 1 2 3 4 5 6 7 8 ┌──[root@liruilongs.github.io]-[/] └─$ docker run -itd --name=c2 -m 200M centos 3b2df1738e84159f4fa02dadbfc285f6da8ddde4d94cb449bc775c9a70eaa4ea ┌──[root@liruilongs.github.io]-[/] └─$ docker stats CONTAINER ID NAME CPU % MEM USAGE / LIMIT MEM % NET I/O BLOCK I/O PIDS 3b2df1738e84 c2 0.00% 528KiB / 200MiB 0.26% 648B / 0B 0B / 0B 1 55e45b34d93d c1 0.00% 8.684MiB / 3.843GiB 0.22% 648B / 0B 30.5MB / 11.5MB 2
对容器CPU的限制:-cpuset-cpus 0 1 2 3 4 5 ┌──[root@liruilongs.github.io]-[/] └─$ ps mo pid,psr $(pgrep cat) ┌──[root@liruilongs.github.io]-[/] └─$ docker run -itd --name=c3 --cpuset-cpus 0 -m 200M centos a771eed8c7c39cd410bd6f43909a67bfcf181d87fcafffe57001f17f3fdff408
Cgroup作为Linux内核技术之一,不论是系统调优还是在容器技术中都会用到,那Cgroup到底是什么呢?简单讲,它是Linux内核的一个功能,由Systemd在系统启动时引导,我们通过Cgroups (Control Groups) 来实现资源管理,资源隔离等,比如限制一个进程组对系统资源的使用上限,这里的资源包括CPU、内存、Block I/O等。关于如何限制,简单说,就是把一些进程放到一个Cgroup组里面,然后通过给这个Cgroup分配一定的资源,从而达到限制的目的。
第 1 章 Cgroup简介 1.1. 什么是Cgroup Cgroup(control group) 是Linux kernel(Linux内核)的一项功能:
在一个系统中运行的层级制进程组,可对其进行资源分配(如CPU时间、系统内存、网络带宽或者这些资源的组合)。
通过使用cgroup ,系统管理员在分配、排序、拒绝、管理和监控系统资源等方面,可以进行精细化控制。硬件资源可以在应用程序和用户间智能分配,从而增加整体效率。
Cgroup可对进程进行层级式分组并标记,并对其可用资源进行限制。
传统情况下,所有的进程分得的系统资源数量相近,管理员用进程niceness值进行调节。
但是用niceness值进行调节,包含大量进程的应用程序可以比包含少量进程的应用程序获得更多资源,这与应用程序的重要程度无关。
通过将cgroup层级系统与systemd单位树捆绑, Linux 可以把资源管理设置从进程级别移至应用程序级别。
可以使用systemctl指令,或者通过修改systemd单位文件来管理系统资源。
在 Linux 7之前的版本中,系统管理员使用libcgroup软件包中的cgconfig指令来建立自定义cgroup层级。但现在,这个软件包已经过时也不被推荐使用,因为它很容易与默认的cgroup层级产生冲突。然而,在一些特定情况下, libcgroup仍然可用,如systemd不可用时,或使用net-prio子系统时。
1.2. cgroup的默认层级 默认情况下, systemd会自动创建slice, scope和service单位的层级,来为cgroup树提供统一结构。使用systemctl指令,您可以通过创建自定义slice进一步修改此结构, systemd也自动为/sys/fs/cgroup/目录中重要的kernel资源管控器挂载层级。
在系统的开机阶段,systemd 会把支持的 controllers (subsystem 子系统)挂载到默认的 /sys/fs/cgroup/ 目录下面:
1 2 3 4 5 6 7 8 9 10 11 12 13 14 15 16 17 18 19 20 21 22 23 24 ┌──[root@liruilongs.github.io]-[~] └─$ ls /sys/fs/cgroup/ blkio cpuacct cpuset freezer memory net_cls,net_prio perf_event systemd cpu cpu,cpuacct devices hugetlb net_cls net_prio pids ┌──[root@liruilongs.github.io]-[~] └─$ ll /sys/fs/cgroup/ total 0 drwxr-xr-x 5 root root 0 Oct 13 01:53 blkio lrwxrwxrwx 1 root root 11 Oct 13 01:53 cpu -> cpu,cpuacct lrwxrwxrwx 1 root root 11 Oct 13 01:53 cpuacct -> cpu,cpuacct drwxr-xr-x 5 root root 0 Oct 13 01:53 cpu,cpuacct drwxr-xr-x 2 root root 0 Oct 13 01:53 cpuset drwxr-xr-x 5 root root 0 Oct 13 01:53 devices drwxr-xr-x 2 root root 0 Oct 13 01:53 freezer drwxr-xr-x 2 root root 0 Oct 13 01:53 hugetlb drwxr-xr-x 5 root root 0 Oct 13 01:53 memory lrwxrwxrwx 1 root root 16 Oct 13 01:53 net_cls -> net_cls,net_prio drwxr-xr-x 2 root root 0 Oct 13 01:53 net_cls,net_prio lrwxrwxrwx 1 root root 16 Oct 13 01:53 net_prio -> net_cls,net_prio drwxr-xr-x 2 root root 0 Oct 13 01:53 perf_event drwxr-xr-x 2 root root 0 Oct 13 01:53 pids drwxr-xr-x 5 root root 0 Oct 13 01:53 systemd ┌──[root@liruilongs.github.io]-[~] └─$
除了systemd目录外,其它目录都是对应的 subsystem。/sys/fs/cgroup/systemd 目录是systemd维护的自己使用的非subsystem的 cgroups 层级结构。
systemd 的单位类型 系统中运行的所有进程,都是 systemd init 进程的子进程。在资源管控方面,systemd 提供了三种单位类型:
service service : 一个或一组进程,由 systemd 依据单位配置文件启动。service 对指定进程进行封装,这样进程可以作为一个整体被启动或终止。service 参照以下方式命名:
scope scope : 一组外部创建的进程。由强制进程通过 fork() 函数启动和终止、之后被 systemd 在运行时注册的进程,scope 会将其封装。例如:用户会话、 容器和虚拟机被认为是 scope。scope 的命名方式如下:
slice slice : 一组按层级排列的单位。slice 并不包含进程,但会组建一个层级,并将 scope 和 service 都放置其中。真正的进程包含在 scope 或 service 中。在这一被划分层级的树中,每一个 slice 单位的名字对应通向层级中一个位置的路径。小横线(“-“)起分离路径组件的作用。例如,如果一个 slice 的名字是:
这说明 parent-name.slice 是 parent.slice 的一个子 slice。这一子 slice 可以再拥有自己的子 slice,被命名为:parent-name-name2.slice,以此类推。
service、scope 和 slice 单位直接映射到 cgroup 树中的对象。当这些单位被激活,它们会直接一一映射到由单位名建立的 cgroup 路径中。例如,ex.service 属于 test-waldo.slice,会直接映射到 cgroup test.slice/test-waldo.slice/ex.service/ 中。
service、scope 和slice是由系统管理员手动创建或者由程序动态创建的。默认情况下, 操作系统会定义一些运行系统必要的内置 service。另外,默认情况下,系统会创建四种 slice:
slice:
描述
-.slice
根 slice;
system.slice
所有系统 service 的默认位置;
user.slice
所有用户会话的默认位置;
machine.slice
所有虚拟机和 Linux 容器的默认位置。
请注意,所有的用户会话、虚拟机和容器进程会被自动放置在一个单独的scope单元中。而且,所有的用户会分得一个隐含子 slice(implicit subslice)。除了上述的默认配置,系统管理员可能会定义新的 slice,并将 service 和 scope 置于其中。
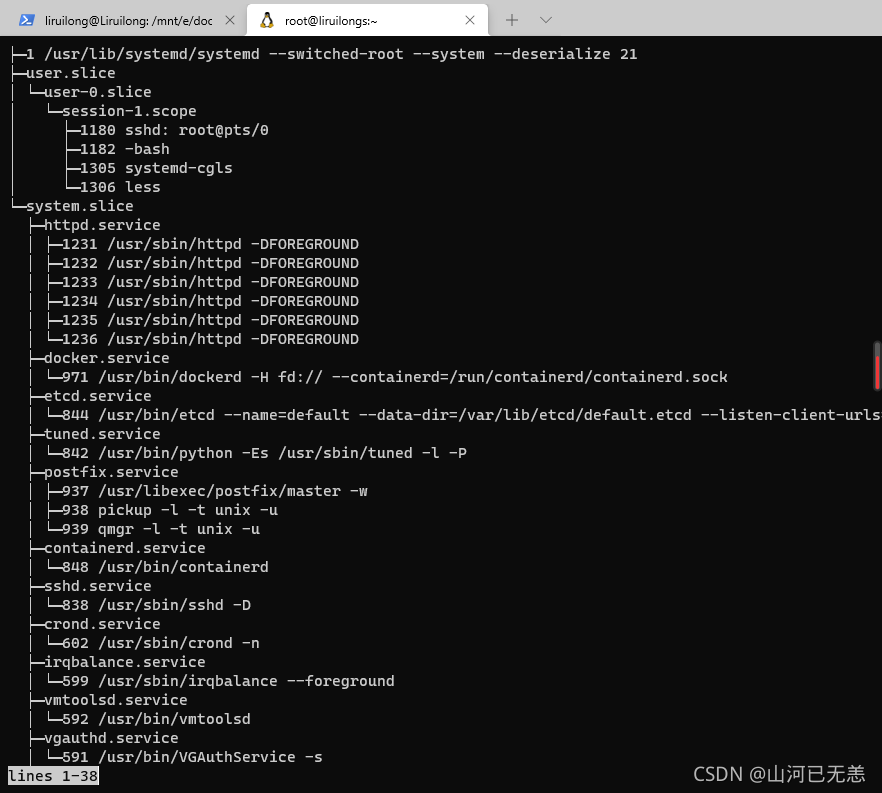
1 2 3 4 5 6 7 8 9 10 11 12 13 14 15 16 17 18 19 20 21 22 23 24 25 26 27 28 29 30 31 32 33 34 35 36 37 38 39 40 41 42 43 44 45 46 47 48 49 50 51 52 53 54 55 56 57 58 59 60 61 62 63 64 65 66 67 68 69 70 71 72 73 74 75 76 77 ├─1 /usr/lib/systemd/systemd --switched-root --system --deserialize 21 ├─docker │ ├─3254bcd54a7b2b1a5ece2ca873ab18c3215484e6b4f83617a522afe4e853c378 │ │ ├─11885 /home/weave/runsvinit │ │ ├─11902 /sbin/runsvdir /etc/service │ │ ├─11903 runsv probe │ │ ├─11904 runsv app │ │ ├─11907 scope-probe --mode probe --probe.docker=true │ │ └─11908 scope-app --mode app --probe.docker=true │ ├─b867272463dffc7a2f698848a622e33ed59a2176da89b99038e451eaf181bc57 │ │ └─11484 /usr/bin/cadvisor -logtostderr │ ├─a771eed8c7c39cd410bd6f43909a67bfcf181d87fcafffe57001f17f3fdff408 │ │ ├─11310 /bin/bash │ │ └─11361 bash │ ├─3b2df1738e84159f4fa02dadbfc285f6da8ddde4d94cb449bc775c9a70eaa4ea │ │ └─11086 /bin/bash │ └─55e45b34d93d0a36a06283c90e7da9097ad3d85d26dfbdc9d07d2e45aeced8f1 │ └─10677 /bin/bash ├─user.slice │ └─user-0.slice │ ├─session-169.scope │ │ ├─26654 sshd: root@pts/2 │ │ ├─26656 -bash │ │ └─26925 systemd-cgls │ ├─session-166.scope │ │ ├─25790 sshd: root@pts/1 │ │ └─25792 -bash │ └─session-158.scope │ ├─24025 sshd: root@pts/0 │ └─24027 -bash └─system.slice ├─docker.service │ ├─10151 /usr/bin/dockerd -H fd:// --containerd=/run/containerd/containerd... │ ├─11445 /usr/bin/docker-proxy -proto tcp -host-ip 0.0.0.0 -host-port 8080... │ └─11452 /usr/bin/docker-proxy -proto tcp -host-ip :: -host-port 8080 -con... ├─postfix.service │ ├─ 1027 /usr/libexec/postfix/master -w │ ├─ 1043 qmgr -l -t unix -u │ └─26337 pickup -l -t unix -u ├─tuned.service │ └─943 /usr/bin/python -Es /usr/sbin/tuned -l -P ├─sshd.service │ └─942 /usr/sbin/sshd -D ├─containerd.service │ ├─ 946 /usr/bin/containerd │ ├─10656 /usr/bin/containerd-shim-runc-v2 -namespace moby -id 55e45b34d93d... │ ├─11066 /usr/bin/containerd-shim-runc-v2 -namespace moby -id 3b2df1738e84... │ ├─11288 /usr/bin/containerd-shim-runc-v2 -namespace moby -id a771eed8c7c3... │ ├─11465 /usr/bin/containerd-shim-runc-v2 -namespace moby -id b867272463df... │ └─11865 /usr/bin/containerd-shim-runc-v2 -namespace moby -id 3254bcd54a7b... ├─crond.service │ └─605 /usr/sbin/crond -n ├─rsyslog.service │ └─600 /usr/sbin/rsyslogd -n ├─dbus.service │ └─590 /bin/dbus-daemon --system --address=systemd: --nofork --nopidfile -... ├─irqbalance.service │ └─589 /usr/sbin/irqbalance --foreground ├─polkit.service │ └─586 /usr/lib/polkit-1/polkitd --no-debug ├─vmtoolsd.service │ └─583 /usr/bin/vmtoolsd ├─vgauthd.service │ └─582 /usr/bin/VGAuthService -s ├─chronyd.service │ └─594 /usr/sbin/chronyd ├─systemd-logind.service │ └─542 /usr/lib/systemd/systemd-logind ├─auditd.service │ └─495 /sbin/auditd ├─systemd-udevd.service │ └─463 /usr/lib/systemd/systemd-udevd ├─system-getty.slice │ └─getty@tty1.service │ └─612 /sbin/agetty --noclear tty1 linux └─systemd-journald.service └─438 /usr/lib/systemd/systemd-journald
service 和 scope 包含进程,但被放置在不包含它们自身进程的 slice 里。唯一例外是位于特殊 systemd.slice 中的 PID 1。请注意,-.slice 未被显示,因为它被整体树的根隐性识别。
service 和 slice 单位可通过永久单位文件来配置;或者对 PID 1 进行 API 调用,在运行时动态创建。scope 单位只能以第一种方式创建。API 调用动态创建的单位是临时的,并且仅在运行时存在。一旦结束、被关闭或者系统重启,临时单位会被自动释放。
1.3. Linux Kernel 的资源管控器 资源管控器(也称为cgroup子系统)代表一种单一资源:如 CPU 时间或者内存。Linux kernel 提供一系列资源管控器,由 systemd 自动挂载。如需参考目前已挂载的资源管控器列表,请参见 /proc/cgroups,或使用 lssubsys 监控工具。在 Linux 7 中,systemd 默认挂载以下管控器:
Linux 7 中可用的管控器
管控器
dest
blkio
对输入 ∕ 输出访问存取块设备设定权限;
cpu
使用 CPU 调度程序让 cgroup 的任务可以存取 CPU。它与 cpuacct 管控器一起挂载在同一 mount 上;
cpuacct
自动生成 cgroup 中任务占用 CPU 资源的报告。它与 cpu 管控器一起挂载在同一 mount 上;
cpuset
给 cgroup 中的任务分配独立 CPU(在多芯系统中)和内存节点;
devices
允许或禁止 cgroup 中的任务存取设备;
freezer
暂停或恢复 cgroup 中的任务;
memory
对 cgroup 中的任务可用内存做出限制,并且自动生成任务占用内存资源报告;
net_cls
使用等级识别符(classid)标记网络数据包,这让 Linux 流量控制器(tc 指令)可以识别来自特定 cgroup 任务的数据包;
perf_event
允许使用 perf 工具来监控 cgroup;
hugetlb
允许使用大篇幅的虚拟内存页,并且给这些内存页强制设定可用资源量。
Linux Kernel 展示了一系列可用 systemd 配置的资源管控器可调参数。参数的详细描述请参阅 kernel 文档(kernel 管控器专项介绍 的参考列表)。
第 2 章 使用Cgroup 创建、管理Cgroup相关的任务。systemd 用于管理cgroup,是被推荐方式并会在将来版本中被支持,
2.1. 创建Cgroup 从 systemd 的角度来看,cgroup 会连接到一个系统单位,此单位可用单位文件进行配置、用systemd命令列实用工具进行管理。根据应用的类型,您的资源管理设定可以是 ** transient(临时的) 或者 persistent(永久的) **。
要为服务创建 transient cgroup(临时 cgroup),请使用 systemd-run 指令启动此服务。如此,可以限制此服务在运行时所用资源。对 systemd 进行 API 调用,应用程序可以动态创建临时 cgroup。服务一旦停止,临时单位就会被自动移除。
要给服务分配 persistent cgroup(永久 cgroup),请对其单位配置文件进行编写。系统重启后,此项配置会被保留,所以它可以用于管理自动启动的服务。请注意,scope 单位不能以此方式创建。
2.1.1. 用 systemd-run 创建临时 cgroup systemd-run 指令用于 创建、启动临时 service 或 scope 单位,并在此单位中运行自定义指令 。 在 service 单位中执行的指令在后台非同步启动,它们从 systemd 进程中被调用。在 scope 单位中运行的指令直接从 systemd-run 进程中启动,因此从调用方继承执行状态。此情况下的执行是同步的。
在一个指定 cgroup 中运行指令,请以 root 身份输入
1 systemd-run --unit=name --scope --slice=slice_name command
–
name 代表您想要此单位被识别的名称。如果 --unit 没有被指定,单位名称会自动生成。建议选择一个描述性的名字,因为它将代表 systemctl 输出中的单位。在单位运行时期间,此名字需为独一无二的。
使用可选的 --scope 参数创建临时scope单位来替代默认创建的service单位。
--slice 选项,让您新近创建的service或scope单位可以成为指定slice的一部分。用现存 slice(如 systemctl -t slice 输出所示)的名字替代 slice_name,或者通过传送一个独有名字来创建新 slice。默认情况下,service 和 scope 做为 system.slice 的一部分被创建。
用您希望在service单位中运行的指令替代 command。将此指令放置于systemd-run句法的最末端。这样,此指令的参数就不会与 systemd-run 参数混淆。
上述选项外,systemd-run 也有一些其它可用参数。例如,–description 可以创建对单位的描述;service 进程结束后,--remain-after-exit 可以收集运行时信息;--machine 选项可以在密闭容器中执行指令
用 systemd-run 来启动新 service 临时创建一个Service,并添加到指定的slice上。
1 2 3 4 5 6 7 8 9 10 11 12 13 14 15 16 17 18 19 20 21 22 23 24 25 26 27 ┌──[root@liruilongs.github.io]-[~] └─$ systemd-run --unit=toptest --slice=test top -b Running as unit toptest.service. ┌──[root@liruilongs.github.io]-[~] └─$ systemctl status toptest.service ● toptest.service - /usr/bin/top -b Loaded: loaded (/run/systemd/system/toptest.service; static; vendor preset: disabled) Drop-In: /run/systemd/system/toptest.service.d └─50-Description.conf, 50-ExecStart.conf, 50-Slice.conf Active: active (running) since Wed 2021-10-13 01:12:43 CST; 50s ago Main PID: 27671 (top) CGroup: /test.slice/toptest.service └─27671 /usr/bin/top -b Oct 13 01:13:31 liruilongs.github.io top[27671]: 24025 root 20 0 145704 5332 4072 S 0.0 0.1 0:0... sshd Oct 13 01:13:31 liruilongs.github.io top[27671]: 24027 root 20 0 116024 2812 1784 S 0.0 0.1 0:0... bash Oct 13 01:13:31 liruilongs.github.io top[27671]: 24926 root 20 0 0 0 0 S 0.0 0.0 0:0...er/u+ Oct 13 01:13:31 liruilongs.github.io top[27671]: 25314 root 20 0 0 0 0 S 0.0 0.0 0:0...er/0+ Oct 13 01:13:31 liruilongs.github.io top[27671]: 25790 root 20 0 145704 5328 4072 S 0.0 0.1 0:0... sshd Oct 13 01:13:31 liruilongs.github.io top[27671]: 25792 root 20 0 115784 2440 1636 S 0.0 0.1 0:0... bash Oct 13 01:13:31 liruilongs.github.io top[27671]: 26067 root 20 0 0 0 0 S 0.0 0.0 0:0...er/0+ Oct 13 01:13:31 liruilongs.github.io top[27671]: 26337 postfix 20 0 89648 4028 3016 S 0.0 0.1 0:0...ickup Oct 13 01:13:31 liruilongs.github.io top[27671]: 27425 root 20 0 0 0 0 S 0.0 0.0 0:0...er/1+ Oct 13 01:13:31 liruilongs.github.io top[27671]: 27530 root 20 0 0 0 0 S 0.0 0.0 0:0...er/1+ Hint: Some lines were ellipsized, use -l to show in full. ┌──[root@liruilongs.github.io]-[~] └─$
检查Cgroup的层级
1 2 3 4 5 6 7 8 9 10 11 12 ┌──[root@liruilongs.github.io]-[~] └─$ systemd-cgls ├─1 /usr/lib/systemd/systemd --switched-root --system --deserialize 21 ├─test.slice │ └─toptest.service │ └─27671 /usr/bin/top -b ├─docker │ ├─3254bcd54a7b2b1a5ece2ca873ab18c3215484e6b4f83617a522afe4e853c378 │ │ ├─11885 /home/weave/runsvinit │ │ ├─11902 /sbin/runsvdir /etc/service │ │ ├─11903 runsv probe ........
2.1.2. 创建永久 cgroup 若要在系统启动时,配置一个自动启动的单位,请执行 systemctl enable 指令。自动运行此指令会在 /usr/lib/systemd/system/ 目录中创建单位文件。如要对cgroup做出永久改变,请添加或修改其单位文件中的配置参数。更多信息,请参阅〈第 2.3.2 节 “修改单位文件”〉。
2.2. 删除Cgroup 临时cgroup所包含的进程一旦结束,临时cgroup就会被自动释放。通过将--remain-after-exit选项传递给 systemd-run,您可以在其进程结束后,让单位继续运行来收集运行时的信息。如要单位停止运行,请输入:
1 systemctl stop name.service
如果您希望一个service停止运行,请将name替换成此service的名字。如要终止一个或多个单位中的进程,请以root身份输入:
1 systemctl kill name.service --kill-who=PID,... --signal=signal
用单位名(如 httpd.service)替代 name。使用 --kill-who 从 cgroup 中挑选您希望结束的进程。如要同时终止多项进程,请传送一份 PID 的逗号分隔列表。用您希望发送至指定进程的POSIX信号类型替代 signal。默认情况下是 SIGTERM。
当单位被禁用并且其配置文件通过运行(下列行)被删除,永久 cgroup 会被释放:
1 2 systemctl disable name.service
2.3. 修改 cgroup 所有被systemd监管的永久单位都在/usr/lib/systemd/system/目录中有一个单位配置文件。如要修改service单位的参数,请修改此配置文件。可以手动完成或者从命令列界面使用systemctl set-property指令。
1 2 systemctl set-property name parameter=value
并非所有单位参数都能在运行时被修改,但是大多数与资源管控相关的参数是可以的,systemctl set-property 指令让您可以同时修改多项属性,所以相较于单独设定每项属性,推荐您使用此指令。
改动会立即生效并被写入单位文件,并在重启后保留。您可以传递 --runtime 选项,让设定变成临时设定。
1 systemctl set-property --runtime name property=value
2.3.1. 在命令列界面设定参数 systemctl set-property 指令让您可以在 **应用程序运行时,持续修改资源管控设置 **。请以root身份使用下列句法来完成此项操作:
使用 systemctl set-property 使用命令列来限定 httpd.service 的 CPU 和内存占用量
1 2 systemctl set-property httpd.service CPUShares=600 MemoryLimit=500M
此更改为临时更改,请添加 –runtime
1 2 systemctl set-property --runtime httpd.service CPUShares=600 MemoryLimit=500M
查看修改,我们会发现没有直接写入httpd.service配置文件,而是写入到目录下的文件里
1 2 3 4 5 6 7 8 9 10 11 12 13 14 15 16 17 18 ┌──[root@liruilongs.github.io]-[~] └─$ systemctl set-property httpd.service BlockIOAccounting=true ┌──[root@liruilongs.github.io]-[~] └─$ systemctl set-property httpd.service CPUShares=600 MemoryLimit=500M ┌──[root@liruilongs.github.io]-[~] └─$ cat /etc/systemd/system/httpd.service.d/50-CPUShares.conf [Service] CPUShares=600 ┌──[root@liruilongs.github.io]-[~] └─$ cat /etc/systemd/system/httpd.service.d/50-MemoryLimit.conf [Service] MemoryLimit=524288000 ┌──[root@liruilongs.github.io]-[~] └─$ cat /etc/systemd/system/httpd.service.d/50-BlockIOAccounting.conf [Service] BlockIOAccounting=yes ┌──[root@liruilongs.github.io]-[~] └─$
2.3.2. 修改单位文件 systemd service 单位文件提供一系列对资源管理有帮助的高级配置参数。这些参数与必须在kernel中启用的Linux cgroup管控器通讯。您可以使用这些参数管理 CPU、内存使用量、block IO和更多精细单位的属性。
管理 CPU cpu 管控器在 kernel 中被默认启动,这可使所有系统 service 的可用 CPU 量相同,而与其所包含进程数量无关。此项默认设定可以使用/etc/systemd/system.conf配置文件中的 DefaultControllers 参数来修改。
1 2 3 4 5 6 ┌──[root@liruilongs.github.io]-[~] └─$ cat /etc/systemd/system.conf | grep -i BlockIOAccounting ┌──[root@liruilongs.github.io]-[~] └─$ cat /etc/systemd/system.conf | grep -i CPUAccounting
如需管理 CPU 的分配,请使用单位配置文件[Service]部分中的下列指令:
请用CPU share的数量代替 value。默认值为 1024,您可以增加此数值来给单位分配更多 CPU。此参数默认:CPUAccounting 已在单位文件中启用。CPUShares 参数可以控制cpu.sharesCgroup参数。
限定一个单位的 CPU 可用量 为 Apache service 分配 1500 个 CPU share 而不是 1024 个,请修改 /usr/lib/systemd/system/httpd.service 单位文件中的 CPUShares 设置:
1 2 [Service] CPUShares=1500
要应用此项修改,请重新载入 systemd 的配置并重启 Apache 来让修改过的 service 文件生效:
1 2 systemctl daemon-reload systemctl restart httpd.service
内存管理 为限定单位可用内存大小,请使用单位配置文件[Service]部分中的下列指令:
对cgroup中执行的进程设定其可用内存的最大值,并用此值替代 value。请以千字节(Kilobyte)、兆字节(Megabyte)、千兆字节(Gigabyte)、太字节(Terabyte)为计量单位并使用 K、M、G、T 后缀来表示。同样,MemoryAccounting 参数必须在同一单元中启用。
MemoryLimit 参数可以控制 memory.limit_in_bytes Cgroup参数。
限制一个单位的可用内存量 若要限定 Apache service 的最大可用内存为 1GB,请修改 /usr/lib/systemd/system/httpd.service 单位文件中的 MemoryLimit 设定:
1 2 3 4 5 [Service] MemoryLimit=1G systemctl daemon-reload systemctl restart httpd.service
管理 Block IO 如要管理 Block IO,请使用单位配置文件[Service]部分中的下列指令。下列指令假设 BlockIOAccounting 参数已启动:
为已执行进程选取一个新的整体 block IO 权重,并以此替代 value。权重需在 10 到 1000 之间选择,默认值是 1000。
1 BlockIODeviceWeight=device_name value
请为 device_name 所指的设备选取 block IO 权重,并以此代替 value。用名称或者通向此设备的路径来代替 device_name。因为有 BlockIOWeight,您可以在 10 到 1000 之间选取权重值。
1 BlockIOReadBandwidth=device_name value
此指令可以为一个单位限定具体带宽。用设备名称或通向块设备节点的路径替换 device_name,value 代表带宽率。使用 K、M、G、T 后缀作为计量单位。没有后缀的值默认单位为 “字节/秒”。
1 BlockIOWriteBandwidth=device_name value
此指令可以给指定设备限定可写带宽。参数与可与 BlockIOReadBandwidth 一致。
限定一个单位 Block IO 的可用量 1 2 3 4 5 6 7 8 9 10 [Service] BlockIODeviceWeight=/home/jdoe 750 [Service] BlockIOReadBandwith=/var/log 5M systemctl daemon-reload systemctl restart httpd.service
管理其它系统资源 另有几种指令,可在单位文件中使用以协助管理资源。
1 2 3 4 5 6 7 8 9 10 11 12 13 DeviceAllow=device_name options DevicePolicy=value Slice=slice_name ControlGroupAttribute=attribute value
更改低级别 cgroup 的属性 如要将 Apache service 的 memory.swappiness 设为 70,请添加下列信息至 /usr/lib/systemd/system/httpd.service:
1 2 3 4 5 [Service] ControlGroupAttribute=memory.swappiness 70 systemctl daemon-reload systemctl restart httpd.service
2.4. 获得关于Cgroup的信息 使用systemctl指令将系统单位列表并检查它们的状态。systemd-cgls 指令可以检查Cgroup的层级,systemd-cgtop 可以监控Cgroup的实时资源消耗。
2.4.1. 将单位列表 使用下列指令将系统中所有被激活单位列表:
1 2 3 4 5 6 ┌──[root@liruilongs.github.io]-[~] └─$ systemctl list-units UNIT LOAD ACTIVE SUB DESCRIPTION proc-sys-fs-binfmt_misc.automount loaded active waiting Arbitrary Executable File Formats File System Au sys-devices-pci0000:00-0000:00:10.0-host2-target2:0:0-2:0:0:0-block-sda-sda1.device loaded active ................
以上所列结果包含四项:
–
–
UNIT单位名称,也反映单位在 cgroup 树中的位置。 有三种单位类型与资源控制相关:slice、scope 和 service。
LOAD显示单位配置文件是否被正确装载。如果装载失败,文件会包含 error 而不是 loaded。其它单位装载状态有:stub、merged 和 masked。
ACTIVE高级单位的激活状态,是 SUB 的一般化。
SUB低级单位的激活状态。可能值的范围取决于单位类型。
DESCRIPTION描述单位内容和性能。
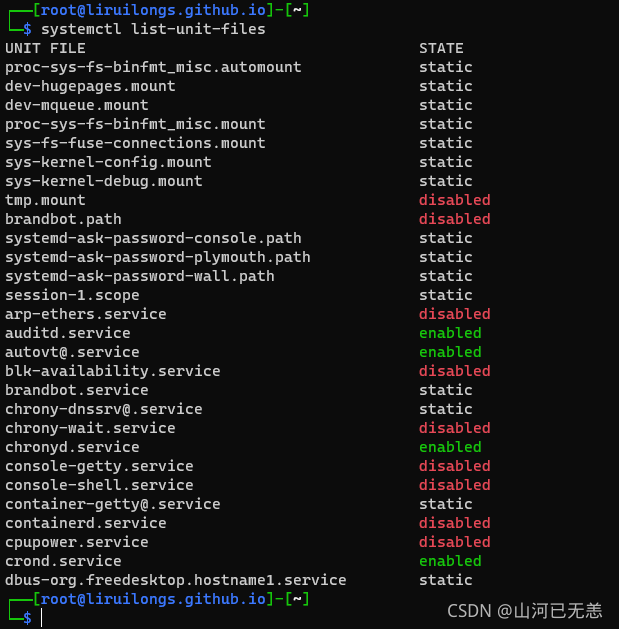
默认情况下,systemctl 只会列出被激活的单位 --all选项可以查看未被激活的单位。如要限制结果列表中的信息量,请使用--type (-t)参数,此参数需要单位类型的逗号分隔列表,如:service 和 slice 或者单位装载状态,如:loaded 和 masked。
使用 systemctl list-units 1 2 3 4 5 6 7 8 9 10 11 12 13 14 15 16 17 18 19 20 21 22 23 24 25 26 27 28 29 30 31 32 33 34 35 36 ┌──[root@liruilongs.github.io]-[~] └─$ systemctl -t slice UNIT LOAD ACTIVE SUB DESCRIPTION -.slice loaded active active Root Slice system-getty.slice loaded active active system-getty.slice system-selinux\x2dpolicy\x2dmigrate\x2dlocal\x2dchanges.slice loaded active active system-selinux\x2dpolicy\x2dmigrate\x system.slice loaded active active System Slice user-0.slice loaded active active User Slice of root user.slice loaded active active User and Session Slice LOAD = Reflects whether the unit definition was properly loaded. ACTIVE = The high-level unit activation state, i.e. generalization of SUB. SUB = The low-level unit activation state, values depend on unit type . 6 loaded units listed. Pass --all to see loaded but inactive units, too. To show all installed unit files use 'systemctl list-unit-files' . ┌──[root@liruilongs.github.io]-[~] └─$ systemctl -t service,masked Unknown unit type or load state 'masked' . Use -t help to see a list of allowed values. ┌──[root@liruilongs.github.io]-[~] └─$ systemctl -t masked 0 loaded units listed. Pass --all to see loaded but inactive units, too. To show all installed unit files use 'systemctl list-unit-files' . ┌──[root@liruilongs.github.io]-[~] └─$ systemctl list-unit-files UNIT FILE STATE proc-sys-fs-binfmt_misc.automount static dev-hugepages.mount static dev-mqueue.mount static proc-sys-fs-binfmt_misc.mount static sys-fs-fuse-connections.mount static sys-kernel-config.mount static sys-kernel-debug.mount static tmp.mount .......
2.4.2. 查看Cgroup的层级 上述指令不会超越单位水平来显示 cgroup 中运行的真正进程。systemctl 结果也不会显示单位的层级。您可以使用 systemd-cgls 指令,根据cgroup将运行的进程分组来同时实现两者。 要显示您系统中的全部cgroup层级,请输入:
1 2 3 4 systemd-cgls systemd-cgls name systemctl status httpd.service
除了上述工具,systemd 也提供了专门监控 Linux 的 machinectl 指令。
2.4.3. 查看资源管控器 上述的systemctl指令可以监控高级单位层级,但是不能显示Linux kernel的资源管控器被哪项进程使用。这些信息存储在专门的进程文件中,如要查阅这些文件,请以root身份输入:
1 2 3 4 5 6 7 8 9 10 11 12 13 14 15 16 17 18 19 20 21 22 23 24 25 26 cat proc/PID/cgroup ┌──[root@liruilongs.github.io]-[~] └─$ ps -ef | grep httpd | grep -v grep root 1231 1 0 02:00 ? 00:00:00 /usr/sbin/httpd -DFOREGROUND apache 1232 1231 0 02:00 ? 00:00:00 /usr/sbin/httpd -DFOREGROUND apache 1233 1231 0 02:00 ? 00:00:00 /usr/sbin/httpd -DFOREGROUND apache 1234 1231 0 02:00 ? 00:00:00 /usr/sbin/httpd -DFOREGROUND apache 1235 1231 0 02:00 ? 00:00:00 /usr/sbin/httpd -DFOREGROUND apache 1236 1231 0 02:00 ? 00:00:00 /usr/sbin/httpd -DFOREGROUND ┌──[root@liruilongs.github.io]-[~] └─$ cat /proc/1231/cgroup 11:blkio:/system.slice/httpd.service 10:memory:/system.slice/httpd.service 9:freezer:/ 8:perf_event:/ 7:cpuacct,cpu:/system.slice/httpd.service 6:devices:/system.slice/httpd.service 5:pids:/ 4:hugetlb:/ 3:net_prio,net_cls:/ 2:cpuset:/ 1:name=systemd:/system.slice/httpd.service ┌──[root@liruilongs.github.io]-[~] └─$
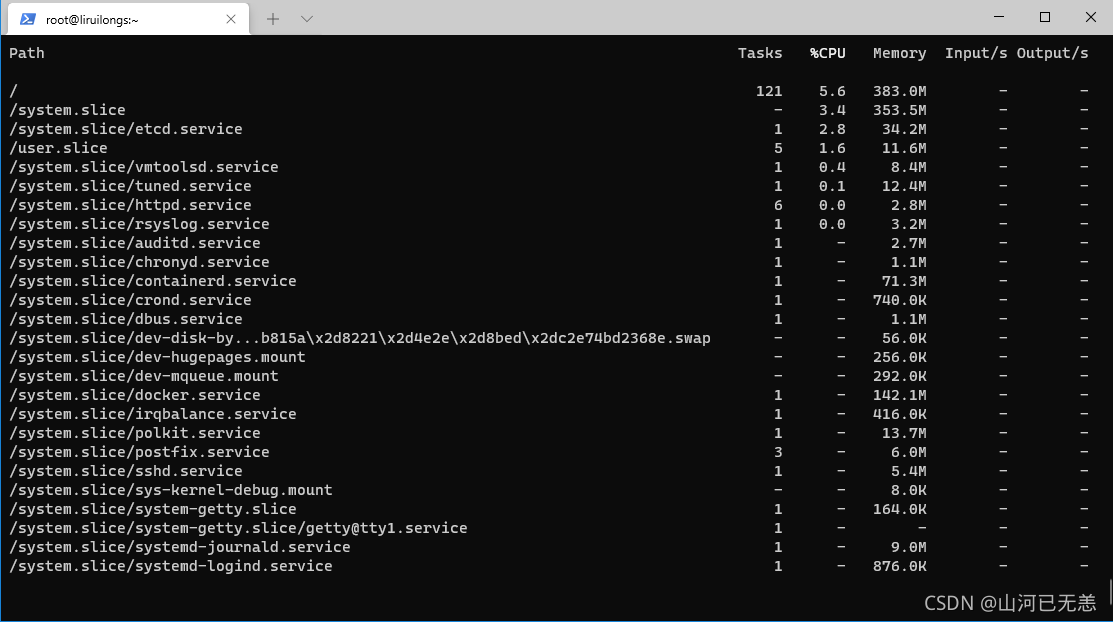
2.4.4. 监控资源消耗量 systemd-cgls 指令给cgroup层级提供了静态数据快照。要查看按资源使用量(CPU、内存和 IO)排序的、正在运行的 cgroup 动态描述请使用:
1 2 3 4 systemd-cgtop ┌──[root@liruilongs.github.io]-[~] └─$ systemd-cgtop
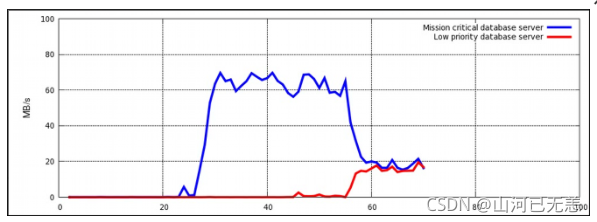
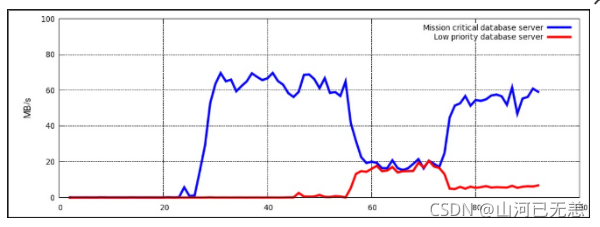
第 4 章 Cgroup应用示例 4.1. 定义数据库 I/O 的优先级 在数据库服务器专用的虚拟机内部运行数据库服务器实例,让您可以根据数据库的优先级来为其分配资源。
系统在两个 KVM 虚拟机内部运行两个数据库服务器。一个数据库的优先级较高,另一个较低。当两个数据库服务器同时运行,I/O 吞吐量会降低来均等地容纳两个数据库的请求;
一旦优先级低的数据库启动(约在时间轴的 45 处),分配给两个服务器的 I/O 吞吐量是相同的。
**为能优先处理来自优先级高的数据库服务器请求,可将此服务器分配给一个 I/O 操作预留量高的 cgroup , 而优先级低的数据库服务器可以分配给一个 I/O 操作预留量少的 cgroup **。可按照以下步骤过程 4.1, “I/O 吞吐量优先化”来完成此操作,这些步骤将全部在主机系统上执行。
4.1.1 I/O 吞吐量优先化 1 2 3 4 5 6 systemctl set-property db1.service BlockIOAccounting=true systemctl set-property db2.service BlockIOAccounting=true systemctl set-property db1.service BlockIOWeight=1000 systemctl set-property db2.service BlockIOWeight=100
显示了优先处理优先级高的数据库请求,而限制优先级低的数据库的情况。一旦数据库服务器移至恰当的 cgroup(约在时间轴的 75 处),I/O 吞吐量就会在两个服务器间按照 10:1 的比率分配。
4.2. 定义网络流量的优先级 在单一服务器系统中运行多项与网络相关的服务时,定义这些服务的网络优先级是很重要的。定义优先级可以保证源自特定服务的数据包比源自其它服务的数据包享有更高优先级。
例如,当一台服务器系统同时起到 NFS 服务器和 Samba 服务器的作用时,优先级就显得尤为重要。NFS 必须享有高优先权,因为用户会预期较高吞吐量。Samba 的优先级可以较低,以确保 NFS 服务器有更佳表现。
net_prio 管控器可以用来为cgroup中的进程设定网络优先级。之后,优先级会被转译为 Type Of Service(TOS,服务类型)比特,并嵌入每一个数据包中。
4.2.1 为共享服务的文件设定网络优先级
net_prio 管控器并未编译进 kernel,它是一个必须手动装载的模块。如需装载,请输入:
请将 net_prio 子系统附加到 /cgroup/net_prio cgroup 中:
1 2 mkdir sys/fs/cgroup/net_prio mount -t cgroup -o net_prio none sys/fs/cgroup/net_prio
请为各项服务创建其 cgroup:1 2 mkdir sys/fs/cgroup/net_prio/nfs_high mkdir sys/fs/cgroup/net_prio/samba_low
如希望nfs服务被自动移至 nfs_high cgroup,请将下列行添至/etc/sysconfig/nfs文件:1 CGROUP_DAEMON="net_prio:nfs_high"
此配置可确保nfs服务启动或重启时,nfs 服务进程已被移至 nfs_high cgroup。smbd 后台驻留程序在/etc/sysconfig目录中没有配置文件。为实现将 smbd 后台驻留程序自动移至 samba_low cgroup,请添加下列行至/etc/cgrules.conf文件:1 *:smbd net_prio samba_low
smbd后台驻留程序(不仅仅是 /usr/sbin/smbd)移至 samba_low cgroup 。
您可以用相似的方式为nmbd和winbindd后台驻留程序定义规则,将它们移至 samba_low cgroup。
请启动cgred服务,以载入之前步骤的配置:Cgred 是一个守护进程,它可根据在 etc/cgrules.conf 文件中设定的参数将任务移动到 cgroup 中。
1 2 systemctl start cgred Starting CGroup Rules Engine Daemon: [ OK ]
至于此示例的目的,让我们假设两项服务都使用 eth1 网络接口;给每一个 cgroup 定义优先级:1 表示优先级低,10 表示优先级高:1 2 echo "eth1 1" > /sys/fs/cgroup/net_prio/samba_low/net_prio.ifpriomapecho "eth1 10" > /sys/fs/cgroup/net_prio/nfs_high/net_prio.ifpriomap
请启动 nfs 和 smb 服务以检查各自的进程是否已被移至正确的 cgroup:1 2 3 4 5 6 7 8 9 10 11 12 13 14 15 16 ~] Starting SMB services: [ OK ] ~] 16122 16124 ~] Starting NFS services: [ OK ] Starting NFS quotas: [ OK ] Starting NFS mountd: [ OK ] Stopping RPC idmapd: [ OK ] Starting RPC idmapd: [ OK ] Starting NFS daemon: [ OK ] ~] 16321 16325 16376
Systemctl 介绍 Systemctl是一个systemd工具,主要负责控制systemd系统和服务管理器。
Systemd是一个系统管理守护进程、工具和库的集合,用于取代System V初始进程。Systemd的功能是用于集中管理和配置类UNIX系统。
在Linux生态系统中,Systemd被部署到了大多数的标准Linux发行版中,只有为数不多的几个发行版尚未部署。
1 2 3 4 5 6 7 8 9 10 11 12 13 14 15 16 17 18 19 20 21 22 23 24 25 26 27 28 29 30 31 32 33 34 35 36 37 38 39 40 41 42 43 44 45 46 47 48 49 50 51 52 53 54 55 56 57 58 59 60 61 62 63 64 65 66 67 68 69 70 71 72 73 74 75 76 77 78 79 80 81 82 83 84 85 86 87 88 89 90 91 92 93 94 95 96 97 98 99 100 101 102 103 104 105 106 107 108 109 110 111 112 113 114 115 116 117 118 119 120 121 122 123 124 125 126 127 128 129 130 131 132 133 ┌──[root@liruilongs.github.io]-[~] └─$ whereis systemd systemd: /usr/lib/systemd /etc/systemd /usr/share/systemd /usr/share/man/man1/systemd.1.gz ┌──[root@liruilongs.github.io]-[~] └─$ ps -eaf | grep [s]ystemd root 1 0 0 18:44 ? 00:00:06 /usr/lib/systemd/systemd --system --deserialize 17 root 438 1 0 18:44 ? 00:00:00 /usr/lib/systemd/systemd-journald dbus 573 1 0 18:45 ? 00:00:00 /bin/dbus-daemon --system --address=systemd: --nofork --nopidfile --systemd-activation root 585 1 0 18:45 ? 00:00:00 /usr/lib/systemd/systemd-logind root 1309 1 0 19:17 ? 00:00:00 /usr/lib/systemd/systemd-machined root 2733 1 0 21:13 ? 00:00:00 /usr/lib/systemd/systemd-udevd ┌──[root@liruilongs.github.io]-[~] └─$ systemd --version -bash: systemd: command not found ┌──[root@liruilongs.github.io]-[~] └─$ systemd-analyze Startup finished in 16.775s (kernel) + 4.983s (initrd) + 28.902s (userspace) = 50.661s ┌──[root@liruilongs.github.io]-[~] └─$ systemd-analyze blame 10.362s docker.service 5.538s network.service 3.974s containerd.service 3.430s etcd.service 3.421s dev-sda1.device 2.829s tuned.service 2.519s postfix.service 1.730s polkit.service 710ms auditd.service 669ms chronyd.service 641ms rsyslog.service 565ms sysstat.service 543ms systemd-vconsole-setup.service 485ms rhel-dmesg.service 483ms systemd-tmpfiles-setup-dev.service 478ms sshd.service 383ms dev-mqueue.mount 370ms systemd-remount-fs.service 368ms sys-kernel-debug.mount 362ms dev-hugepages.mount 361ms httpd.service 342ms rhel-readonly.service 292ms systemd-journald.service 229ms systemd-logind.service 229ms rhel-import-state.service 182ms plymouth-quit.service 172ms systemd-udev-trigger.service 162ms systemd-journal-flush.service 159ms plymouth-quit-wait.service ┌──[root@liruilongs.github.io]-[~] └─$ systemd-analyze critical-chain The time after the unit is active or started is printed after the "@" character. The time the unit takes to start is printed after the "+" character. multi-user.target @28.877s └─docker.service @18.514s +10.362s └─containerd.service @14.536s +3.974s └─network.target @14.513s ┌──[root@liruilongs.github.io]-[~] └─$ systemctl list-unit-files UNIT FILE STATE proc-sys-fs-binfmt_misc.automount static dev-hugepages.mount static dev-mqueue.mount static proc-sys-fs-binfmt_misc.mount static sys-fs-fuse-connections.mount static sys-kernel-config.mount static sys-kernel-debug.mount static tmp.mount disabled brandbot.path disabled systemd-ask-password-console.path static systemd-ask-password-plymouth.path static systemd-ask-password-wall.path static session-1.scope static session-11.scope static arp-ethers.service disabled auditd.service enabled autovt@.service enabled blk-availability.service disabled brandbot.service static chrony-dnssrv@.service static chrony-wait.service disabled chronyd.service enabled console-getty.service disabled console-shell.service disabled container-getty@.service static containerd.service disabled cpupower.service disabled crond.service enabled ┌──[root@liruilongs.github.io]-[~] └─$ systemctl list-units UNIT LOAD ACTIVE SUB DESCRIPTION proc-sys-fs-binfmt_misc.automount loaded active waiting Arbitrary Executable File Formats File System Au sys-devices-pci0000:00-0000:00:10.0-host2-target2:0:0-2:0:0:0-block-sda-sda1.device loaded active plugged VMware_Virtu sys-devices-pci0000:00-0000:00:10.0-host2-target2:0:0-2:0:0:0-block-sda-sda2.device loaded active plugged VMware_Virtu sys-devices-pci0000:00-0000:00:10.0-host2-target2:0:0-2:0:0:0-block-sda.device loaded active plugged VMware_Virtual_S sys-devices-pci0000:00-0000:00:11.0-0000:02:00.0-net-ens32.device loaded active plugged 82545EM Gigabit Ethernet Contr sys-devices-platform-serial8250-tty-ttyS0.device loaded active plugged /sys/devices/platform/serial8250/tty/ttyS0 sys-devices-platform-serial8250-tty-ttyS1.device loaded active plugged /sys/devices/platform/serial8250/tty/ttyS1 sys-devices-platform-serial8250-tty-ttyS2.device loaded active plugged /sys/devices/platform/serial8250/tty/ttyS2 sys-devices-platform-serial8250-tty-ttyS3.device loaded active plugged /sys/devices/platform/serial8250/tty/ttyS3 sys-devices-virtual-net-br\x2d4b3da203747c.device loaded active plugged /sys/devices/virtual/net/br-4b3da203747c sys-devices-virtual-net-docker0.device loaded active plugged /sys/devices/virtual/net/docker0 sys-module-configfs.device loaded active plugged /sys/module/configfs sys-subsystem-net-devices-br\x2d4b3da203747c.device loaded active plugged /sys/subsystem/net/devices/br-4b3da203747c sys-subsystem-net-devices-docker0.device loaded active plugged /sys/subsystem/net/devices/docker0 sys-subsystem-net-devices-ens32.device loaded active plugged 82545EM Gigabit Ethernet Controller (Copper) (PR -.mount loaded active mounted / dev-hugepages.mount loaded active mounted Huge Pages File System dev-mqueue.mount loaded active mounted POSIX Message Queue File System run-user-0.mount loaded active mounted /run/user/0 sys-kernel-config.mount loaded active mounted Configuration File System sys-kernel-debug.mount loaded active mounted Debug File System brandbot.path loaded active waiting Flexible branding systemd-ask-password-plymouth.path loaded active waiting Forward Password Requests to Plymouth Directory systemd-ask-password-wall.path loaded active waiting Forward Password Requests to Wall Directory Watc session-1.scope loaded active running Session 1 of user root session-11.scope loaded active running Session 11 of user root auditd.service loaded active running Security Auditing Service chronyd.service loaded active running NTP client/server ┌──[root@liruilongs.github.io]-[~] └─$ systemctl --failed 0 loaded units listed. Pass --all to see loaded but inactive units, too. To show all installed unit files use 'systemctl list-unit-files' . ┌──[root@liruilongs.github.io]-[~] └─$ systemctl is-enabled crond.service enabled ┌──[root@liruilongs.github.io]-[~] └─$ systemctl status firewalld.service ● firewalld.service - firewalld - dynamic firewall daemon Loaded: loaded (/usr/lib/systemd/system/firewalld.service; disabled; vendor preset: enabled) Active: inactive (dead) Docs: man:firewalld(1)
使用Systemctl控制和管理服务 1 2 3 4 5 6 7 8 9 10 11 12 13 14 15 16 17 18 19 20 21 22 23 24 25 26 27 28 29 30 31 32 33 34 35 36 37 38 39 40 41 42 43 44 45 46 47 48 49 50 51 52 53 54 55 56 57 58 59 60 61 62 63 64 65 66 67 68 69 70 71 72 73 74 75 76 77 78 79 ┌──[root@liruilongs.github.io]-[~] └─$ systemctl list-unit-files --type =service UNIT FILE STATE arp-ethers.service disabled auditd.service enabled autovt@.service enabled blk-availability.service disabled brandbot.service static chrony-dnssrv@.service static chrony-wait.service disabled chronyd.service enabled console-getty.service disabled console-shell.service disabled container-getty@.service static containerd.service disabled cpupower.service disabled crond.service enabled dbus-org.freedesktop.hostname1.service static dbus-org.freedesktop.import1.service static dbus-org.freedesktop.locale1.service static dbus-org.freedesktop.login1.service static dbus-org.freedesktop.machine1.service static dbus-org.freedesktop.timedate1.service static dbus.service static debug-shell.service disabled docker.service enabled dracut-cmdline.service static dracut-initqueue.service static dracut-mount.service static dracut-pre-mount.service static dracut-pre-pivot.service static ┌──[root@liruilongs.github.io]-[~] └─$ ┌──[root@liruilongs.github.io]-[~] └─$ ┌──[root@liruilongs.github.io]-[~] └─$ ┌──[root@liruilongs.github.io]-[~] └─$ ┌──[root@liruilongs.github.io]-[~] └─$ ┌──[root@liruilongs.github.io]-[~] └─$ ┌──[root@liruilongs.github.io]-[~] └─$ ┌──[root@liruilongs.github.io]-[~] └─$ ┌──[root@liruilongs.github.io]-[~] └─$ ln -s '/dev/null' '/etc/systemd/system/httpd.service' ┌──[root@liruilongs.github.io]-[~] └─$ systemctl unmask httpd.service Removed symlink /etc/systemd/system/httpd.service. ┌──[root@liruilongs.github.io]-[~] └─$ rm '/etc/systemd/system/httpd.service' rm: cannot remove ‘/etc/systemd/system/httpd.service’: No such file or directory ┌──[root@liruilongs.github.io]-[~] └─$ systemctl kill httpd ┌──[root@liruilongs.github.io]-[~] └─$ systemctl status httpd ● httpd.service - The Apache HTTP Server Loaded: loaded (/usr/lib/systemd/system/httpd.service; enabled; vendor preset: disabled) Drop-In: /etc/systemd/system/httpd.service.d └─50-BlockIOAccounting.conf, 50-CPUShares.conf, 50-MemoryLimit.conf Active: failed (Result: exit-code) since Thu 2021-10-14 21:21:12 CST; 6s ago Docs: man:httpd(8) man:apachectl(8) Process: 2827 ExecStop=/bin/kill -WINCH ${MAINPID} (code=exited, status=1/FAILURE) Main PID: 1231 (code=exited, status=0/SUCCESS) Status: "Total requests: 0; Current requests/sec: 0; Current traffic: 0 B/sec" Oct 13 02:00:13 liruilongs.github.io systemd[1]: Starting The Apache HTTP Server... Oct 13 02:00:13 liruilongs.github.io systemd[1]: Started The Apache HTTP Server. Oct 14 21:21:12 liruilongs.github.io kill [2827]: kill : cannot find process "" Oct 14 21:21:12 liruilongs.github.io systemd[1]: httpd.service: control process exited, code=exited status=1 Oct 14 21:21:12 liruilongs.github.io systemd[1]: Unit httpd.service entered failed state. Oct 14 21:21:12 liruilongs.github.io systemd[1]: httpd.service failed. ┌──[root@liruilongs.github.io]-[~] └─$ cat /etc/systemd/system/httpd.service cat: /etc/systemd/system/httpd.service: No such file or directory
使用Systemctl控制和管理挂载点 1 2 3 4 5 6 7 8 9 10 11 12 13 14 15 16 17 18 19 20 21 22 23 24 25 26 27 28 ┌──[root@liruilongs.github.io]-[~] └─$ systemctl list-unit-files --type =mount UNIT FILE STATE dev-hugepages.mount static dev-mqueue.mount static proc-sys-fs-binfmt_misc.mount static sys-fs-fuse-connections.mount static sys-kernel-config.mount static sys-kernel-debug.mount static tmp.mount disabled 7 unit files listed. ┌──[root@liruilongs.github.io]-[~] └─$ ┌──[root@liruilongs.github.io]-[~] └─$ ┌──[root@liruilongs.github.io]-[~] └─$ ┌──[root@liruilongs.github.io]-[~] └─$ ┌──[root@liruilongs.github.io]-[~] └─$ ┌──[root@liruilongs.github.io]-[~] └─$ ┌──[root@liruilongs.github.io]-[~] └─$ ┌──[root@liruilongs.github.io]-[~] └─$
使用Systemctl控制和管理套接字 1 2 3 4 5 6 7 8 9 10 11 12 13 14 15 16 17 18 19 20 21 22 23 24 25 26 27 28 29 30 ┌──[root@liruilongs.github.io]-[~] └─$ systemctl list-unit-files --type =socket UNIT FILE STATE dbus.socket static docker.socket disabled sshd.socket disabled syslog.socket static systemd-initctl.socket static systemd-journald.socket static systemd-shutdownd.socket static systemd-udevd-control.socket static systemd-udevd-kernel.socket static 9 unit files listed. ┌──[root@liruilongs.github.io]-[~] └─$ ┌──[root@liruilongs.github.io]-[~] └─$ ┌──[root@liruilongs.github.io]-[~] └─$ ┌──[root@liruilongs.github.io]-[~] └─$ ┌──[root@liruilongs.github.io]-[~] └─$ ┌──[root@liruilongs.github.io]-[~] └─$ ┌──[root@liruilongs.github.io]-[~] └─$ ┌──[root@liruilongs.github.io]-[~] └─$
服务的CPU利用率(份额) 1 2 3 4 5 6 7 ┌──[root@liruilongs.github.io]-[~] └─$ systemctl show -p CPUShares httpd.service CPUShares=600 ┌──[root@liruilongs.github.io]-[~] └─$ ┌──[root@liruilongs.github.io]-[~] └─$
检查服务的所有配置详细信息 1 2 3 4 5 6 7 8 9 10 11 12 13 14 15 16 17 18 19 20 21 22 23 24 25 26 27 28 29 30 31 32 ┌──[root@liruilongs.github.io]-[~] └─$ systemctl show httpd Type=notify Restart=no NotifyAccess=main RestartUSec=100ms TimeoutStartUSec=1min 30s TimeoutStopUSec=1min 30s WatchdogUSec=0 WatchdogTimestampMonotonic=0 StartLimitInterval=10000000 StartLimitBurst=5 StartLimitAction=none FailureAction=none PermissionsStartOnly=no RootDirectoryStartOnly=no RemainAfterExit=no GuessMainPID=yes MainPID=0 ControlPID=0 FileDescriptorStoreMax=0 StatusText=Total requests: 0; Current requests/sec: 0; Current traffic: 0 B/sec StatusErrno=0 Result=exit-code ExecMainStartTimestamp=Wed 2021-10-13 02:00:13 CST ExecMainStartTimestampMonotonic=421085770 ExecMainExitTimestamp=Thu 2021-10-14 21:21:12 CST ExecMainExitTimestampMonotonic=9398280544 ExecMainPID=1231 ExecMainCode=1 ExecMainStatus=0
分析服务的关键链(httpd) 1 2 3 4 5 6 7 ┌──[root@liruilongs.github.io]-[~] └─$ systemd-analyze critical-chain httpd.service The time after the unit is active or started is printed after the "@" character. The time the unit takes to start is printed after the "+" character. httpd.service +361ms └─network.target @14.513s
获取服务的依赖项列表(httpd) 1 2 3 4 5 6 7 8 9 10 11 12 13 14 15 16 17 18 19 20 21 22 23 24 25 26 27 28 29 30 31 32 33 34 35 36 37 38 39 ┌──[root@liruilongs.github.io]-[~] └─$ systemctl list-dependencies httpd.service httpd.service ● ├─-.mount ● ├─system.slice ● └─basic.target ● ├─microcode.service ● ├─rhel-autorelabel-mark.service ● ├─rhel-autorelabel.service ● ├─rhel-configure.service ● ├─rhel-dmesg.service ● ├─rhel-loadmodules.service ● ├─selinux-policy-migrate-local-changes@targeted.service ● ├─paths.target ● ├─slices.target ● │ ├─-.slice ● │ └─system.slice ● ├─sockets.target ● │ ├─dbus.socket ● │ ├─systemd-initctl.socket ● │ ├─systemd-journald.socket ● │ ├─systemd-shutdownd.socket ● │ ├─systemd-udevd-control.socket ● │ └─systemd-udevd-kernel.socket ● ├─sysinit.target ● │ ├─dev-hugepages.mount ● │ ├─dev-mqueue.mount ● │ ├─kmod-static-nodes.service ● │ ├─plymouth-read-write.service ● │ ├─plymouth-start.service ● │ ├─proc-sys-fs-binfmt_misc.automount ┌──[root@liruilongs.github.io]-[~] └─$ ┌──[root@liruilongs.github.io]-[~] └─$ ┌──[root@liruilongs.github.io]-[~] └─$ ┌──[root@liruilongs.github.io]-[~] └─$
列出当前使用的运行级别 1 2 3 4 5 6 7 8 9 10 11 12 13 ┌──[root@liruilongs.github.io]-[~] └─$ systemctl get-default multi-user.target ┌──[root@liruilongs.github.io]-[~] └─$ ┌──[root@liruilongs.github.io]-[~] └─$ ┌──[root@liruilongs.github.io]-[~] └─$ ┌──[root@liruilongs.github.io]-[~] └─$ ┌──[root@liruilongs.github.io]-[~] └─$
控制系统运行级别 1 2 3 4 5 6 7 8 9 10 11 12 ┌──[root@liruilongs.github.io]-[~] └─$ ┌──[root@liruilongs.github.io]-[~] └─$ ┌──[root@liruilongs.github.io]-[~] └─$ ┌──[root@liruilongs.github.io]-[~] └─$ ┌──[root@liruilongs.github.io]-[~] └─$ ┌──[root@liruilongs.github.io]-[~] └─$