┌──[root@vms16.liruilongs.github.io]-[~] └─$yum -y install docker-ce ┌──[root@vms16.liruilongs.github.io]-[~] └─$systemctlenable docker.service --now Created symlink from /etc/systemd/system/multi-user.target.wants/docker.service to /usr/lib/systemd/system/docker.service.
┌──[root@vms16.liruilongs.github.io]-[~] └─$oc cluster up --skip-registry-check=true --public-hostname=192.168.26.16 --no-proxy=172.17.0.0/16,127.0.0.1 ..... Login to server ... Creating initial project "myproject" ... Server Information ... OpenShift server started.
The server is accessible via web console at: https://192.168.26.16:8443:8443
You are logged in as: User: developer Password: <any value>
To login as administrator: oc login -u system:admin
# System wide environment and startup programs, for login setup # Functions and aliases go in /etc/bashrc
# It's NOT a good idea to change this file unless you know what you # are doing. It's much better to create a custom.sh shell script in # /etc/profile.d/ to make custom changes to your environment, as this # will prevent the need for merging in future updates.
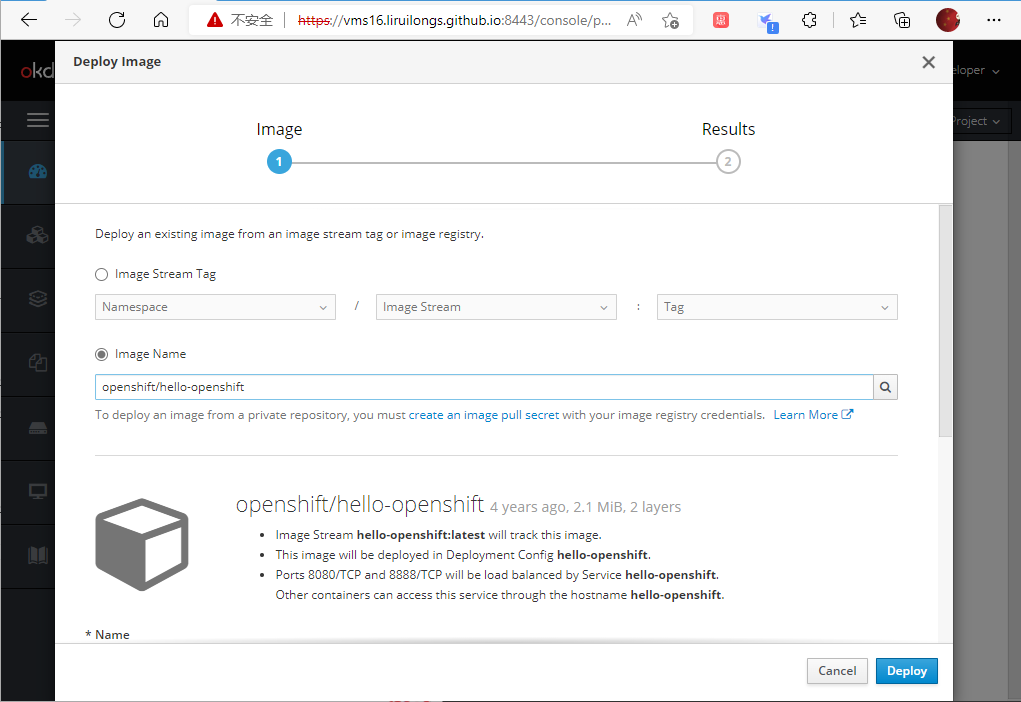
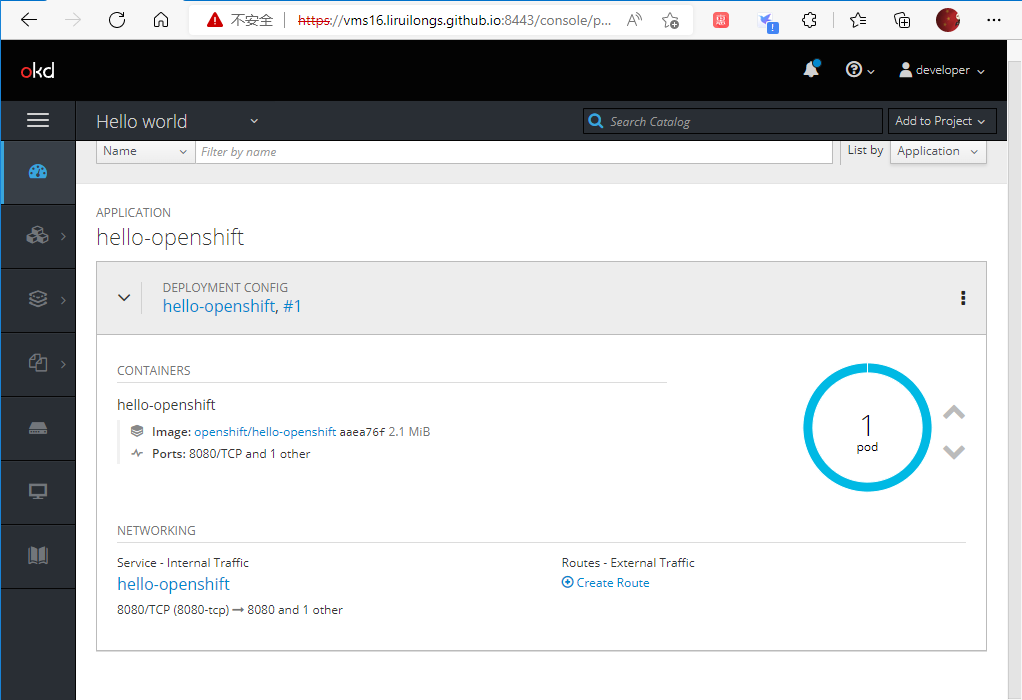
┌──[root@192.168.26.16]-[~] └─$oc new-app openshift/hello-openshift --> Found Docker image 7af3297 (4 years old) from Docker Hub for"openshift/hello-openshift"
* An image stream tag will be created as "hello-openshift:latest" that will track this image * This image will be deployed in deployment config "hello-openshift" * Ports 8080/tcp, 8888/tcp will be load balanced by service "hello-openshift" * Other containers can access this service through the hostname "hello-openshift"
--> Creating resources ... imagestream.image.openshift.io "hello-openshift" created deploymentconfig.apps.openshift.io "hello-openshift" created service "hello-openshift" created --> Success Application is not exposed. You can expose services to the outside world by executing one or more of the commands below: 'oc expose svc/hello-openshift' Run 'oc status' to view your app. ┌──[root@192.168.26.16]-[~] └─$
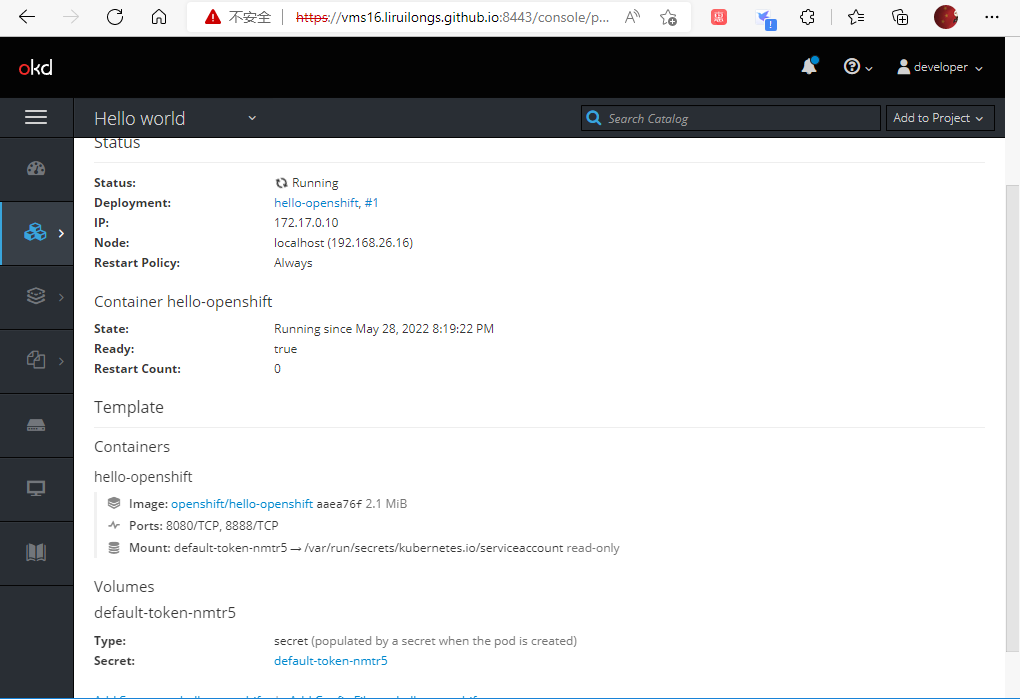
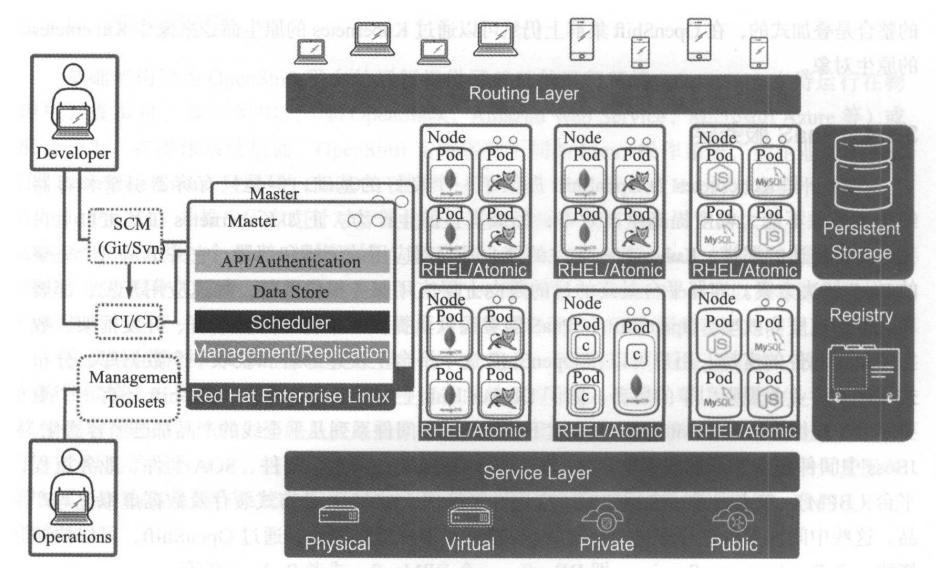
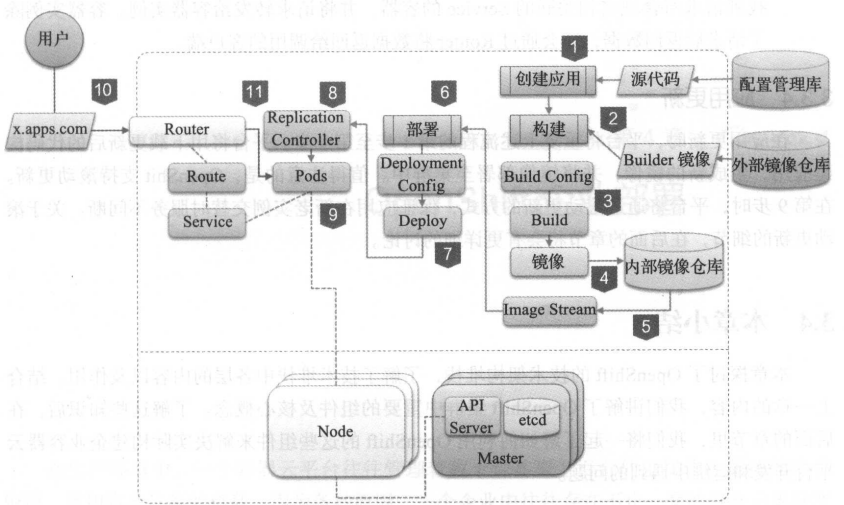
执行oc get pod命令可以查看当前项目的容器的列表。和在Kubernetes一样,在Open-Shift中,所有的Docker容器都是被“包裹”在一种称为Pod的容器内部。用户可以近似地认为Pod就是我们要运行的Docker容器本身。
1 2 3 4
┌──[root@192.168.26.16]-[~] └─$oc get pods NAME READY STATUS RESTARTS AGE hello-openshift-1-5sr5j 1/1 Running 0 1m
┌──[root@vms16.liruilongs.github.io]-[~] └─$oc status In project My Project (myproject) on server https://127.0.0.1:8443
http://hello.openshift to pod port 8080-tcp (svc/hello-openshift) dc/hello-openshift deploys istag/hello-openshift:latest deployment #1 deployed 6 months ago - 1 pod
deployment/testpod deploys yauritux/busybox-curl deployment #1 running for 6 months
3 infos identified, use 'oc status --suggest' to see details. ┌──[root@vms16.liruilongs.github.io]-[~] └─$oc get route NAME HOST/PORT PATH SERVICES PORT TERMINATION WILDCARD hello-openshift hello.openshift hello-openshift 8080-tcp None ┌──[root@vms16.liruilongs.github.io]-[~] └─$ ┌──[root@vms16.liruilongs.github.io]-[~] └─$oc get svc NAME TYPE CLUSTER-IP EXTERNAL-IP PORT(S) AGE hello-openshift ClusterIP 172.30.166.53 <none> 8080/TCP,8888/TCP 183d ┌──[root@vms16.liruilongs.github.io]-[~] └─$oc get dc NAME REVISION DESIRED CURRENT TRIGGERED BY hello-openshift 1 1 1 config,image(hello-openshift:latest) ┌──[root@vms16.liruilongs.github.io]-[~] └─$oc get istag NAME DOCKER REF UPDATED hello-openshift:latest openshift/hello-openshift@sha256:aaea76ff622d2f8bcb32e538e7b3cd0ef6d291953f3e7c9f556c1ba5baf47e2e 6 months ago ┌──[root@vms16.liruilongs.github.io]-[~] └─$ ┌──[root@vms16.liruilongs.github.io]-[~] └─$oc get route NAME HOST/PORT PATH SERVICES PORT TERMINATION WILDCARD hello-openshift hello.openshift hello-openshift 8080-tcp None
┌──[root@192.168.26.16]-[~/.kube] └─$oc get ns NAME STATUS AGE default Active 4h hello-world Active 59m hello-world-oc Active 16m kube-dns Active 4h kube-proxy Active 4h kube-public Active 4h kube-system Active 4h myproject Active 4h openshift Active 4h openshift-apiserver Active 4h openshift-controller-manager Active 4h openshift-core-operators Active 4h openshift-infra Active 4h openshift-node Active 4h openshift-service-cert-signer Active 4h openshift-web-console Active 4h ┌──[root@192.168.26.16]-[~/.kube] └─$
┌──[root@192.168.26.16]-[~/openshift-origin-server-v3.11.0-0cbc58b-linux-64bit] └─$source /etc/profile DEPRECATED: The 'oadm'command is deprecated, please use 'oc adm' instead.
┌──[root@192.168.26.16]-[~/openshift-origin-server-v3.11.0-0cbc58b-linux-64bit] └─$kubectl get pods NAME READY STATUS RESTARTS AGE docker-registry-1-7g7s2 1/1 Running 0 5h persistent-volume-setup-c5h5g 0/1 Completed 0 5h router-1-vnphx 1/1 Running 0 5h
可以看到默认会运行一个镜像仓库pod和一个
1 2 3 4 5 6
┌──[root@192.168.26.16]-[~/openshift-origin-server-v3.11.0-0cbc58b-linux-64bit] └─$kubectl get nodes NAME STATUS ROLES AGE VERSION localhost Ready <none> 5h v1.11.0+d4cacc0 ┌──[root@192.168.26.16]-[~/openshift-origin-server-v3.11.0-0cbc58b-linux-64bit] └─$
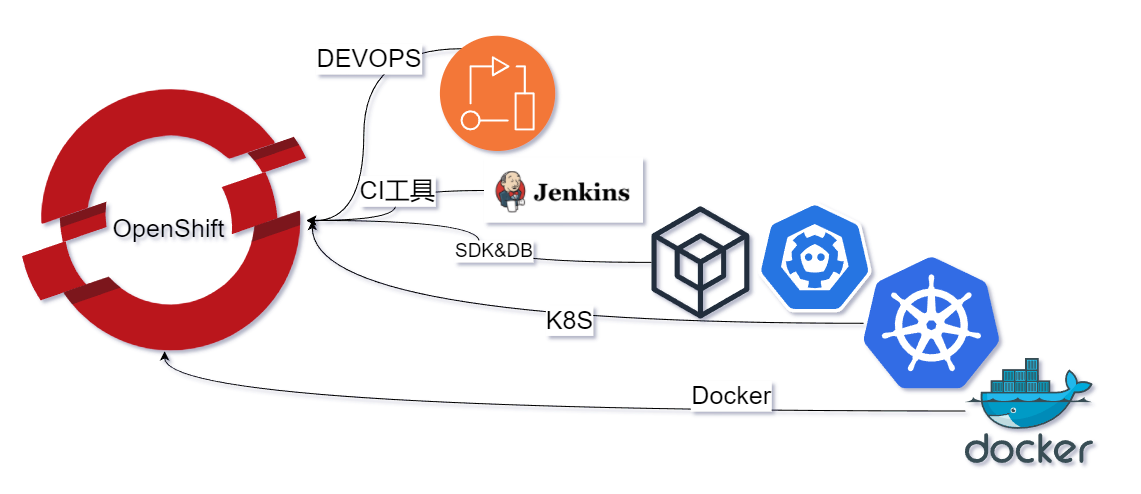
2.3.3 添加 Router
1 2 3 4 5 6 7 8 9 10 11
┌──[root@192.168.26.16]-[~/openshift-origin-server-v3.11.0-0cbc58b-linux-64bit] └─$oc adm router router-demo --replicas=1 --service-account=router info: password for stats user admin has been set to mJGgS56vY1 --> Creating router router-demo ... warning: serviceaccounts "router" already exists clusterrolebinding.authorization.openshift.io "router-router-demo-role" created deploymentconfig.apps.openshift.io "router-demo" created service "router-demo" created --> Successkub ┌──[root@192.168.26.16]-[~/openshift-origin-server-v3.11.0-0cbc58b-linux-64bit] └─$
当然,我们当前的环境默认已经添加了一个router组件
router 组件本质上是一个通过RC提供能力的SVC
1 2 3 4 5 6 7 8 9 10 11 12 13 14 15
┌──[root@192.168.26.16]-[~] └─$kubectl get svc NAME TYPE CLUSTER-IP EXTERNAL-IP PORT(S) AGE docker-registry ClusterIP 172.30.1.1 <none> 5000/TCP 5h kubernetes ClusterIP 172.30.0.1 <none> 443/TCP 5h router ClusterIP 172.30.34.201 <none> 80/TCP,443/TCP,1936/TCP 5h router-demo ClusterIP 172.30.16.35 <none> 80/TCP,443/TCP,1936/TCP 17m ┌──[root@192.168.26.16]-[~] └─$kubectl get rc NAME DESIRED CURRENT READY AGE docker-registry-1 1 1 1 5h router-1 1 1 1 5h router-demo-1 0 0 0 18m ┌──[root@192.168.26.16]-[~] └─$k
2.3.4 添加Registry
1 2 3
┌──[root@192.168.26.16]-[~/openshift-origin-server-v3.11.0-0cbc58b-linux-64bit] └─$oc project default Already on project "default" on server "https://127.0.0.1:8443".
1 2 3 4 5 6 7 8
┌──[root@192.168.26.16]-[~/openshift-origin-server-v3.11.0-0cbc58b-linux-64bit] └─$oc get pods NAME READY STATUS RESTARTS AGE docker-registry-1-7g7s2 1/1 Running 0 7h persistent-volume-setup-c5h5g 0/1 Completed 0 7h router-1-vnphx 1/1 Running 1 7h ┌──[root@192.168.26.16]-[~/openshift-origin-server-v3.11.0-0cbc58b-linux-64bit] └─$
┌──[root@192.168.26.16]-[~/openshift-origin-server-v3.11.0-0cbc58b-linux-64bit] └─$oc project openshift Now using project "openshift" on server "https://127.0.0.1:8443". ┌──[root@192.168.26.16]-[~/openshift-origin-server-v3.11.0-0cbc58b-linux-64bit] └─$oc get is NAME DOCKER REPO TAGS UPDATED dotnet 172.30.1.1:5000/openshift/dotnet 2.0,latest 7 hours ago httpd 172.30.1.1:5000/openshift/httpd 2.4,latest 7 hours ago jenkins 172.30.1.1:5000/openshift/jenkins 1,2,latest 7 hours ago mariadb 172.30.1.1:5000/openshift/mariadb 10.1,10.2,latest 7 hours ago mongodb 172.30.1.1:5000/openshift/mongodb 3.6,latest,2.4 + 3 more... 7 hours ago mysql 172.30.1.1:5000/openshift/mysql latest,5.5,5.6 + 1 more... 7 hours ago nginx 172.30.1.1:5000/openshift/nginx 1.10,1.12,1.8 + 1 more... 7 hours ago nodejs 172.30.1.1:5000/openshift/nodejs latest,0.10,10 + 4 more... 7 hours ago perl 172.30.1.1:5000/openshift/perl 5.24,5.26,latest + 2 more... 7 hours ago php 172.30.1.1:5000/openshift/php 7.1,latest,5.5 + 2 more... 7 hours ago postgresql 172.30.1.1:5000/openshift/postgresql 9.6,latest,10 + 3 more... 7 hours ago python 172.30.1.1:5000/openshift/python 3.6,latest,2.7 + 3 more... 7 hours ago redis 172.30.1.1:5000/openshift/redis 3.2,latest 7 hours ago ruby 172.30.1.1:5000/openshift/ruby 2.5,latest,2.0 + 3 more... 7 hours ago wildfly 172.30.1.1:5000/openshift/wildfly 8.1,9.0,latest + 5 more... 7 hours ago ┌──[root@192.168.26.16]-[~/openshift-origin-server-v3.11.0-0cbc58b-linux-64bit] └─$
2.3.6 添加Template
1 2 3 4 5 6 7 8 9 10 11 12 13 14 15 16 17 18 19
┌──[root@192.168.26.16]-[~/openshift-origin-server-v3.11.0-0cbc58b-linux-64bit] └─$oc project openshift Already on project "openshift" on server "https://127.0.0.1:8443". ┌──[root@192.168.26.16]-[~/openshift-origin-server-v3.11.0-0cbc58b-linux-64bit] └─$oc get template NAME DESCRIPTION PARAMETERS OBJECTS cakephp-mysql-persistent An example CakePHP application with a MySQL database. For more information ab... 20 (4 blank) 9 dancer-mysql-persistent An example Dancer application with a MySQL database. For more information abo... 17 (5 blank) 9 django-psql-persistent An example Django application with a PostgreSQL database. For more informatio... 20 (5 blank) 9 jenkins-ephemeral Jenkins service, without persistent storage.... 7 (all set) 6 jenkins-pipeline-example This example showcases the new Jenkins Pipeline integration in OpenShift,... 16 (4 blank) 8 mariadb-persistent MariaDB database service, with persistent storage. For more information about... 9 (3 generated) 4 mongodb-persistent MongoDB database service, with persistent storage. For more information about... 9 (3 generated) 4 mysql-persistent MySQL database service, with persistent storage. For more information about u... 9 (3 generated) 4 nodejs-mongo-persistent An example Node.js application with a MongoDB database. For more information... 19 (4 blank) 9 postgresql-persistent PostgreSQL database service, with persistent storage. For more information ab... 8 (2 generated) 4 rails-pgsql-persistent An example Rails application with a PostgreSQL database. For more information... 21 (4 blank) 9 ┌──[root@192.168.26.16]-[~/openshift-origin-server-v3.11.0-0cbc58b-linux-64bit] └─$
1 2 3 4 5 6 7 8 9 10 11
┌──[root@192.168.26.16]-[~/openshift-origin-server-v3.11.0-0cbc58b-linux-64bit] └─$oc get template cakephp-mysql-persistent -o json -n openshift { "apiVersion": "template.openshift.io/v1", "kind": "Template", "labels": { "app": "cakephp-mysql-persistent", "template": "cakephp-mysql-persistent" }, "message": "The following service(s) have been created in your project: ${NAME}, ${DATABASE_SERVICE_NAME}.\n\nFor more information about using this template, including OpenShift considerations, see https://github.com/openshift/cake-ex/blob/master/README.md.", "metadata": {
┌──[root@192.168.26.16]-[~/openshift-origin-server-v3.11.0-0cbc58b-linux-64bit] └─$oc project Using project "myproject" on server "https://127.0.0.1:8443". ┌──[root@192.168.26.16]-[~/openshift-origin-server-v3.11.0-0cbc58b-linux-64bit] └─$oc get project NAME DISPLAY NAME STATUS default Active kube-dns Active kube-proxy Active kube-public Active kube-system Active myproject My Project Active openshift Active openshift-apiserver Active openshift-controller-manager Active openshift-core-operators Active openshift-infra Active openshift-node Active openshift-service-cert-signer Active openshift-web-console Active ┌──[root@192.168.26.16]-[~/openshift-origin-server-v3.11.0-0cbc58b-linux-64bit] └─$oc project kube-system Now using project "kube-system" on server "https://127.0.0.1:8443".
3.2.4 Pod
1 2 3 4 5 6 7 8 9
┌──[root@192.168.26.16]-[~/openshift-origin-server-v3.11.0-0cbc58b-linux-64bit] └─$kubectl get pods NAME READY STATUS RESTARTS AGE kube-controller-manager-localhost 1/1 Running 1 9h kube-scheduler-localhost 1/1 Running 1 9h master-api-localhost 1/1 Running 2 9h master-etcd-localhost 1/1 Running 0 9h ┌──[root@192.168.26.16]-[~/openshift-origin-server-v3.11.0-0cbc58b-linux-64bit] └─$
1 2 3 4 5 6 7 8 9 10 11 12 13 14 15 16
┌──[root@192.168.26.16]-[~/openshift-origin-server-v3.11.0-0cbc58b-linux-64bit] └─$oc get pods NAME READY STATUS RESTARTS AGE kube-controller-manager-localhost 1/1 Running 1 9h kube-scheduler-localhost 1/1 Running 1 9h master-api-localhost 1/1 Running 2 9h master-etcd-localhost 1/1 Running 0 9h ┌──[root@192.168.26.16]-[~/openshift-origin-server-v3.11.0-0cbc58b-linux-64bit] └─$oc get pods -o wide NAME READY STATUS RESTARTS AGE IP NODE NOMINATED NODE kube-controller-manager-localhost 1/1 Running 1 9h 192.168.26.16 localhost <none> kube-scheduler-localhost 1/1 Running 1 9h 192.168.26.16 localhost <none> master-api-localhost 1/1 Running 2 9h 192.168.26.16 localhost <none> master-etcd-localhost 1/1 Running 0 9h 192.168.26.16 localhost <none> ┌──[root@192.168.26.16]-[~/openshift-origin-server-v3.11.0-0cbc58b-linux-64bit] └─$
┌──[root@192.168.26.16]-[~/openshift-origin-server-v3.11.0-0cbc58b-linux-64bit] └─$oc get pods -o wide NAME READY STATUS RESTARTS AGE IP NODE NOMINATED NODE kube-controller-manager-localhost 1/1 Running 1 9h 192.168.26.16 localhost <none> kube-scheduler-localhost 1/1 Running 1 9h 192.168.26.16 localhost <none> master-api-localhost 1/1 Running 2 9h 192.168.26.16 localhost <none> master-etcd-localhost 1/1 Running 0 9h 192.168.26.16 localhost <none> ┌──[root@192.168.26.16]-[~/openshift-origin-server-v3.11.0-0cbc58b-linux-64bit] └─$oc logs kube-scheduler-localhost I0528 15:09:15.474701 1 server.go:126] Version: v1.11.0+d4cacc0 W0528 15:09:15.475558 1 authorization.go:47] Authorization is disabled W0528 15:09:15.475582 1 authentication.go:55] Authentication is disabled I0528 15:09:15.475593 1 insecure_serving.go:47] Serving healthz insecurely on [::]:10251 E0528 15:09:15.482479 1 reflector.go:136] k8s.io/client-go/informers/factory.go:130: Failed to list *v1beta1.StatefulSet: Get https://127.0.0.1:8443/apis/apps/v1beta1/statefulsets?limit=500&resourceVersion=0: dial tcp 127.0.0.1:8443: connect: connection refused
1 2 3 4 5
┌──[root@192.168.26.16]-[~/openshift-origin-server-v3.11.0-0cbc58b-linux-64bit]
└─$oc rsh master-api-localhost
sh-4.2# ls
anaconda-post.log  bin  dev  etc  home  lib  lib64  media  mnt  opt  proc  root  run  sbin  srv  sys  tmp  usr  var
sh-4.2#
┌──[root@192.168.26.16]-[~] └─$kubectl run testpod-1 -it --rm --image=yauritux/busybox-curl --image-pull-policy=IfNotPresent If you don t see a command prompt, try pressing enter. /home $ curl hello-openshift.myproject.svc.cluster.local:8080 Hello OpenShift! /home $ exit Session ended, resume using 'kubectl attach testpod-1-b4d55675f-54855 -c testpod-1 -i -t'command when the pod is running deployment.apps "testpod-1" deleted
┌──[root@192.168.26.16]-[~]
└─$oc get svc -n myproject
NAME              TYPE        CLUSTER-IP      EXTERNAL-IP   PORT(S)             AGE
hello-openshift   ClusterIP   172.30.166.53   <none>        8080/TCP,8888/TCP   51m
┌──[root@192.168.26.16]-[~]
└─$oc get rc -n myproject
NAME                DESIRED   CURRENT   READY     AGE
hello-openshift-1   1         1         1         51m
┌──[root@192.168.26.16]-[~]
└─$