对每个人而言,真正的职责只有一个:找到自我。然后在心中坚守其一生,全心全意,永不停息。所有其它的路都是不完整的,是人的逃避方式,是对大众理想的懦弱回归,是随波逐流,是对内心的恐惧 ——赫尔曼·黑塞《德米安》
写在前面
准备考试整理相关笔记
博文内容涉及 iSCSI简单介绍,服务端启动器配置以及一个使用Demo
理解不足小伙伴帮忙指正
对每个人而言,真正的职责只有一个:找到自我。然后在心中坚守其一生,全心全意,永不停息。所有其它的路都是不完整的,是人的逃避方式,是对大众理想的懦弱回归,是随波逐流,是对内心的恐惧 ——赫尔曼·黑塞《德米安》
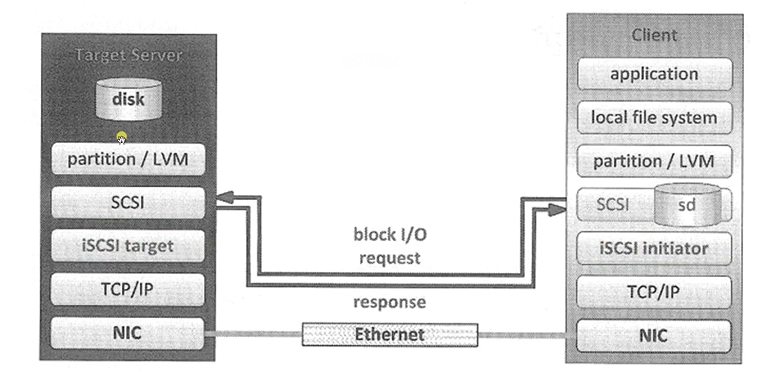
简单介绍 iSCSI(Internet Small Computer System Interface)是一种在IP网络上传输SCSI(Small Computer System Interface)命令和数据的存储协议。它允许将远程存储设备映射到本地主机,提供了一种基于网络的存储解决方案。
iSCSI服务架构涉及以下组件:
iSCSI Initiator(客户端):iSCSI发起器是指主机或计算机系统,它通过iSCSI协议与远程存储设备进行通信。发起器通过网络发送iSCSI命令和数据来访问远程存储。
iSCSI Target(服务端):iSCSI目标是远程存储设备或存储服务器,它通过iSCSI协议接受发起器的请求。目标将接收到的iSCSI命令转换为对存储设备的本地SCSI命令,并将数据传输回发起器。
iSCSI Initiator 和 Target 之间的网络连接:iSCSI Initiator 和 Target 之间的通信是通过TCP/IP网络实现的。通常使用以太网作为传输介质,并使用标准的IP协议栈进行通信。
iSCSI Initiator 驱动程序(iscsid):iSCSI Initiator 驱动程序是在主机操作系统上运行的软件组件,负责将iSCSI命令和数据传递给网络,并处理从网络接收到的响应。
iSCSI Target 软件(target.service,targetcli):iSCSI Target 软件是在远程存储设备上运行的软件组件,用于接受和处理来自发起器的iSCSI请求,并将其转换为本地存储设备的操作。
存储设备:存储设备可以是磁盘阵列、磁盘存储系统或其他支持SCSI协议的存储设备,LVM 等。iSCSI目标通过本地存储设备提供存储服务。
部署以及使用Demo 提供 iSCSI 存储(iSCSI目标配置) 安装和配置iSCSI Target(目标)
准备后端的块设备
1
2
3
4
5
[root@serverd ~] NAME FSTYPE LABEL UUID MOUNTPOINT vda └─vda1 xfs f7614c41-2835-4125-bb13-50772dc2f30c / vdb
这里使用空的磁盘 vdb 当做 ISCSI 的后端存储,根据命令输出,目前系统中有两个块设备,即 vda和vdb。其中,
vda 已经被格式化为XFS文件系统,并且已经被挂载到根目录(/)。
vdb 并没有显示文件系统类型、标签或UUID,这意味着该设备尚未被格式化为文件系统。
安装 targetcli,targetcli 是一个用于管理和配置iSCSI目标的命令行工具。它可以创建、配置和管理iSCSI目标以供其他计算机通过网络访问。
1
2
3
4
5
6
[root@serverd ~] [root@serverd ~] /etc/target /etc/target/backup /usr/bin/targetcli .....
target.service 是iSCSI Target服务的系统服务单元(systemd unit)。它用于启动、停止和管理iSCSI Target,以便其他计算机可以通过网络访问共享的存储设备。
配置开机自启,放行防火墙,这里需要注意一下防火墙的放行 services 名字为 iscsi-target
1
2
3
4
5
6
7
8
[root@serverd ~] Created symlink /etc/systemd/system/multi-user.target.wants/target.service → /usr/lib/systemd/system/target.service. [root@serverd ~] [root@serverd ~] success [root@serverd ~] success
启动 targetcli 命令行界面:
1
2
3
4
5
6
[root@serverd ~] Warning: Could not load preferences file /root/.targetcli/prefs.bin. targetcli shell version 2.1.fb49 Copyright 2011-2013 by Datera, Inc and others. For help on commands, type 'help' .
查看 iSCSI 目标的配置:
1
2
3
4
5
6
7
8
9
/> ls o- / ............................................................................................ [...] o- backstores ................................................................................. [...] | o- block ..................................................................... [Storage Objects: 0] | o- fileio .................................................................... [Storage Objects: 0] | o- pscsi ..................................................................... [Storage Objects: 0] | o- ramdisk ................................................................... [Storage Objects: 0] o- iscsi ............................................................................... [Targets: 0] o- loopback ............................................................................ [Targets: 0]
当前系统中没有已创建的iSCSI后端存储(backstores)。目前, backstores/block、backstores/fileio、backstores/pscsi和backstores/ramdisk 都没有任何存储对象。
iSCSI 支持下面四种后端存储类型:
block:它允许将块设备作为iSCSI后端存储使用,例如硬盘驱动器或逻辑卷。fileio:它允许使用文件作为iSCSI后端存储使用,即将文件作为虚拟磁盘提供给iSCSI客户端。pscsi:pscsi代表”pass-through SCSI”,允许将SCSI设备直接公开给iSCSI客户端,以便客户端可以直接访问SCSI命令。ramdisk:它允许将RAM磁盘作为iSCSI后端存储使用,即将内存中的一部分作为虚拟磁盘提供给iSCSI客户端。
创建iSCSI后端存储 创建iSCSI后端存储(backstore)类型为block,进入backstores/block目录:创建一个新的block后端存储设备:
1
2
3
/> cd backstores/block /backstores/block> create serverd.disk1 /dev/vdb Created block storage object serverd.disk1 using /dev/vdb.
查看配置情况
1
2
3
4
5
6
/backstores/block> ls o- block ......................................................................... [Storage Objects: 1] o- serverd.disk1 ......................................... [/dev/vdb (5.0GiB) write-thru deactivated] o- alua .......................................................................... [ALUA Groups: 1] o- default_tg_pt_gp .............................................. [ALUA state: Active/optimized] /backstores/block>
创建一个新的iSCSI目标 为⽬标创建唯⼀的 IQN。使⽤名称 iqn.2014-06.com.example:serverd 作为 IQN。
1
2
3
4
5
6
7
8
/backstores/block> cd /iscsi /iscsi> ls o- iscsi ................................................................................. [Targets: 0] /iscsi> create iqn.2014-06.com.example:serverd Created target iqn.2014-06.com.example:serverd. Created TPG 1. Global pref auto_add_default_portal=true Created default portal listening on all IPs (0.0.0.0), port 3260.
查看目标
1
2
3
4
5
6
7
8
9
/iscsi> ls o- iscsi ................................................................................. [Targets: 1] o- iqn.2023-08.com.example:serverd ........................................................ [TPGs: 1] o- tpg1 .................................................................... [no-gen-acls, no-auth] o- acls ............................................................................... [ACLs: 0] o- luns ............................................................................... [LUNs: 0] o- portals ......................................................................... [Portals: 1] o- 0.0.0.0:3260 .......................................................................... [OK] /iscsi>
在iSCSI目标中创建逻辑单元号(LUN):
为要提供的⽬标创建⼀个 LUN。使⽤上面创建的 serverd.disk1 block 块存储作为后备存储。
1
2
3
4
5
6
7
/iscsi> cd /iscsi/iqn.2023-08.com.example:serverd/tpg1/luns /iscsi/iqn.20...erd/tpg1/luns> create /backstores/block/serverd.disk1 Created LUN 0. /iscsi/iqn.20...erd/tpg1/luns> ls o- luns ..................................................................................... [LUNs: 1] o- lun0 ......................................... [block/serverd.disk1 (/dev/vdb) (default_tg_pt_gp)] /iscsi/iqn.20...erd/tpg1/luns>
创建 ACL,以允许 servera.lab.example.com 上的启动器访问⽬标。启动器将在其启动器名称设置为 iqn.2014-06.com.example:servera 的情况下进⾏连接
1
2
3
4
5
6
7
8
9
10
/iscsi/iqn.20...:serverd/tpg1> cd acls /iscsi/iqn.20...erd/tpg1/acls> ls o- acls ..................................................................................... [ACLs: 0] /iscsi/iqn.20...erd/tpg1/acls> create iqn.2023-08.com.example:servera Created Node ACL for iqn.2023-08.com.example:servera Created mapped LUN 0. /iscsi/iqn.20...erd/tpg1/acls> ls o- acls ..................................................................................... [ACLs: 1] o- iqn.2023-08.com.example:servera ................................................. [Mapped LUNs: 1] o- mapped_lun0 .................................................... [lun0 block/serverd.disk1 (rw)]
删除默认目标端口组(TPG),然后创建⼀个仅侦听主⽹络接⼝ 172.25.250.13 上的端⼝ 3260 的目标端口组(TPG)
创建⼀个在使⽤ 172.25.250.13 地址的⽹络接⼝上侦听端⼝ 3260 的目标端口组(TPG)。
1
2
3
4
5
6
7
8
9
10
11
12
13
/iscsi/iqn.20...:serverd/tpg1> cd portals/ /iscsi/iqn.20.../tpg1/portals> ls o- portals ............................................................................... [Portals: 1] o- 0.0.0.0:3260 ................................................................................ [OK] /iscsi/iqn.20.../tpg1/portals> delete 0.0.0.0 3260 Deleted network portal 0.0.0.0:3260 /iscsi/iqn.20.../tpg1/portals> create 172.25.250.13 3260 Using default IP port 3260 Created network portal 172.25.250.13:3260. /iscsi/iqn.20.../tpg1/portals> ls o- portals ............................................................................... [Portals: 1] o- 172.25.250.13:3260 .......................................................................... [OK] /iscsi/iqn.20.../tpg1/portals>
列出⽬标配置,以验证。完成后,退出 targetcli 命令。
1
2
3
4
5
6
7
8
9
10
11
12
13
14
15
16
17
18
19
20
21
22
/> ls o- / ............................................................................................ [...] o- backstores ................................................................................. [...] | o- block ..................................................................... [Storage Objects: 1] | | o- serverd.disk1 ....................................... [/dev/vdb (5.0GiB) write-thru activated] | | o- alua ...................................................................... [ALUA Groups: 1] | | o- default_tg_pt_gp .......................................... [ALUA state: Active/optimized] | o- fileio .................................................................... [Storage Objects: 0] | o- pscsi ..................................................................... [Storage Objects: 0] | o- ramdisk ................................................................... [Storage Objects: 0] o- iscsi ............................................................................... [Targets: 1] | o- iqn.2023-08.com.example:serverd ...................................................... [TPGs: 1] | o- tpg1 .................................................................. [no-gen-acls, no-auth] | o- acls ............................................................................. [ACLs: 1] | | o- iqn.2023-08.com.example:servera ......................................... [Mapped LUNs: 1] | | o- mapped_lun0 ............................................ [lun0 block/serverd.disk1 (rw)] | o- luns ............................................................................. [LUNs: 1] | | o- lun0 ................................. [block/serverd.disk1 (/dev/vdb) (default_tg_pt_gp)] | o- portals ....................................................................... [Portals: 1] | o- 172.25.250.13:3260 .................................................................. [OK] o- loopback ............................................................................ [Targets: 0] />
退出的时候会自动保存,可以在默认目录下查看配置文件
1
2
3
4
5
6
7
8
9
10
11
12
13
14
/> exit Global pref auto_save_on_exit=true Configuration saved to /etc/target/saveconfig.json [root@serverd ~] { "fabric_modules" : [], "storage_objects" : [ { "alua_tpgs" : [ { "alua_access_state" : 0, "alua_access_status" : 0, "alua_access_type" : 3, .....................................
访问 iSCSI 存储 确认已经存在的 iSCSI 存储目标,服务状态
确实配置文件
1 2 3 4 5 6 7 8 9 10 11 12 13 14 15 16 17 18 19 20 21 22 23 24 25 26 27 [root@serverd ~] targetcli shell version 2.1.fb49 Copyright 2011-2013 by Datera, Inc and others. For help on commands, type 'help' . /> ls o- / ............................................................................................ [...] o- backstores ................................................................................. [...] | o- block ..................................................................... [Storage Objects: 1] | | o- serverd.disk1 ....................................... [/dev/vdb (5.0GiB) write-thru activated] | | o- alua ...................................................................... [ALUA Groups: 1] | | o- default_tg_pt_gp .......................................... [ALUA state: Active/optimized] | o- fileio .................................................................... [Storage Objects: 0] | o- pscsi ..................................................................... [Storage Objects: 0] | o- ramdisk ................................................................... [Storage Objects: 0] o- iscsi ............................................................................... [Targets: 1] | o- iqn.2014-06.com.example:serverd ...................................................... [TPGs: 1] | o- tpg1 .................................................................. [no-gen-acls, no-auth] | o- acls ............................................................................. [ACLs: 1] | | o- iqn.2014-06.com.example:servera ......................................... [Mapped LUNs: 1] | | o- mapped_lun0 ............................................ [lun0 block/serverd.disk1 (rw)] | o- luns ............................................................................. [LUNs: 1] | | o- lun0 ................................. [block/serverd.disk1 (/dev/vdb) (default_tg_pt_gp)] | o- portals ....................................................................... [Portals: 1] | o- 0.0.0.0:3260 ........................................................................ [OK] o- loopback ............................................................................ [Targets: 0] />
客户端准备 iscsi-initiator-utils 提供了 iSCSI 客户端的工具和服务,用于管理和配置 iSCSI 连接。它包含了 iscsiadm 命令行工具和其他与 iSCSI 相关的组件。
主要功能和组件包括:
iscsiadm 命令行工具:iscsi-initiator-utils 包含了 iscsiadm 命令行工具,用于管理和配置 iSCSI 连接。您可以使用该工具来发现 iSCSI 目标、建立会话、断开连接、管理目标列表等。iSCSI 服务:iscsi-initiator-utils 包含了 iSCSI 服务(通常是 iscsid 守护进程),它在后台运行并处理与 iSCSI 存储目标的通信。该服务负责管理 iSCSI 会话和设备,并提供与 iSCSI 目标的交互接口。iSCSI 配置文件:iscsi-initiator-utils 提供了用于配置 iSCSI 客户端的配置文件。这些配置文件包含了 iSCSI 目标的信息、认证设置、会话选项等。您可以编辑这些配置文件来自定义 iSCSI 连接的行为。
安装 工具包,确实是否需要配置 iscsid 服务开启自启和服务是否启动
1 2 3 4 [root@servera ~] [root@servera ~] [root@servera ~] [root@servera ~]
使用 iscsiadm 命令的 discovery 子命令来发现指定 IP 地址(172.25.250.13)上的 iSCSI 目标。
1 2 3 [root@servera ~] 172.25.250.13:3260,1 iqn.2014-06.com.example:serverd
对应的命名可以通过帮助文档获取 man iscsiadm
1 2 3 4 5 6 7 8 9 10 11 12 13 14 15 16 17 18 19 20 21 22 23 24 25 26 27 28 29 30 31 32 33 34 35 36 EXAMPLES Discover targets at a given IP address: iscsiadm --mode discoverydb --type sendtargets --portal 192.168.1.10 --discover Login, must use a node record id found by the discovery: iscsiadm --mode node --targetname iqn.2001-05.com.doe:test --portal 192.168.1.1:3260 --login Logout: iscsiadm --mode node --targetname iqn.2001-05.com.doe:test --portal 192.168.1.1:3260 --logout List node records: iscsiadm --mode node Display all data for a given node record: iscsiadm --mode node --targetname iqn.2001-05.com.doe:test --portal 192.168.1.1:3260 FILES /etc/iscsi/iscsid.conf The configuration file read by iscsid and iscsiadm on startup. /etc/iscsi/initiatorname.iscsi The file containing the iSCSI InitiatorName and InitiatorAlias read by iscsid and isc‐ siadm on startup. /var/lib/iscsi/nodes/ This directory contains the nodes with their targets. /var/lib/iscsi/send_targets This directory contains the portals.
登录 iSCSI ⽬标 您使用 iscsiadm 命令进行了 iSCSI 目标发现, 获取 IQN,更改了系统的 iSCSI 主机名,并重新启动了 iSCSI 服务以使更改生效
1 2 3 4 5 6 [root@servera ~] InitiatorName=iqn.1994-05.com.redhat:652a957da83c [root@servera ~] 172.25.250.13:3260,1 iqn.2014-06.com.example:serverd [root@servera ~] [root@servera ~]
登录到 iSCSI 目标
1 2 3 4 [root@servera ~] Logging in to [iface: default, target: iqn.2014-06.com.example:serverd, portal: 172.25.250.13,3260] Login to [iface: default, target: iqn.2014-06.com.example:serverd, portal: 172.25.250.13,3260] successful. [root@servera ~]
确定新的可⽤块设备,使用 iscsiadm 命令的 session 子命令来获取有关当前 iSCSI 会话的详细信息,并通过 -P 3 参数指定了输出级别为 3。
1 2 3 4 5 6 7 8 9 10 11 12 13 14 15 16 17 18 19 20 21 22 23 24 25 26 27 28 29 30 31 32 33 34 35 36 37 38 39 40 41 42 43 44 45 46 47 48 49 50 51 [root@servera ~] iSCSI Transport Class version 2.0-870 version 6.2.0.877-0 Target: iqn.2014-06.com.example:serverd (non-flash) Current Portal: 172.25.250.13:3260,1 Persistent Portal: 172.25.250.13:3260,1 ********** Interface: ********** Iface Name: default Iface Transport: tcp Iface Initiatorname: iqn.2014-06.com.example:servera Iface IPaddress: 172.25.250.10 Iface HWaddress: default Iface Netdev: default SID: 8 iSCSI Connection State: LOGGED IN iSCSI Session State: LOGGED_IN Internal iscsid Session State: NO CHANGE ********* Timeouts: ********* Recovery Timeout: 120 Target Reset Timeout: 30 LUN Reset Timeout: 30 Abort Timeout: 15 ***** CHAP: ***** username: <empty> password: ******** username_in: <empty> password_in: ******** ************************ Negotiated iSCSI params: ************************ HeaderDigest: None DataDigest: None MaxRecvDataSegmentLength: 262144 MaxXmitDataSegmentLength: 262144 FirstBurstLength: 65536 MaxBurstLength: 262144 ImmediateData: Yes InitialR2T: Yes MaxOutstandingR2T: 1 ************************ Attached SCSI devices: ************************ Host Number: 6 State: running scsi6 Channel 00 Id 0 Lun: 0 Attached scsi disk sda State: running
根据提供的输出信息,可以看到 iSCSI 登录到目标成功,并且与目标建立了连接。下面是一些关键信息:
目标名称 (Target): iqn.2014-06.com.example:serverd
当前使用的端口 (Portal): 172.25.250.13:3260
使用的网络接口 (Interface): default
发起器名称 (Initiatorname): iqn.2014-06.com.example:servera
发起器 IP 地址 (Iface IPaddress): 172.25.250.10
iSCSI 连接状态 (iSCSI Connection State): 已登录 (LOGGED IN)
iSCSI 会话状态 (iSCSI Session State): 已登录 (LOGGED_IN)
CHAP 设置: 您提供了空的用户名和密码
Negotiated iSCSI params: 显示了协商的 iSCSI 参数,如数据段长度、突发长度等信息
已连接的 SCSI 设备: 一个 SCSI 设备 sda 已附加到主机号为 6 的通道 00,ID 0,逻辑单元号 0。
根据提供的信息, iSCSI 连接似乎已成功建立,并且已将 SCSI 设备附加到主机。您可以在主机上执行相关的操作,如挂载磁盘、访问文件系统等
使⽤ lsblk 命令以及 –fs 选项列出块设备上的分区和⽂件系统。
1 2 3 4 5 6 7 8 9 [root@servera ~] Attached scsi disk sda State: running [root@servera ~] NAME FSTYPE LABEL UUID MOUNTPOINT sda vda └─vda1 xfs f7614c41-2835-4125-bb13-50772dc2f30c / vdb [root@servera ~]
使⽤ mkfs.xfs 命令,将 xfs ⽂件系统应⽤到/dev/sda
1 2 3 4 5 6 7 8 9 10 11 [root@servera ~] meta-data=/dev/sda isize=512 agcount=4, agsize=327680 blks = sectsz=512 attr=2, projid32bit=1 = crc=1 finobt=1, sparse=1, rmapbt=0 = reflink=1 data = bsize=4096 blocks=1310720, imaxpct=25 = sunit=0 swidth=0 blks naming =version 2 bsize=4096 ascii-ci=0, ftype=1 log =internal log bsize=4096 blocks=2560, version=2 = sectsz=512 sunit=0 blks, lazy-count=1 realtime =none extsz=4096 blocks=0, rtextents=0
编辑 /etc/fstab ⽂件,再为新⽂件系统添加⼀⾏。记得指定 _netdev 选项。把上面共享的 /dev/sda 挂载到 /data 目录下
1 2 3 4 5 6 7 8 9 10 11 12 13 14 15 16 17 18 19 20 21 [root@servera ~] [root@servera ~] NAME FSTYPE LABEL UUID MOUNTPOINT sda xfs e088a91d-ceb7-40de-9536-e990fa7f4f44 [root@servera ~] [root@servera ~] UUID=f7614c41-2835-4125-bb13-50772dc2f30c / xfs defaults 0 0 UUID=e088a91d-ceb7-40de-9536-e990fa7f4f44 /data xfs _netdev 0 0 [root@servera ~] [root@servera ~]
查看挂载情况
1
2
3
4
[root@servera ~] Filesystem 1K-blocks Used Available Use% Mounted on /dev/sda 5232640 69616 5163024 2% /data [root@servera ~]
卸载⽂件系统,从 iSCSI ⽬标注销,然后删除⽬标的所有记录
1
2
3
4
5
6
7
[root@servera ~] [root@servera ~] [root@servera ~] Logging out of session [sid: 8, target: iqn.2014-06.com.example:serverd, portal: 172.25.250.13,3260] Logout of [sid: 8, target: iqn.2014-06.com.example:serverd, portal: 172.25.250.13,3260] successful. [root@servera ~] [root@servera ~]
博文部分内容参考 © 文中涉及参考链接内容版权归原作者所有,如有侵权请告知:)
红帽服务管理与自动化(RH358)授课笔记
© 2018-至今 liruilonger@gmail.com , All rights reserved. 保持署名-非商用-相同方式共享(CC BY-NC-SA 4.0)